How to Play Trills on the Violin

In this guide to violin trills you’ll learn how to trill, on or above the notes and the types of trills there are on the violin:

When young students first embark on their violin journey and notice their teachers doing some mysterious technique, they often excitedly want to try it right away themselves. For example, watching an advanced violinist execute a clean, sharp trill always prompts students to ask, “How did you do that?” Unfortunately, if they try it on their own they quickly become frustrated, because they do not yet know how to really make trill sound good.
Although it is important to have a teacher’s feedback on this, I hope this article will shed some light on what trills are for and how to practice them.

What are Trills?

A trill in music is when you oscillate (rapidly go back and forth) between two notes that are either a whole step or a half step apart. The different types of trills are also called ornamentations.

Ornamentations were an incredibly important part of Baroque performance practice. Baroque musicians typically embellished while they played, so they need to be fluent in all the types of trills and what would be tasteful. The rules of Baroque ornamentation were incredibly complex, and some of them are not even used anymore. Baroque composers such as Bach made entire tables of what all their ornamentation markings meant, but to go through them all would be more confusing than helpful. Sometimes when a particular type of trill is called for, editors will show a little example beneath the music. For example, many editions of Bach’s solo violin sonatas and partitas have demonstrations in the margins for particular trills.

Types of Trills

Pictured above is an example of Bach’s table. For our purposes, we are interested in the first four examples. (1) is the standard trill marking still used today. If you simply see tr written in the music, that means the same thing. You will also sometimes see (2), which indicates a simpler one-note turn called a mordent. Bach’s example has a vertical slash through it, meaning it is a lower mordent. A short squiggle without the slash would indicate an upper mordant (in this example, moving from C up to D). (4) is also very common. The other markings are more obscure today and relevant mostly if you are specializing in Baroque music.

It is important to mention that Bach’s system is only one of many, and other Baroque composers would give very different examples for each symbol. In case of doubt, follow any explicit markings in the music, the expertise of your teacher or ensemble leader, and your own sense of musical taste.

Half Step or Whole Step?

This is the most important question to ask when learning a piece with trills. Playing a half step instead of a whole step would change the entire feel of the melody. As a general rule, trill within the key signature. What does this mean? Say you are playing a piece in C major, no sharps or flats. You come to a B-natural with a trill marking over it. You should trill to C-natural, because C-sharp is not in the key signature. If the composer ever has a different intention, there will usually be a little flat or sharp sign above the note. Don’t hesitate to listen to good recordings if you are still unsure!

Trilling On or Above the Note?!?

Although the previous question was the most important, this is the most controversial! To this day, scholars argue about how trills from different eras should be played. Treatises from the mid-seventeen hundreds give many examples of starting a trill above or below the note, but rarely on the note. There were a few exceptions, such as when the main note of the trill began the melody. This convention must have changed over time however, because in 1830 Thomas Lindsay wrote, “Theorists are not agreed whether [the trill] should begin with the main or upper note; it is, therefore, as often performed one way as the other.” In 1828, pianist J. N. Hummel first suggested playing the main note first because it is the most important. Violinist Louis Spohr adopted this rule as well.

How to trill also depends on which “school” of violin playing you are using. The French school emphasizes trilling above the notes, while the Russians prefer a strong start on the main note.

How to Practice Trills

Practicing trills regularly will improve your left hand balance and set-up. There are several exercises to help with this. Start with first and second finger and alternate between the two. For this exercise, lift the first finger when you play the second (even though you would never do this during an actual trill!) Blend the two notes into one sound.
When actually playing trills, keep your lower fingers down. This means that if you are trilling between third and fourth finger, first and second fingers should be on the string as well. Also, when lifting fingers lift them in the same shape you put them down in, rather than going up to the ceiling or straightening. Trill with light left hand fingers but a strong sound in the bow.

Lastly, lift your trill finger as quickly as you put it down. This will create a very crisp and precise sound.

Practicing Trills, with a Metronome

You knew the metronome was going to come up eventually didn’t you? Once you have the feel of trills, this is a great way to get them up to speed. Set the metronome around 60 bpm. Trill once at the beginning of each click, remembering to lift the finger quickly. Then do two trills, three trills, etc. In pieces, most trills are very fast (think tremolo speed) but may be a little more moderate depending on context.

Trills in Famous Violin Pieces

Trills add sparks of excitement to many beautiful violin pieces at all levels. The most famous example is Tartini’s “Devil’s Trill” Sonata. The difficult trill passages come in the final movement. In the score Tartini wrote, “Trillo del diavolo al pie del letto”— The trill of the devil at the foot of the bed.

Mendelssohn’s Violin Concerto in E Minor features extended trills at the beginning of the third movement. The trills build expectation and transition into the frolicking rondo theme.

Hi! I'm Zlata

Classical violinist helping you overcome technical struggles and play with feeling by improving your bow technique.

A less intimidating but still beautiful example is the second movement of Kabalevsky’s Violin Concerto in C Major. The soloist, after a long chromatic passage, crescendos into ethereal trills that weave their way back to the main theme to close the piece.

I hope you enjoyed this introduction to the history and execution of trills! Comment what your favorite piece with trills is, or any tips you have for practicing them!

What are Violin Arpeggios? (and why should you practice them)

Scales and arpeggios are great to improve your violin technique

Whether you just started playing or you are practicing violin arpeggios for years already, in this article you’ll learn how arpeggios are structured and why it’s so important to practice them.

Introducing Violin Arpeggios

If you have taken a serious interest in violin, whether on your own or with a teacher, you have probably heard many times by now, “You have to practice scales!” This is true: scales lay the groundwork for all your future pieces and help you understand where all the notes are on the fingerboard. If you practice them consistently and in different patterns, your playing will become more fluent and confident.

Here’s the catch though: only doing scales is not enough. Arpeggios also form a major part of violin repertoire.

What does that mean exactly? Arpeggios are broken chords that use the chord tones in a scale. In other words, imagine a C major scale: C, D, E, F, G, A, B, C. Say you want to play a C major arpeggio. The C major triad is C, E, G, so a one-octave C major arpeggio would be C, E, G, C. (In exercises arpeggios usually end on the tonic, but remember in music there will often be incomplete arpeggios as well.)

On the violin, arpeggios can go for one, two, three, or sometimes four octaves.

Like scales, you should use arpeggios for practicing multiple things, including bow technique. We will go into this more in a moment when we talk about how to practice arpeggios.

Why should you practice arpeggios on the violin?

Perhaps you feel you already have enough to practice. Maybe just playing scales is so helpful you don’t see a reason to add arpeggios. I guarantee that doing both will give you the fastest improvement. Arpeggios teach you finger patterns that scales don’t because in arpeggios you have to skip notes. Arpeggios also help with jump shifts and silently finding the right notes. You will most definitely encounter arpeggios in any level of repertoire you are learning, so why not begin working on them now?

Examples of arpeggios is violin music

For example here are three excerpts from the Mendelssohn, Vivaldi, and Kabalevsky concertos. All the arpeggios here are very fast and performed best when they are practiced out of context first.

How to Practice Violin Arpeggios

Practicing violin arpeggios to improve intonation (playing in tune)

As mentioned previously, you can practice arpeggios many different ways. Initially, just play each note separately to get the intonation and shifting if there is any. To practice the jump shifts in arpeggios, always shift keeping the old finger down. Slide the finger along the string audibly from the lower pitch to the higher pitch to make sure you are hitting it correctly before trying to do it silently. Even in silent shifts, the finger still stays on the string but with less pressure so a sound is not produced. If you take your finger completely off the string while shifting, there is no guarantee you will correctly hit the next note. Another common pitfall is breaking the contact of the bow and the string while shifting. People do this as a way to “hide” the shift, but it actually just lessens the tone quality of the arpeggio. Similarly, it is important to use more pressure at the tip so your arpeggio does not fade away at the top.

Practicing violin arpeggios in martelé bow strokes

Practicing in martelé is a good way develop strong tone quality in every part of the bow. Practice with three, six, and nine martele per bow. Similarly, practicing in rhythms helps coordinate left hand speed, bow action, and shifting. The rhythm combinations you can choose are almost endless, but the most common are short-long and long-short. Make sure on the short notes your bow catches the string with a little bit of a bite so you are always getting the best sound.

Practicing violin arpeggios for bowing technique

Arpeggios also help us learn a wide variety of bowing techniques. If you are new to arpeggios, start with just separate bows in martelé and detaché first. Then slur together three, six, nine, etc. Some teachers ask their students to get to up and down twice in one bow. The more notes you have per slur, the faster your left hand has to be and the slower your bow speed should be.
When you can execute slurred legato arpeggios with good intonation and solid tone, consider trying some of the following: slurred rhythms, upbow staccato, little detaché’s at the frog (great for flexibility of the right hand fingers), and collé.

The left hand can get pretty complicated during arpeggios (all those shifts and string crossings!) which can distract from getting a focused sound with the bow. It is always better to play arpeggios slowly with a strong, beautiful tone before trying to go faster.

How Violin Arpeggios are Structured

As we discussed previously, all arpeggios are simply broken chords.

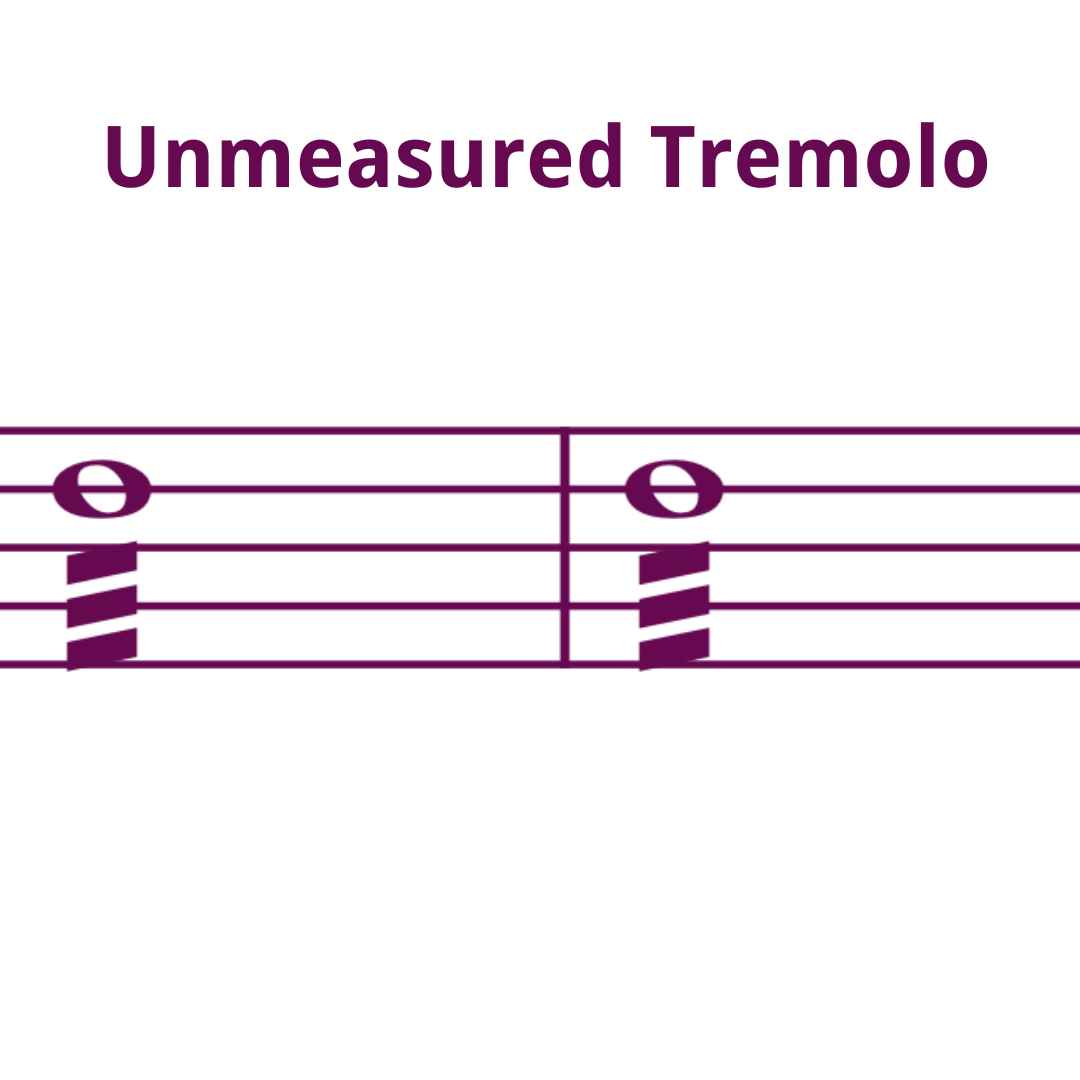
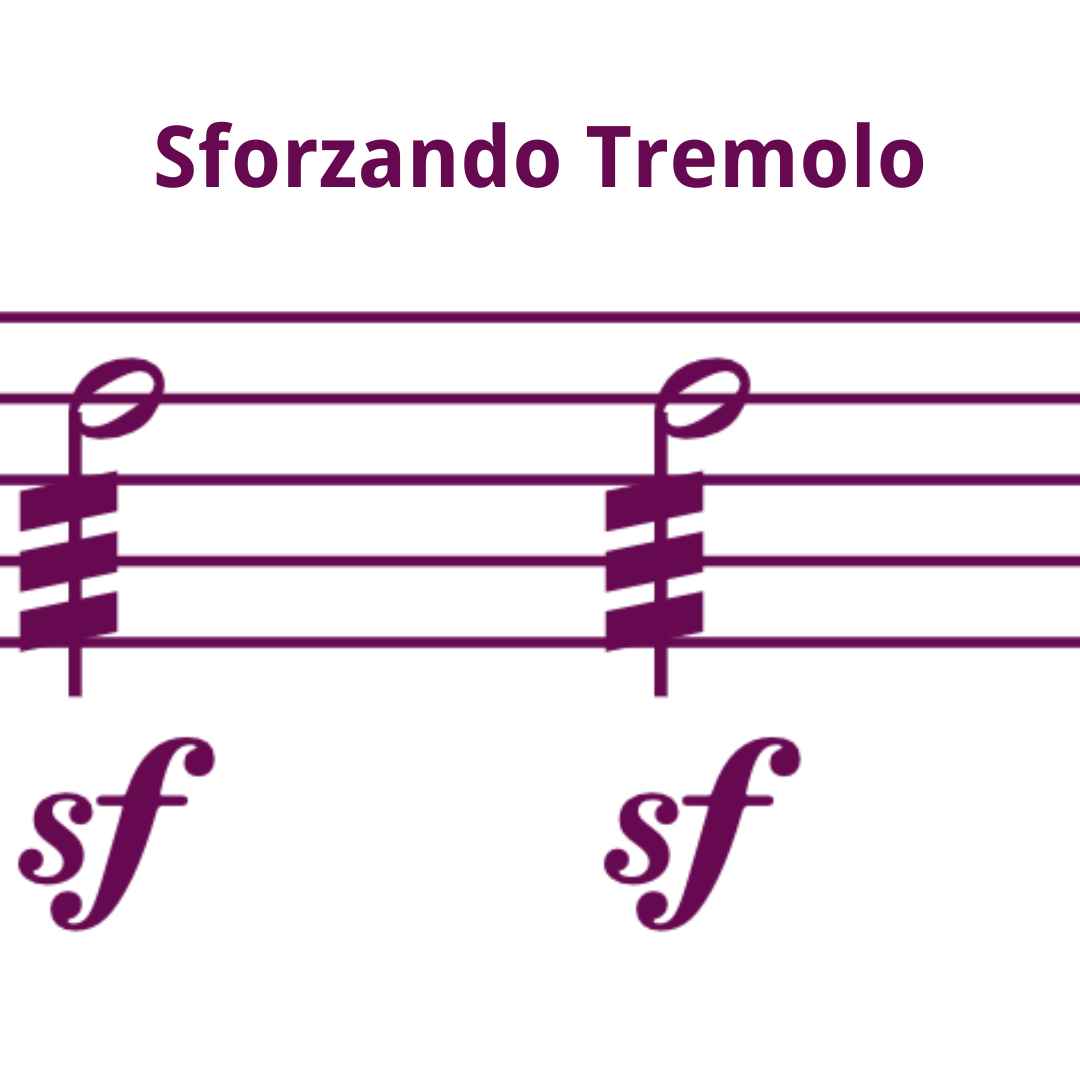
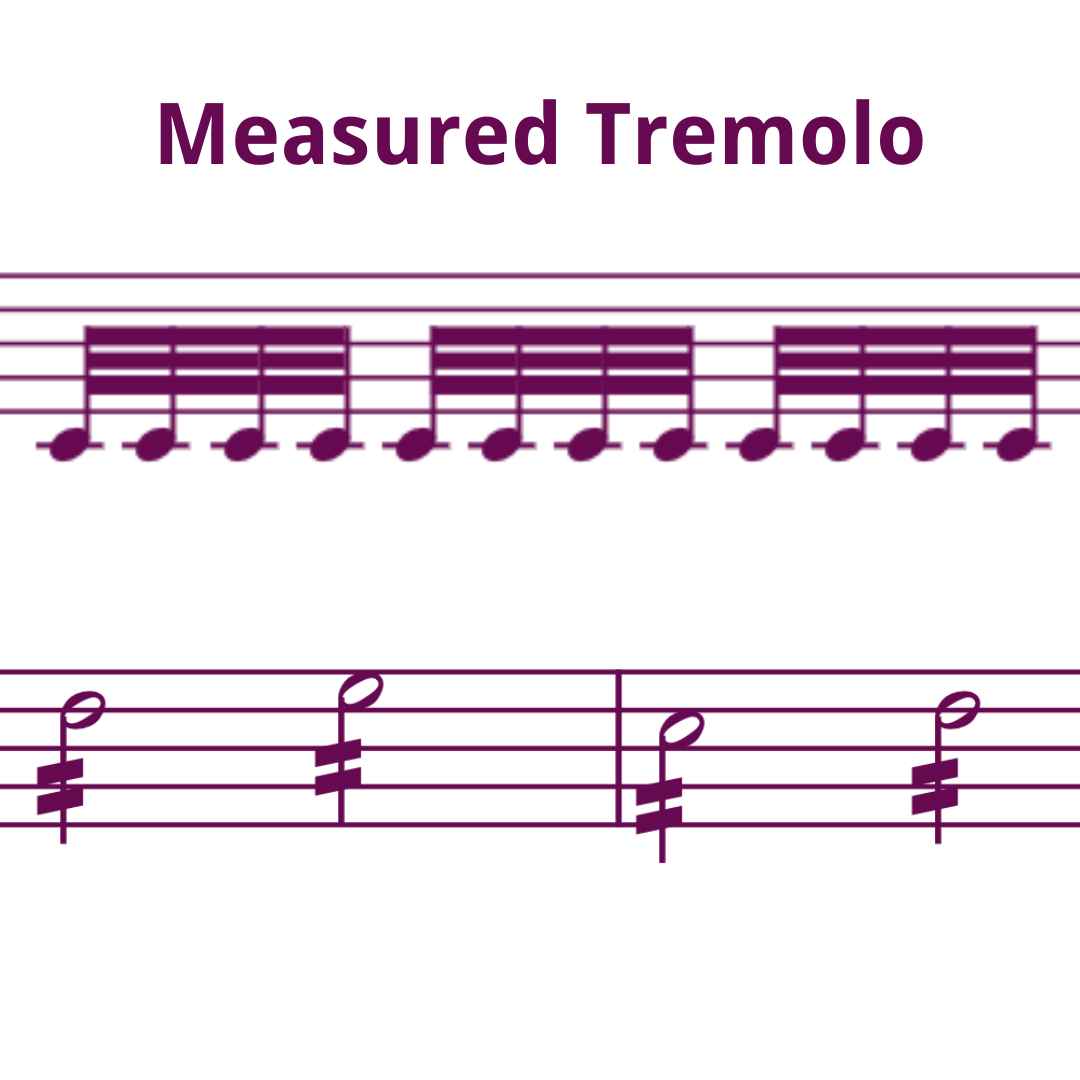
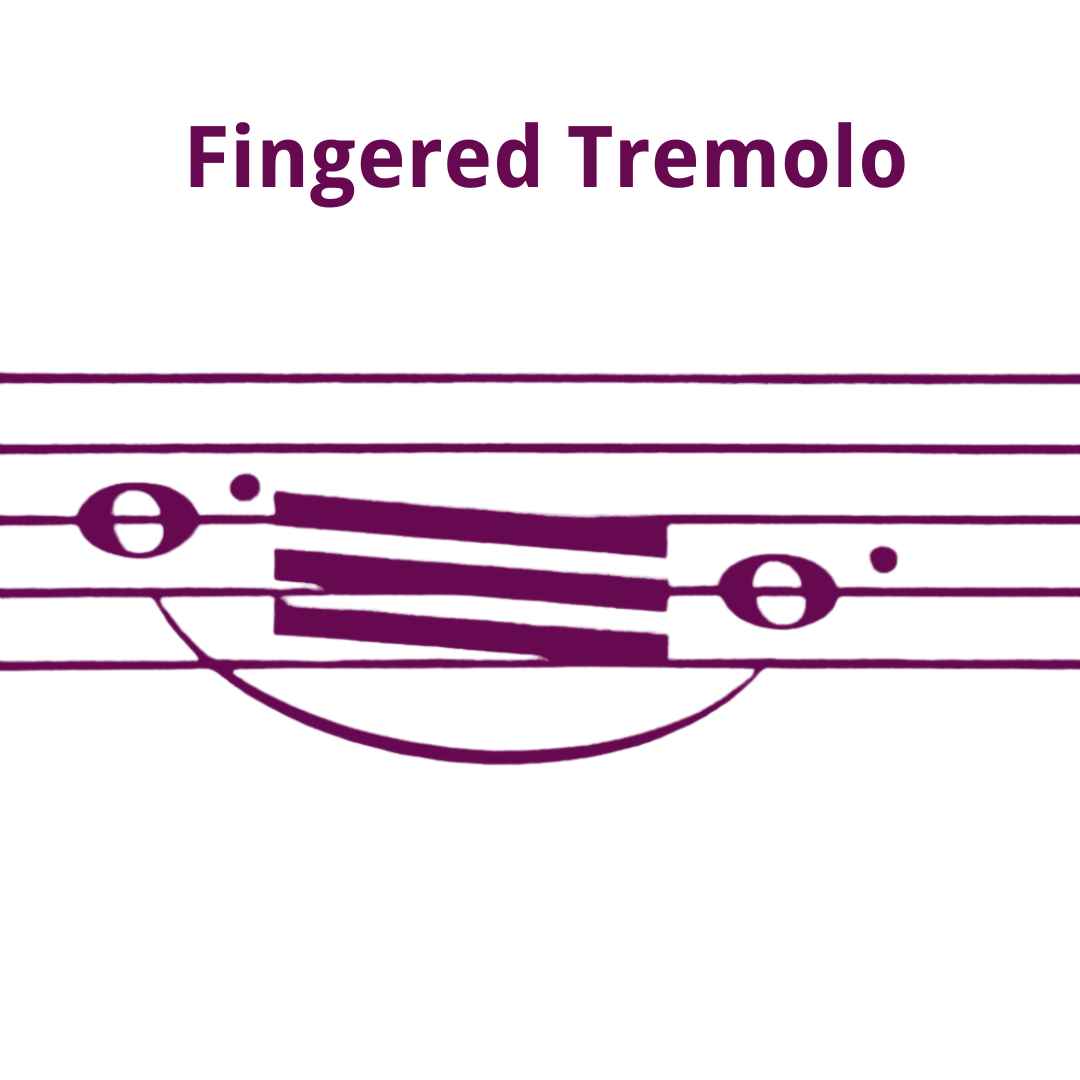
In a chord the notes are placed above each other in the sheet music and they are played at the same time. In an arpeggio the notes are played one by one starting on the lowest note. Sometimes in sheet music arpeggios are written like chords, but with a vertical wave next to them or with a tremolo notation like in the picture.

This means that no matter what scale you are playing, if you don’t have arpeggio sheet music you can always figure out what the arpeggio should be if you know the chord. Most arpeggios are based on the major or minor scales, but advanced books will also include diminished arpeggios and seventh chords, which helps with learning different finger placements.

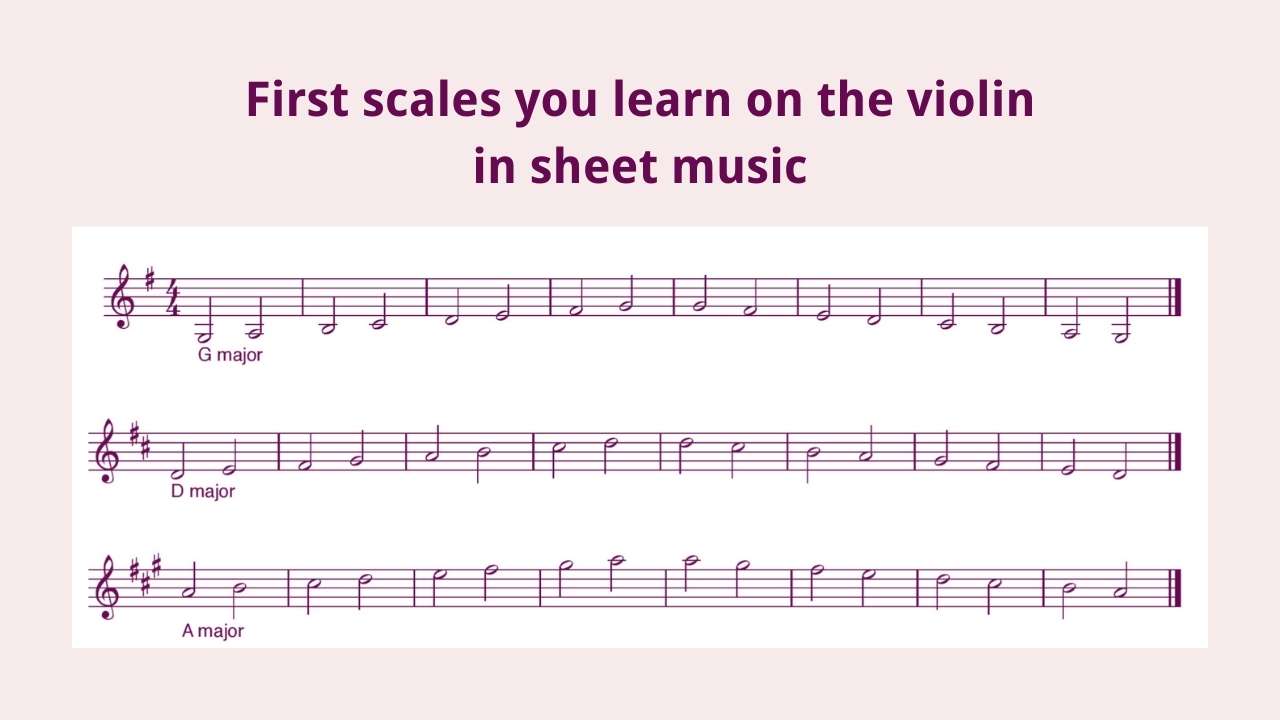
A triad is a three-note chord built on the 1st, 3rd, and 5th degrees of its parent scale. For example, the easiest scale to play on violin is A Major: A, B, C#, D, E, F#, G#, A. What are the 1st, 3rd, and 5th scale degrees? A, C#, E. The full arpeggio would add the high A at the top. This way of structuring arpeggios is the same no matter how many octaves you are playing.

A Side Note on Minor Arpeggios

If you have already been playing scales for a while, you may know that there are three types of minor scale: natural, harmonic, and melodic. You might be wondering, “how does this affect the arpeggios? Do I need to learn three different kinds?” No, actually, you don’t! Harmonic and melodic minor alter the sixth and seventh scale degrees. Since arpeggios use scale degrees 1, 3, and 5, the minor arpeggio will be the same for every type of minor scale.

Most common arpeggios to practice on the violin

The most common arpeggios on the violin go with the most common scales: G, A, D, and C. G Major is the easiest to start with because it starts on the lowest open string. For advanced violinists, there is a whole cycle of arpeggios for each given key. This is demonstrated in the Carl Flesh scale system. The cycle of arpeggios for G Major is: G Minor, G Major, E Minor, C Major, C Minor, G diminished, and G dominant seventh. Why do this whole cycle instead of just G Major? Because it moves through multiple related finger patterns and develops left hand flexibility faster. The E Minor, C Major, and C Minor arpeggios are inverted to fit better with G Major. Inverting a chord means putting a note other than the root, such as the third or fifth, on the bottom of the chord. Here’s an overview of how the G major arpeggios are structured:

Books for Learning Scales and Arpeggios

I’ve linked up the most popular violin scale books below, so you can easily buy the book of your choice and start practicing violin arpeggios.

There are SO many systems out there for learning arpeggios, especially at the beginner level. If you use a system like Suzuki and Sassmanshaus, you will learn scales in a very particular order connected to the pieces you learn. This is better than trying to learn them all at once, which can be overwhelming and mess up your intonation if you attempt them all before solidifying a few.

For advancing beginners and intermediate players, Hrimaly, Fischer, and Sevcik are good choices. Excellent new-comers are Serrano scales and Barber. A free option is my book Sensational Scales which you can download right here.

The two major scale systems used by advanced violinists are Flesch and Galamian. These are very extensive systems that incorporate scales, arpeggio patterns, chromatic scales, thirds, sixths, octaves, harmonics, and everything in between.

Do you practice violin arpeggios?

Let me know what book you’re using in the comments!

All Violin Notes in the First Position for Beginners

Find all the notes on the violin as a beginner violinist with this finger chart and sheet music

If you are just getting started on violin, it may seem intimidating to watch videos of great violinists and watch their fingers rapidly move up and down the instrument. You can and will learn how to do this, but for now take comfort in knowing that there are many pieces you can play just in first position. To do that though still requires a firm basis in note reading, accidentals, and changing between hand frames. In this article, we’ll go over all the notes in first position, how to know which finger to use, and clear up some common confusions such as high 2’s vs. low 2’s and how to treat enharmonic pitches.

First Position Violin Finger Chart

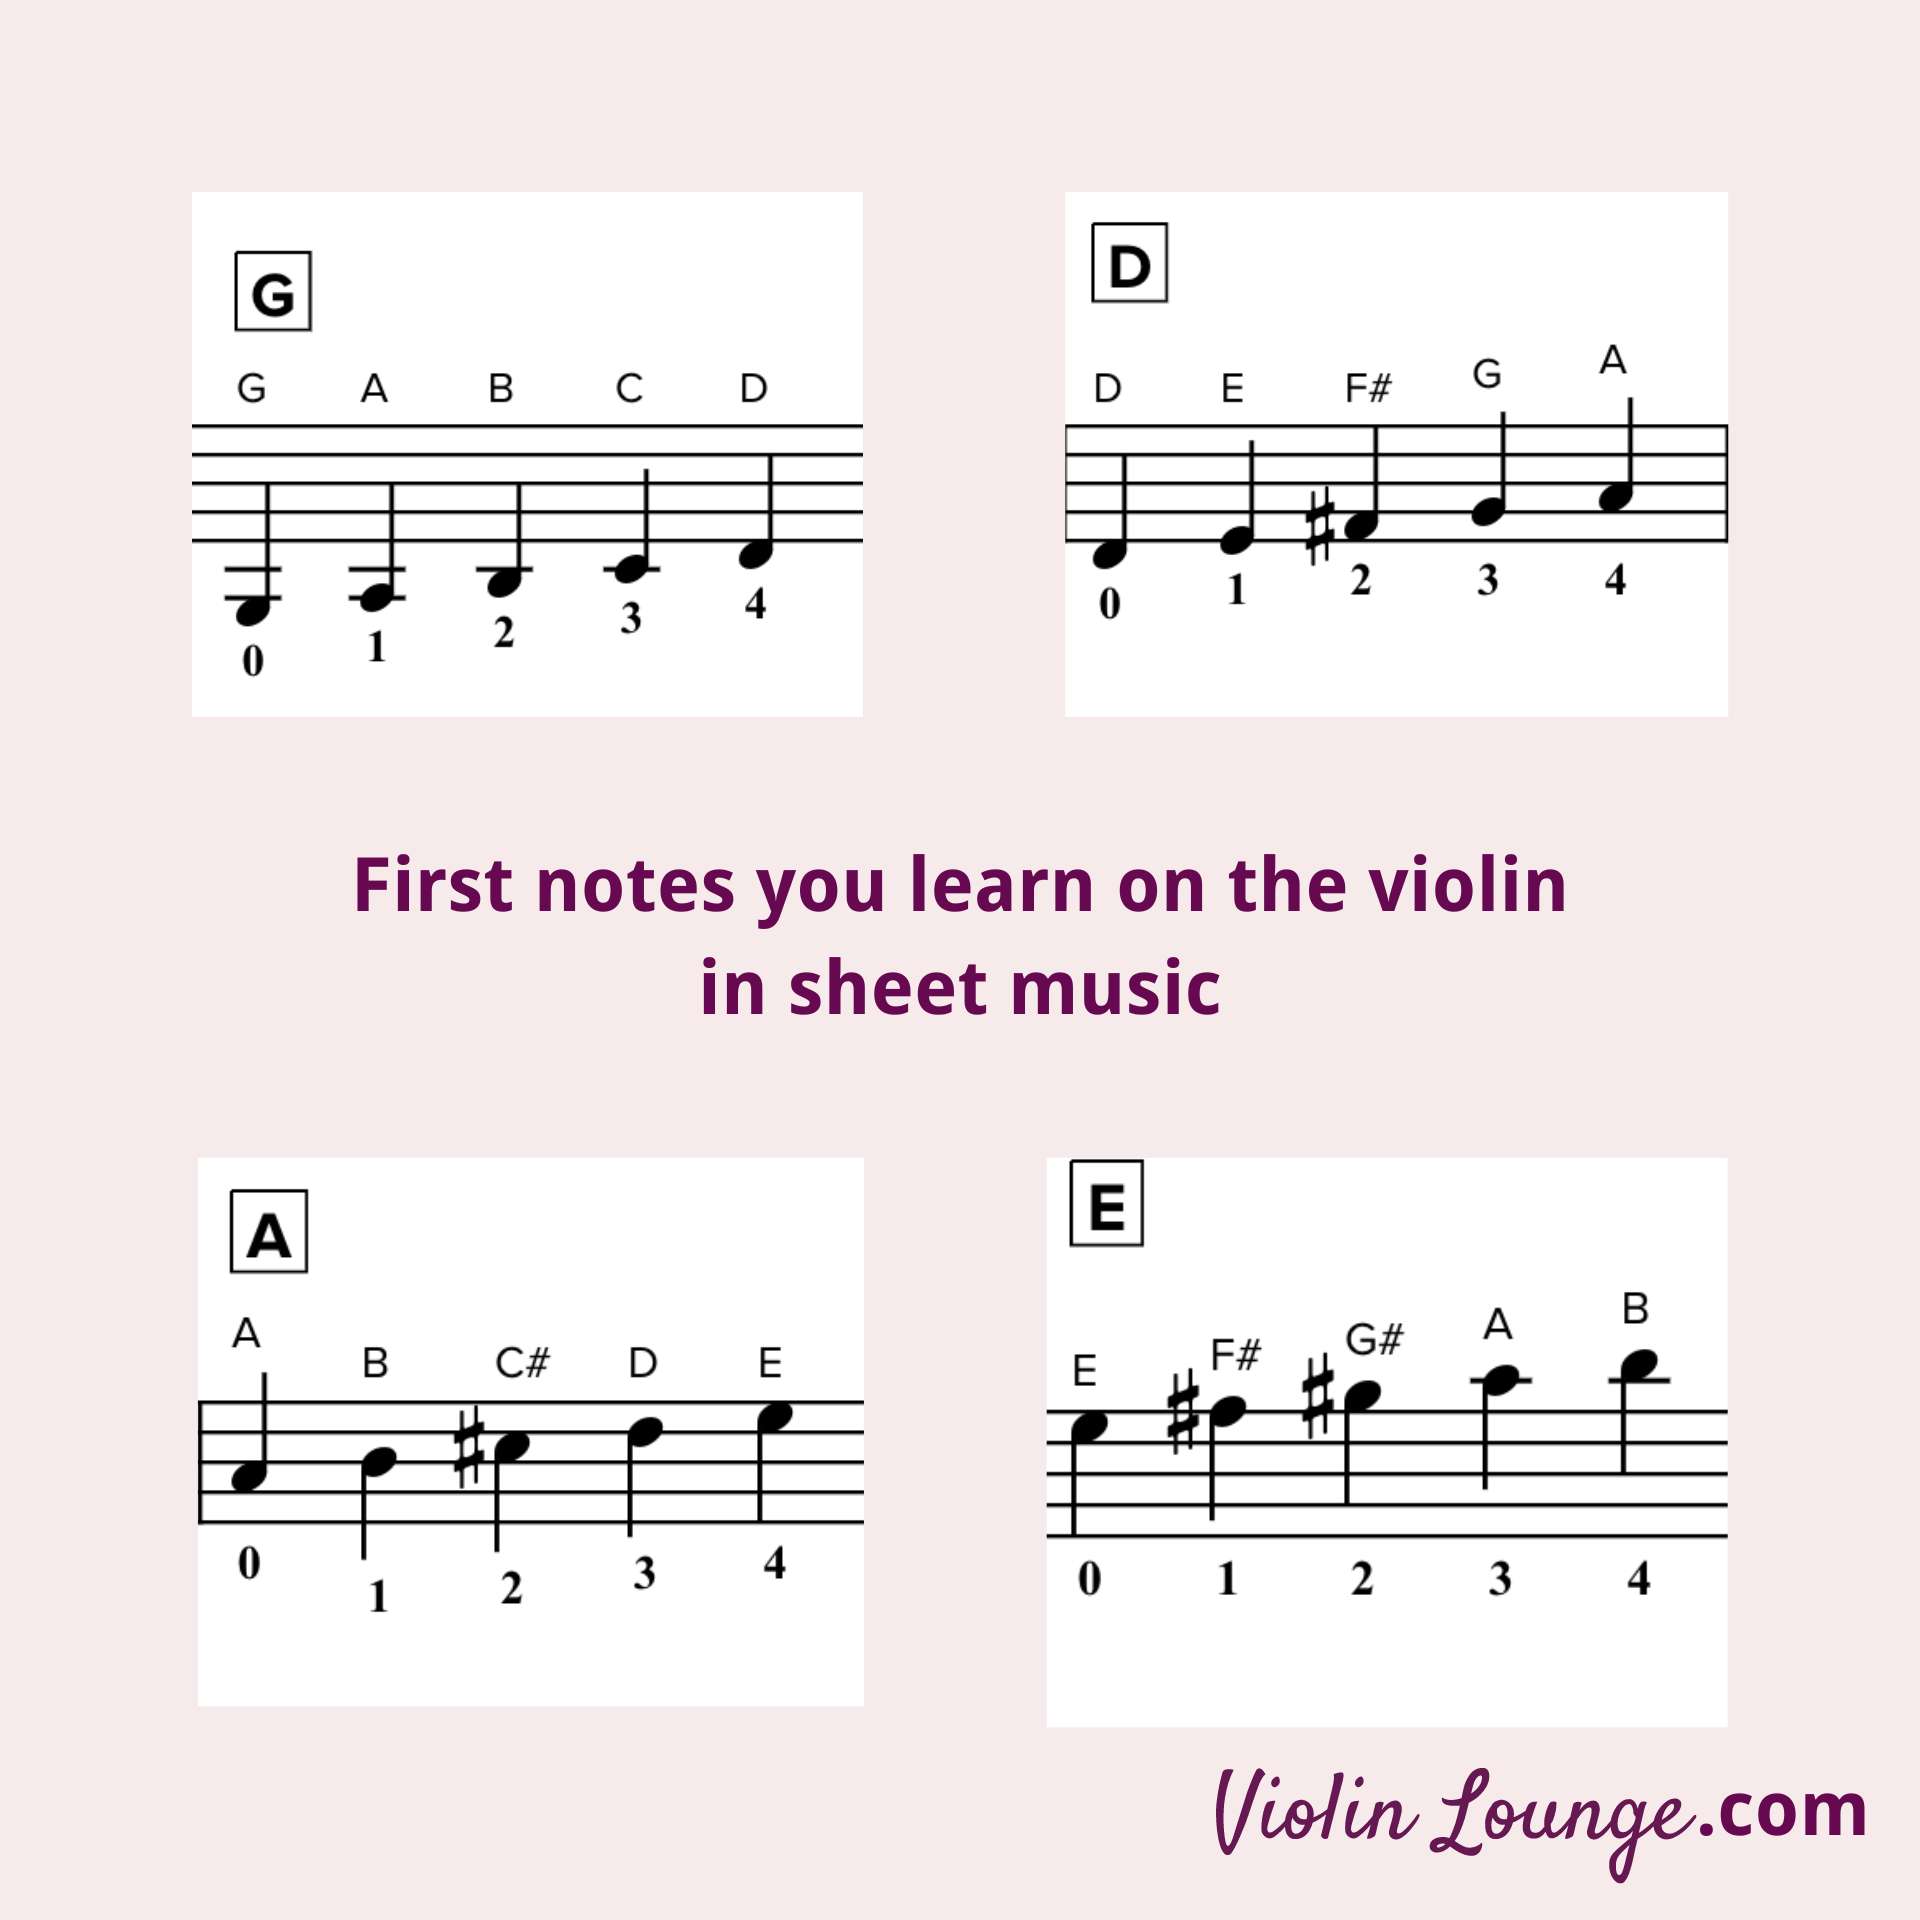
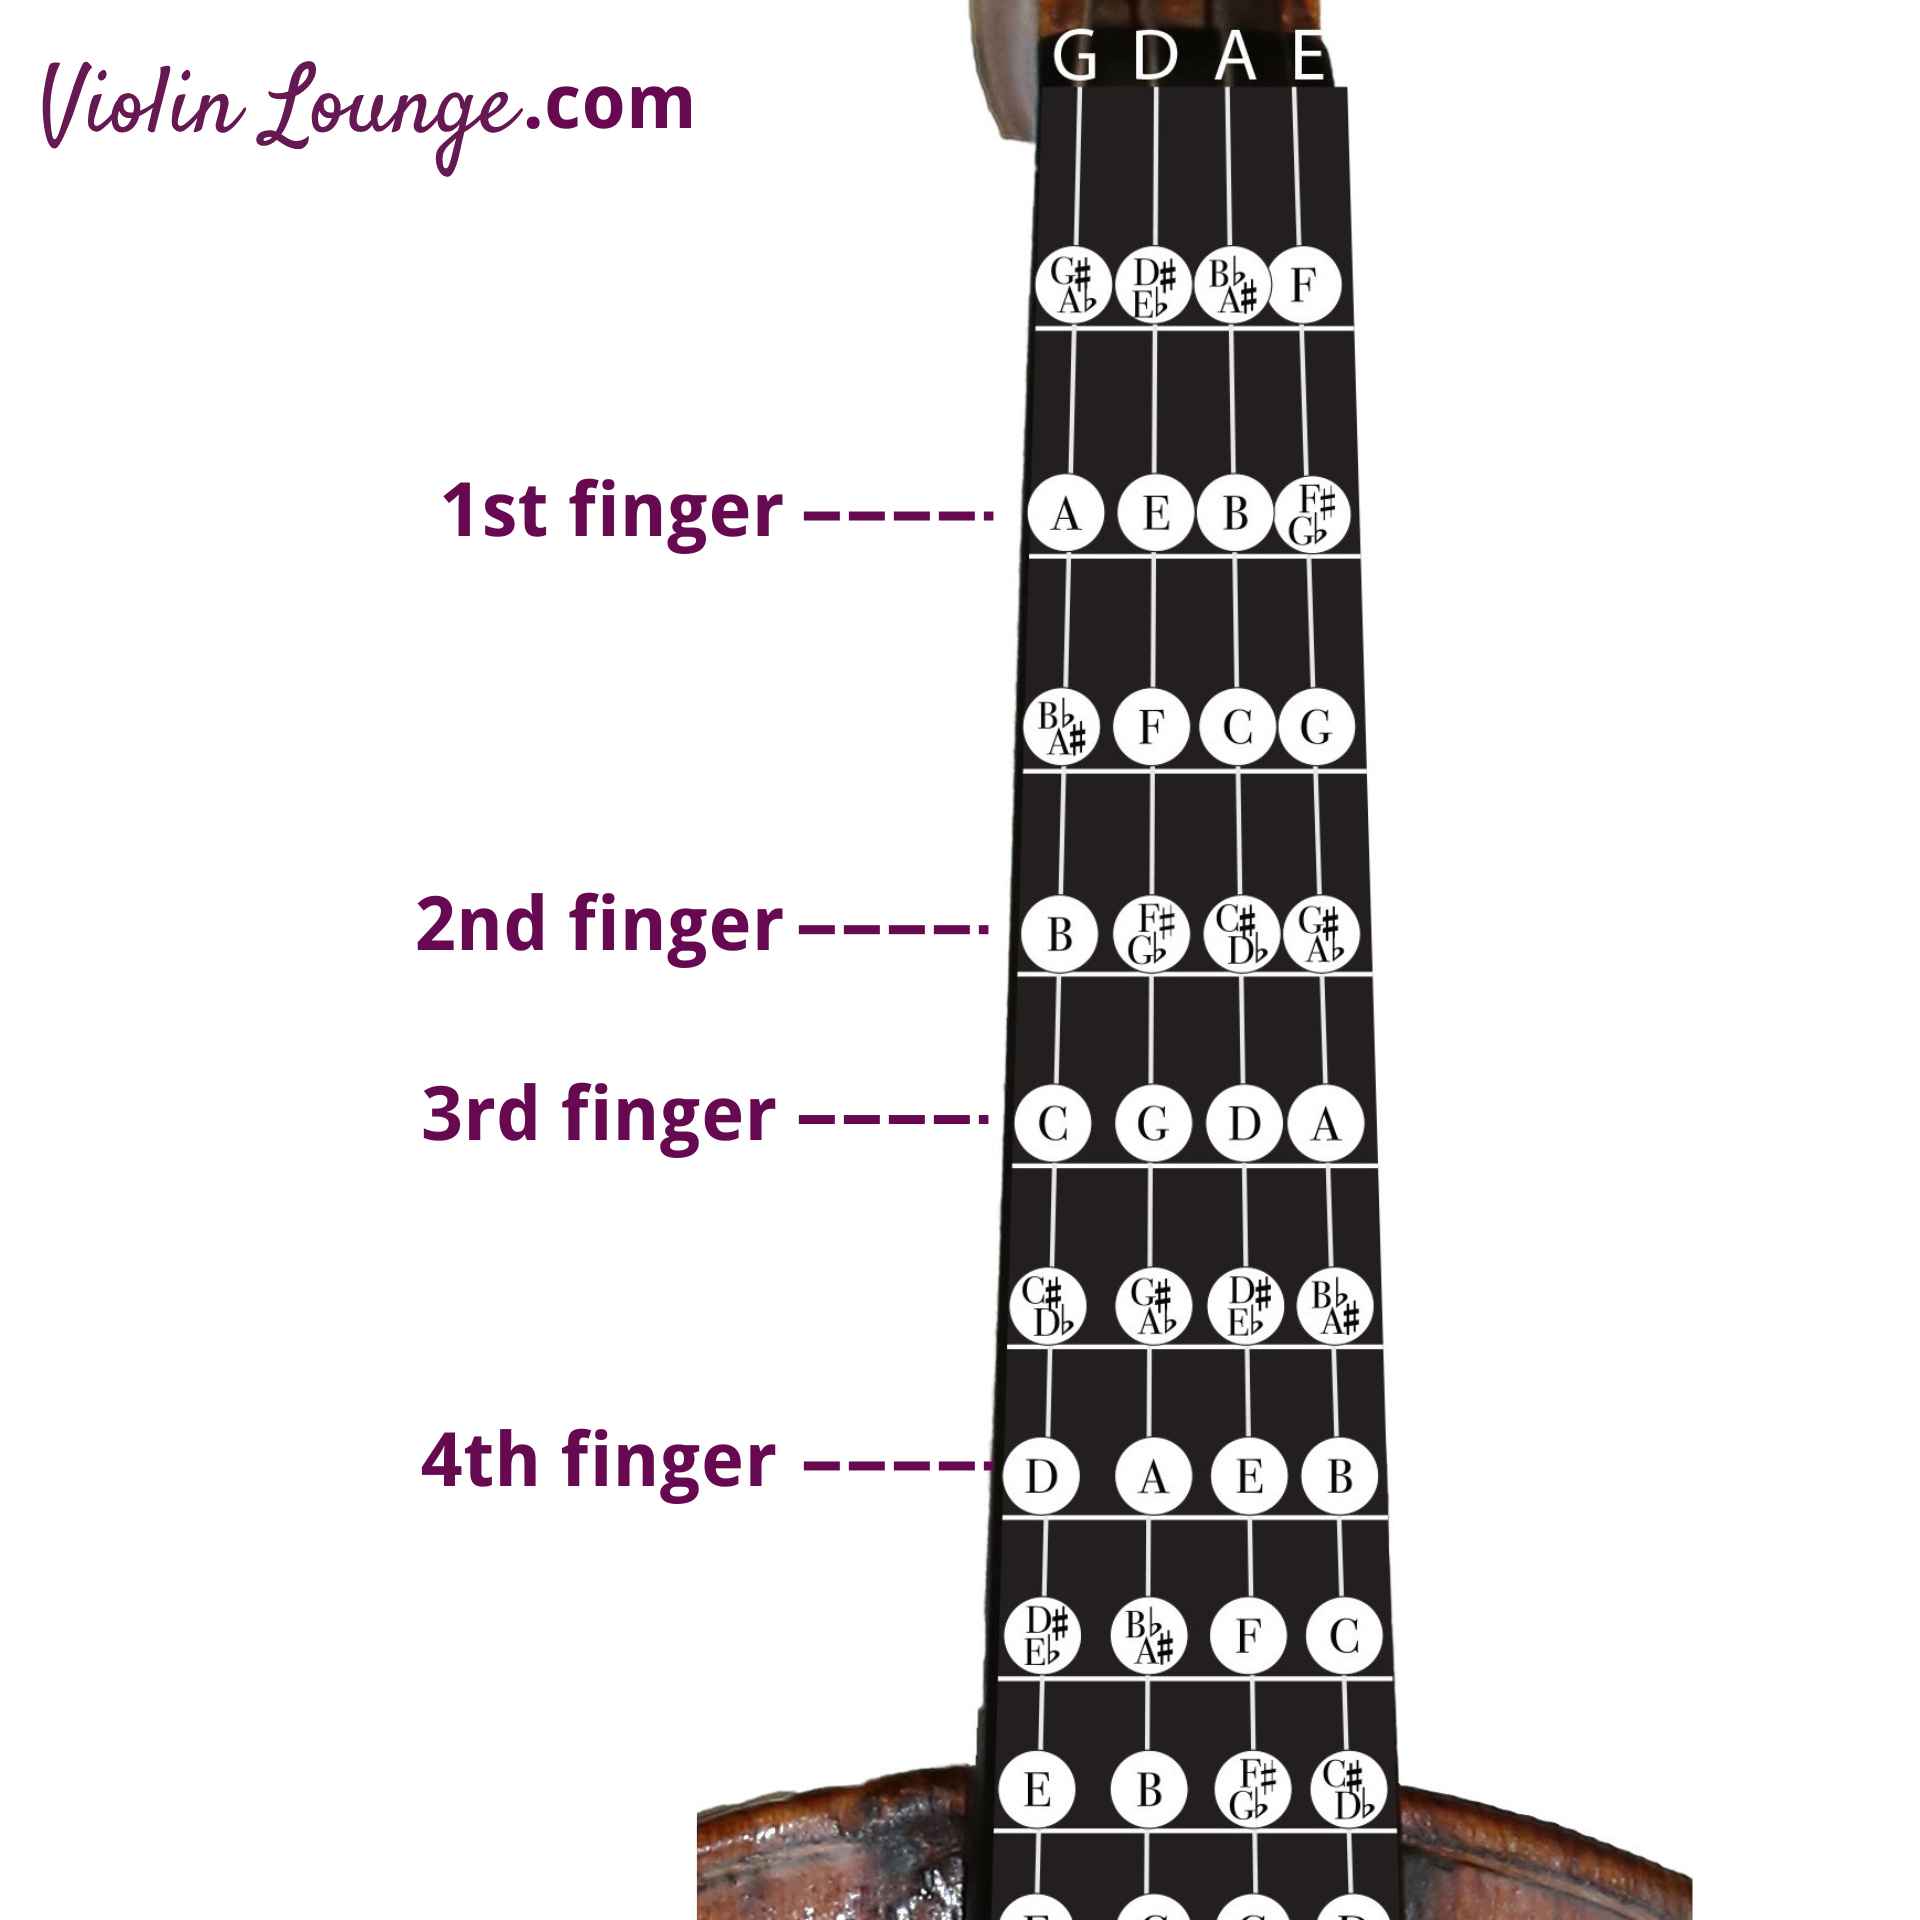
To start off, here is a chart of all the notes in first position that we will reference throughout the article:

High Vs. Low

As you can see, there are multiple positions for each finger. We differentiate between the positions by calling them “low”, “normal”, or “high”. If you have finger tapes, your tapes are on normal 1, high 2, normal 3, and normal 4. There is actually no such thing as normal 2, because 2 will either touch 1 or 3. So we just refer to these as low or high 2. Remembering which to use is a big challenge for beginners, so look carefully at the fingering chart.

Fingering Enharmonics

This fingering chart shows low 1, normal 1, low 2, high 2, normal 3, high 3, and four. Are there other combinations? Absolutely. For example, instead of playing D#/Eb with high 3, you could use a low 4. There are all kinds of ways to change things up, but the chart gives everything you need for knowing where every note in first position is.

That being said, it is important to think your fingerings through carefully when dealing with enharmonic pitches. An enharmonic is a note that could be written two different ways in the music, but is technically the same pitch. I say “technically” because on violin it is possible to tune them differently! For example, D# and Eb on a piano are the exact same key. On violin, however, minute adjustments can be made to make the pitch more accurate in its tonal context. There isn’t an easier way to explain this so here goes: Eb should be slightly lower than D#. When choosing fingerings, follow this general rule: Use lowered fingers for flats (such as low 4 in this case) and raised fingers for sharps. There will be situations where this rule will not work, but it’s a good place to start for intonation.

All the First Position Violin Notes

To help with the chart, here are all the notes listed out in order by string, as well as the notes on the staff:

G string violin notes in the first position

G: open G
G#/Ab: low 1
A: normal 1
A#/Bb: low 2
B: high 2
C: normal 3
C#/Db: high 3
D: normal 4

D string violin notes in the first position

D: open D
D#/Eb: low 1
E: normal 1
F: low 2
F#/Gb: high 2
G: normal 3
G#/Ab: high 3
A: normal 4

A string violin notes in the first position

A: open A
A#/Bb: low 1
B: normal 1
C: low 2
C#/Db: high 2
D: normal 3
D#/Eb: high 3
E: normal 4

E string violin notes in the first position

E: open E
F: low 1
F#/Gb: normal 1
G: low 2
G#/Ab: high 2
A: normal 3
A#/Bb: high 3
B: normal 4

Join my FREE beginner violin course

I take you from scratch step by step to your first violin concerto including 40 videos, sheet music and violin tabs.

Hi! I'm Zlata

Classical violinist helping you overcome technical struggles and play with feeling by improving your bow technique.

Sheet Music of All Violin Notes in the First Position

Notice that the sheet music does not include all the enharmonic pitches, but they are provided on the fingerboard chart.

Would you like to start playing the violin?

Take my free beginner course right here!

Insights on Teaching Toddlers Violin from a Violin Teacher and Mom of 5

by Laura Carr, creator of Stringosaurus

The great thing about the violin is that one can learn from a very young age

As a parent or teacher, introducing toddlers to the world of music can be a rewarding and challenging experience

While teaching toddlers how to play the violin may seem like an overwhelming task, it’s possible with the right balance of educational tools and approaches

One approach that has proven successful for many early childhood art teachers is a process-inspired approach.

This approach focuses on the journey of learning, rather than the end result, and emphasises exploration, creativity, and play.

Though many violin teachers may use this approach without realizing, I think it’s certainly less talked about. Hence why I want everyone to know about it!

So what is process-inspired learning?

Unlike traditional teaching methods that focus on the end result (i.e., playing a specific piece), a process-inspired approach prioritizes the journey of learning itself. It’s all about breaking down each step of the learning process into manageable, engaging activities that build skills and foster a love of music along the way.

The benefits of this approach are many: it can help students stay motivated, build a strong foundation of skills, and even improve their overall cognitive development. And best of all, it’s fun and engaging for both you and your students!

I have been in awe of a friend, violin teaching colleague, and Teachosaurus of mine, who has been (until recently, unknowingly) embracing process-inspired learning with her own gorgeous children! She was delighted to discover that there’s been a ‘method to her madness’!

This amazing person actually asked me to write a blog to help early childhood violin teachers gain a better understanding of a process-inspired approach. Instead, I had a better idea. I mischievously surprised her by sending her a set of interview questions!

To help us understand more about teaching violin to toddlers, I interviewed Zlata Ihou-Brouwer, teacher extraordinaire and Creator of the Violin Lounge, usually for adult violin learners.

In this blog post, Zlata has generously shared her insights and tips on how she teaches her own toddlers to play the violin:

How many children do you have? Tell us a little bit about them.

I have five kids under four years old: 3 year old twins Louise and Victor, 2 year old Tristan and 6 weeks old twins Isabella and Catharina.

How did you first become interested in teaching your children violin and how have you approached this?

From the age of eight I wanted to become a violin teacher, but in conservatory, you’re trained to teach children from about six years old. For earlier ages one would do more general music education like baby and toddler music classes.

At one year old, my twins eagerly wanted to join my violin practice, so much so that I couldn’t get away with just playful, general musical activities and in the end, I caved in and bought little violins for them: first toy violins and quite quickly after that, real 1/32 and 1/16 violins.

Can you describe what a typical process-inspired violin lesson with your children looks like?

I combine the Stringosaurus Resources Hub library with the method Music Play and some stuff I make up on my own. At this age I offer them informal music/violin lessons on a daily basis, but participating is on a voluntary basis.

Some days the kids don’t want anything to do with the violins and other days they are focussed for nearly an hour. It also differs which kids I teach violin on a day.

I try to do music play activities daily and sing with them. This always involves singing and movement with some props like scarves and a parachute.

The violin part is playing songs to them, which they can join in with on open strings, doing exercises like harmonics, landing the bow and following along with the songs in the Stringosaurus Resources Hub library.

At this age my main focus is to develop their music vocabulary and the violin is more of a prop. The focus might shift more to instrumental teaching at a later age and when it truly appears that this is their instrument (or whether it’s a different instrument).

With the three year olds, I now discover that I can truly teach them techniques on the violin.

Two year old Tristan learns a little bit, like how to hold the violin and hold the bow. He does some bowing, but doesn’t respond much yet to instruction.

How has your own experience as a musician influenced your teaching approach and philosophy?

I’m very traditionally taught, which means I was told by the teacher what to practice and did exactly that. There was not much room for creativity and initiative.

During my teacher training I got to know the music learning theory by Gordon, (similar to Kodaly, which is better known), which treats music as a language that you not only imitate and recite, but in which you can tell your own story with the vocabulary and grammar you know.

While I had quality violin lessons, my own musicianship skills were underdeveloped making it feel impossible for me to do things such as improvising and composing.

For my own students and my own children I really want them to KNOW and express their individual inner music.

In what ways have you seen your children benefit from process-inspired violin learning, both in terms of their musical abilities and other aspects of their development?

It’s been hard for me not to focus on a certain outcome and focus on the process, but I noticed that the outcome often surprises me.

My kids know a lot of songs, can learn new music quickly and can sing different arpeggios in tune. Their breathing and movement is in flow and effortless congruent with the music. They quickly recognize songs if they have the same melody, but a different text. They focus on melody and not words.

They engage creatively in music: make up their own songs, even do duets with each other, make up different text to existing songs or mix up songs to a new song. Also they sing almost all day long and do other activities like crafting or making a puzzle.

In terms of violin they bow straight, know the strings, recognize their songs and have a very relaxed and natural posture.

Often I get the compliment that my kids sing so well, even the preschool teacher says they sing all the time. That’s what makes me happy. These are skills they can use on any instrument and in any music listening experience. Plus they enjoy it.

What are some of the challenges you’ve encountered while teaching your children violin using a process-inspired approach, and how have you addressed them?

The main challenge is to let go of the outcome and the fact that you do not always see the outcome. For example, a kid might not seem serious and only be giggling when a new song is introduced. Then the next day they suddenly sing that song perfectly while playing independently.

And more extreme: after lots of attempts teaching them Silent night in December they didn’t want to sing it, but suddenly in February out of the blue they could suddenly sing it!

What advice would you give to other parents/teachers who are interested in exploring process-inspired learning approaches for their children, particularly in the context of music education?

Accept that the outcome can come at a different time and might not look exactly like you intended. Certainly for A type parents and teachers (or teaching parents) this can be hard.

Looking to the future, what are your goals for your children’s musical education and how do you plan to continue incorporating process-inspired learning into their violin lessons?

My goals are that they develop their music aptitude and learn a variety of music styles and periods. This can end up in playing an instrument (professionally or not), being a fervent classical concert visitor, singing in the shower or discovering a music style they really love.

What saddens me is that today, when I enthusiastically tell someone that I’ve created a course on Vivaldi Four Seasons, Bach’s Sonatas and Partitas or Paganini technique, people don’t even have an idea who Vivaldi, Bach or Paganini were. They don’t have to like it, but I want my kids (or all kids) to have the opportunity to know these exist, how their music sounds and decide if they like it or not (and that’s ok too).

On behalf of all of us, thank you Zlata for sharing with us your musical journey so far with your little ones. It certainly sounds like your beautiful family keeps you busy! We look forward to seeing and hearing more as they grow.

Teaching violin to toddlers can be a challenging but rewarding experience, and a process-inspired approach can be a great way to make the journey of learning more engaging and enjoyable for both you and your students.

By incorporating imaginative play, exploration, and creativity into your lessons, you can help your students develop a lifelong love of music and a deep appreciation for the journey of learning.

If you’re interested in learning more about how a process-inspired approach can transform your teaching, I encourage you to check out Laura Carr’s mini teacher training course right here. This course is designed to help you deepen your understanding of the process-inspired approach and incorporate it into your teaching practice.

The course is part of the Stringosaurus Resources Hub. Inside is a wealth of tools and materials designed specifically for early childhood violin teachers, including 80 amazing resources to help you build engaging, effective lesson plans. They can be used independently or as addition to the method you work with in your studio.

Don’t miss out on this exciting opportunity to take your teaching to the next level!

Legato Violin Bowing Technique

Legato is the violin bow stroke we use for slurred notes in the sheet music. The transitions between the notes are fluent.

What is legato bowing on the violin?

Legato is the most smooth, flowing way to create sound with the violin. It comes from the Italian tradition of bel canto operatic singing, where the phrase is completely smooth and the notes melt into each other. Legato is notated in sheet music as long slurs over the notes.

Tips for Playing Legato

Legato is a difficult technique to really do well, mostly because the hands must work completely independently. Before we get into some exercises for how to do this, let’s go over a few important tips. First, use finger and wrist motion to help create smooth bow changes. As your arm moves the bow across the string, allow your wrist and fingers to move a little further to keep the bow in motion. Ideally, you want no break in the sound. The second important principle is bow distribution. Use an even amount of bow for each note, or each length of note. In other words, if you have eight eighth notes, use ⅛ of your bow for each of them. If you have a half note and then two quarters, use half your bow for the half note and the other half for the quarters. This will help you avoid “belly bowing”, which happens when you increase the pressure just in the middle of the bow. Another good way to avoid this pitfall is practicing in “stop bows”, rearticulating the sound after each note.

To accomplish this, it is tempting to tighten the right hand to create more pressure. Remember that the friction comes from the rosin gripping the string, not your hand gripping the bow!

Independency between the hands means that what you are doing with your left hand does not affect the speed or weight of your bow. How can we develop this? The great violin teacher Ivan Galamian came up with a good exercise: Play two open string whole notes (on the A string for example) followed by two measures of sixteenth notes (finger pattern 0-1-2-0 1-2-3-1 2-3-4-2 etc.) on the same string. Does your right arm feel the same in both versions? How does the left hand impact your smooth bowing? The goal is for the right arm to feel the same on both the open strings and the sixteenth notes. Also, if you are playing fast legato passages with string crossings, putting fingers down early on the next string helps maintain the legato.

Another great legato exercise is called “son file”. The principle is very simple: starting at the frog, play an open string to the tip as slowly as you possibly can, patiently moving your right hand the same speed the entire time.

Legato, Shifting, and Vibrato

You may not have encountered this yet, but legato bowing becomes more complex when you incorporate shifting. Violinists too often create a bump or hiccup with the bow when they shift, especially if they shift too fast. An important key to effortless legato is intentional shifting. The same thing applies to vibrato. Vibrato is not just ketchup that you can throw on top of any technique. It must be clearly incorporated into the articulation. This is again where independency of the hands comes in. The right hand is legato, but the left hand is very crisp and articulate.

Legato Examples in Repertoire

Composers love the expressivity of legato, so it comes up all the time in pieces! You can find a beautiful legato excerpt regardless of your skill level. In fact, one of the most beautiful student violin concertos is also one of the best pieces for practicing legato, particularly the first movement. The melody incorporates quarter, half, and eighth note patterns, an excellent way to learn bow division. The first movement is also entirely in first position.

For intermediate players, I recommend Saint-Saëns’ The Swan. Not only is it one of the most gorgeous and recognizable melodies in classical music, but also a study of how legato, bow control, shifting, and vibrato interact. In this video pay attention to Ray Chen’s bow speed. Notice how he is completely consistent through the slurs, uses the whole bow, and uses faster (but still consistent) bow speed through the crescendos. Notice also how he makes his shifts intentionally audible (portamento) and vibrates before and after each shift for a smooth, luscious sound.

If you’re an advanced player who’s fallen in love with Saint-Saëns and wants a challenge, you can learn Violin Concerto No. 3 in B Minor. Words cannot do justice to the second movement of this piece so please listen to this recording!

Portato or Legato?

You may have noticed that the bow stroke here alternates between legato and a slightly different technique: portato. In portato (also called louré), you stop the bow for a very short moment between the notes. This lovely effect creates variety and build-up in a phrase, for example in the Mendelssohn concerto:

Passages that the composer wants portato are marked with a slur and dashes under the notes. However, portato is also an expressive technique that soloists can choose to incorporate elsewhere. As shown in the Saint-Saens concerto, alternating between legato and portato creates variety and special effects.

Now that you understand how true legato works, try to practice a legato exercise every day. Perhaps this just means taking five minutes to play slow long bows on open strings. Even this simple exercise does wonders for your bow control and legato ability. Legato creates the most expressive violin music, but like every technique it is improved through careful practice.

Hi! I'm Zlata

Classical violinist helping you overcome technical struggles and play with feeling by improving your bow technique.

Improve your violin bowing technique with these lessons and articles:

Do you want to know every possible bowing technique on the violin? Watch this video with 102 violin bowing techniques.

The basis for all bowing techniques is to bow smoothly. This video lesson will help you with that.

A proper and relaxed violin bow hold will help a lot improving your bowing technique and sound. Read this article.

Take bowing technique lessons with Zlata

Join my Violin Bowing Bootcamp to build a great basic technique, make a beautiful sound and learn the most common bow strokes.

Join Bow like a Pro for personal guidance by Zlata and her teacher team combined with an extensive curriculum all things bowing.