How to Hold a Violin Bow: 3 Easy Steps and 5 Bowing Exercises
The violin bow hold is SO important to let your violin sing
Maybe you just started playing the violin and although you know you have to start with simple songs, you do long to create such a beautiful resonant sound from your violin.
You might have tried to make some bow strokes, but it feels very uncomfortable and all tutorials out there may make your bow hold feel so unnatural.
It can be so frustrating that when your favorite violinist plays, it looks so easy, but for you it’s a struggle. This article will help you get a violin bow hold that feels great and with which your violin playing sounds great.
Let’s look at the violin bow hold from all sides
Before I go into my three easy steps to build a proper violin bow hold, let’s first see what it should look like.
Violin bow hold front
You will see that the fingers are curved and over the bow. The hand looks relaxed. The violin bow hold is slightly tilted in the direction of the tip of the bow. The fingers are flexible and can move along the bow strokes like a spring system. In this way you can bow smoothly and create a beautiful sound on the violin.
Pictured is a Franco Belgian bow hold. I will go into Russian vs Franco Belgian further in this article.
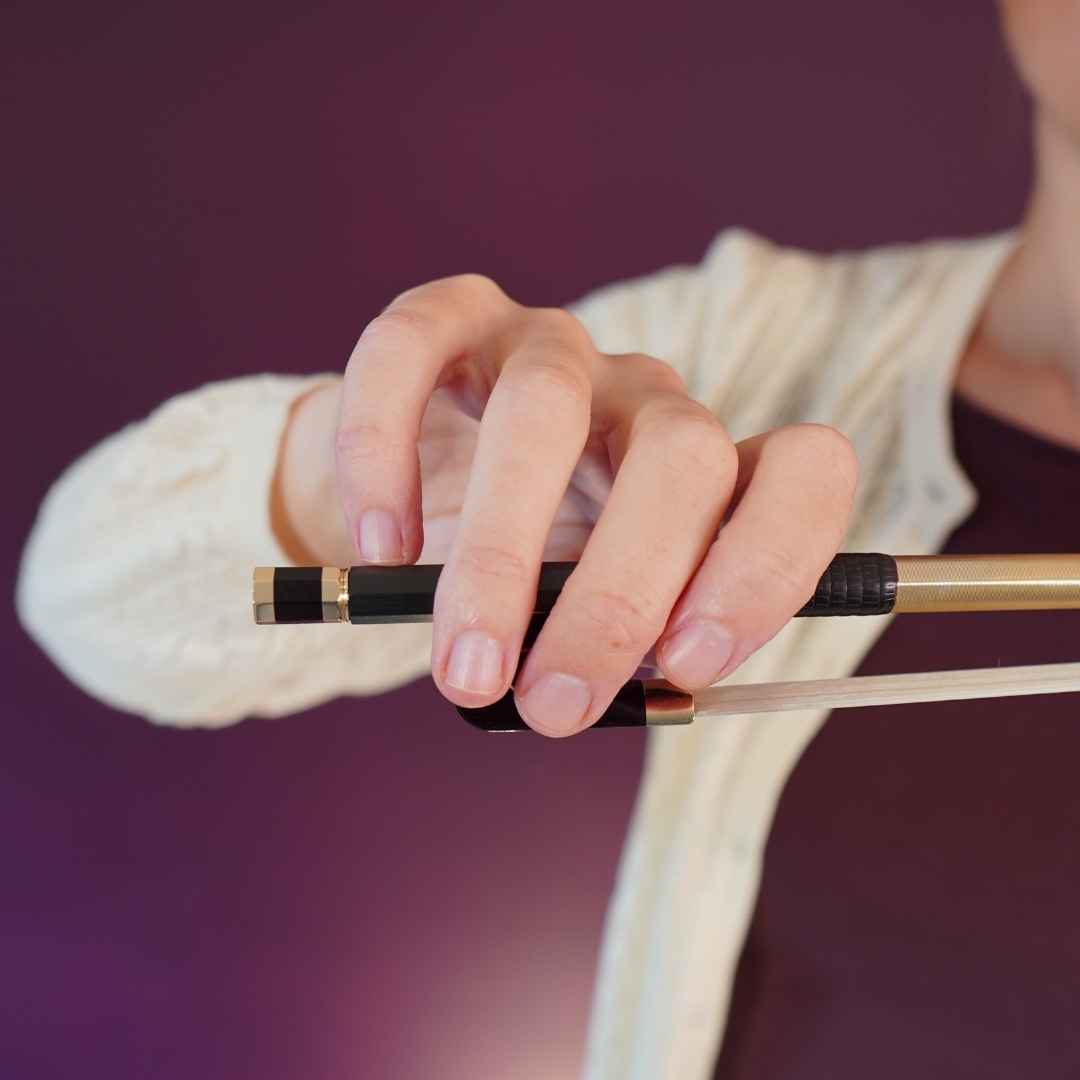
Violin bow hold knuckles
The knuckles of the hand are low and in line with the stick of the bow or slightly tilted towards the left.
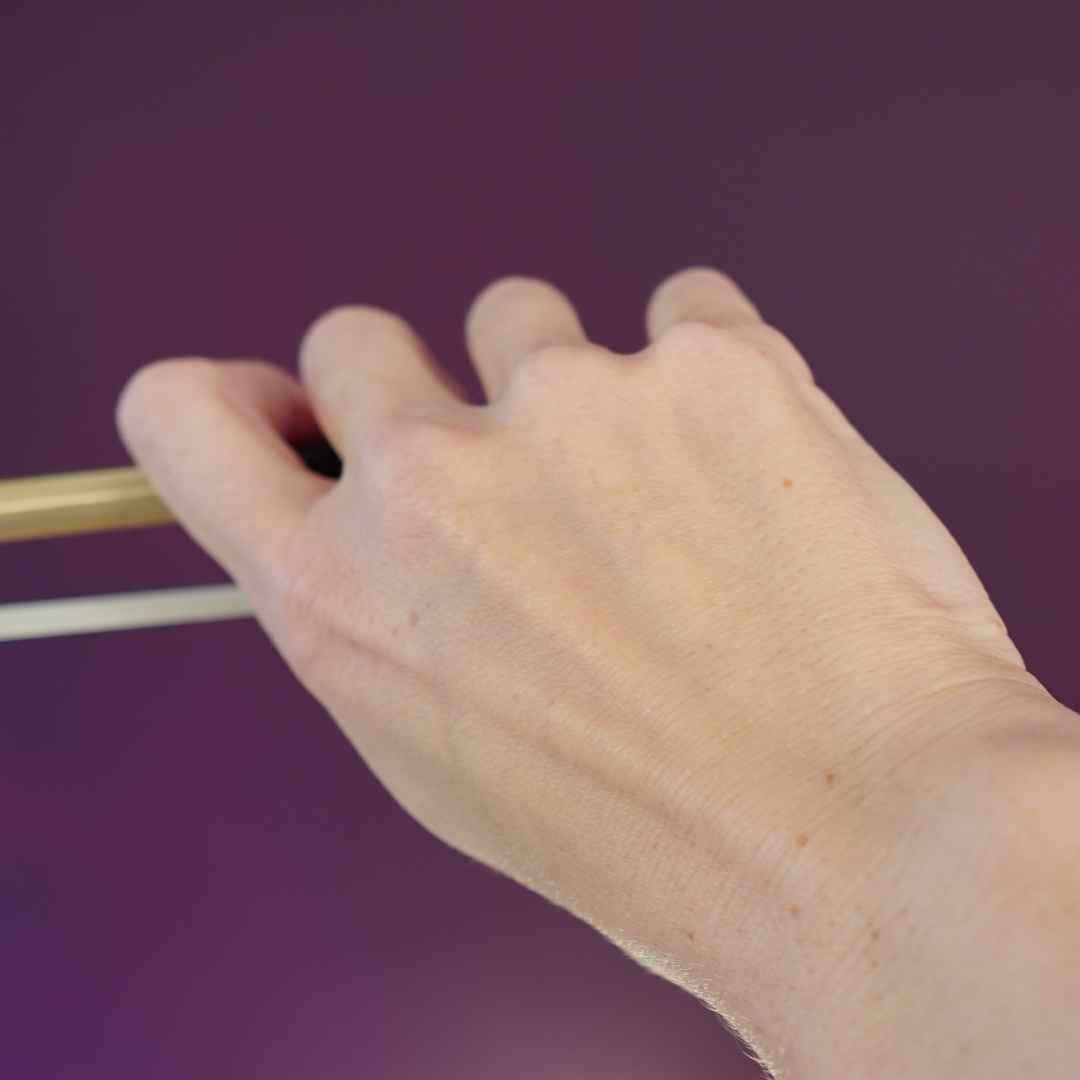
Violin bow hold pinky
The pinky is curved. You will notice that every bow has eight edges (octagonal) at the frog. You don’t place the pinky on the top edge, but the one just before. In that way the pinky doesn’t slip off the bow while playing that easily.
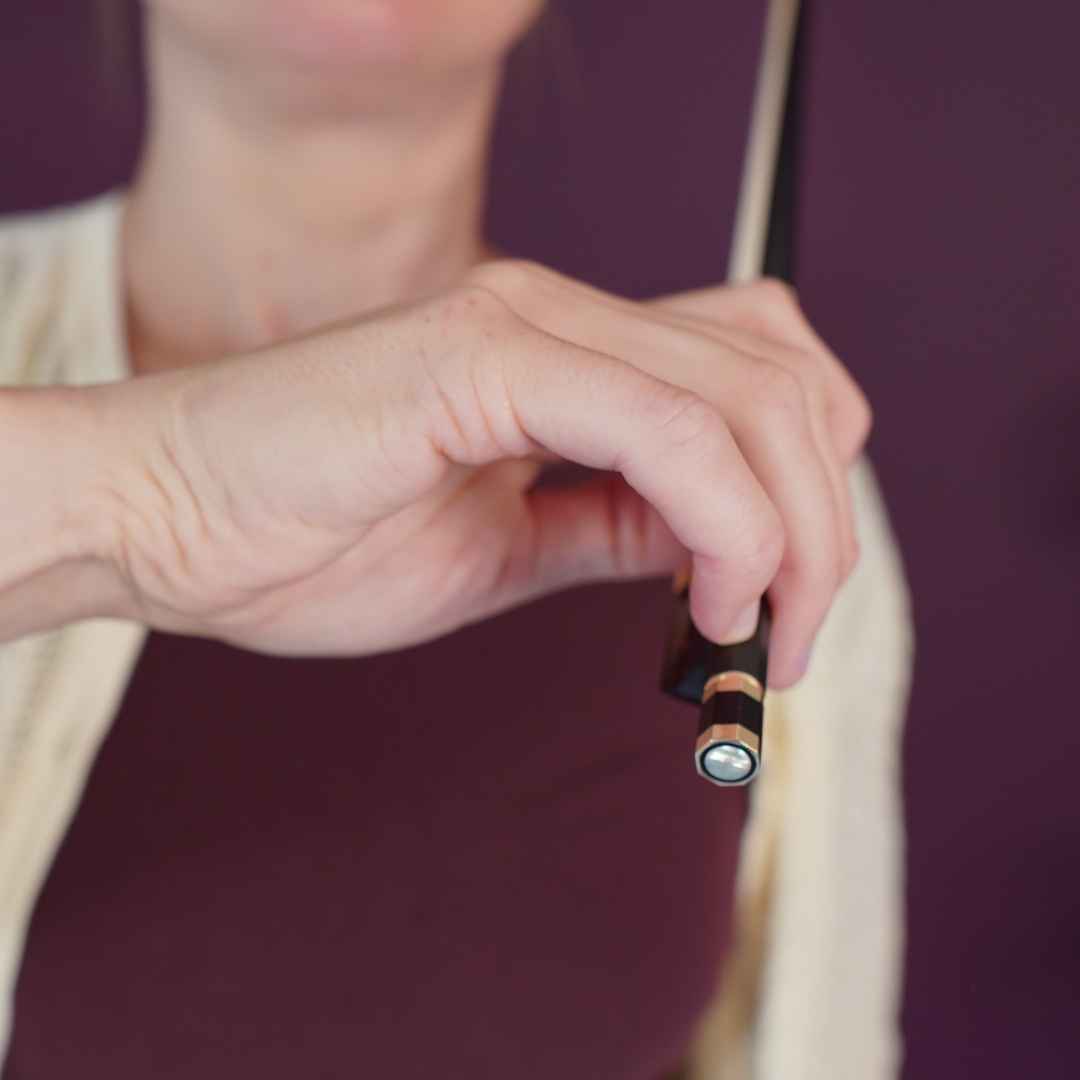
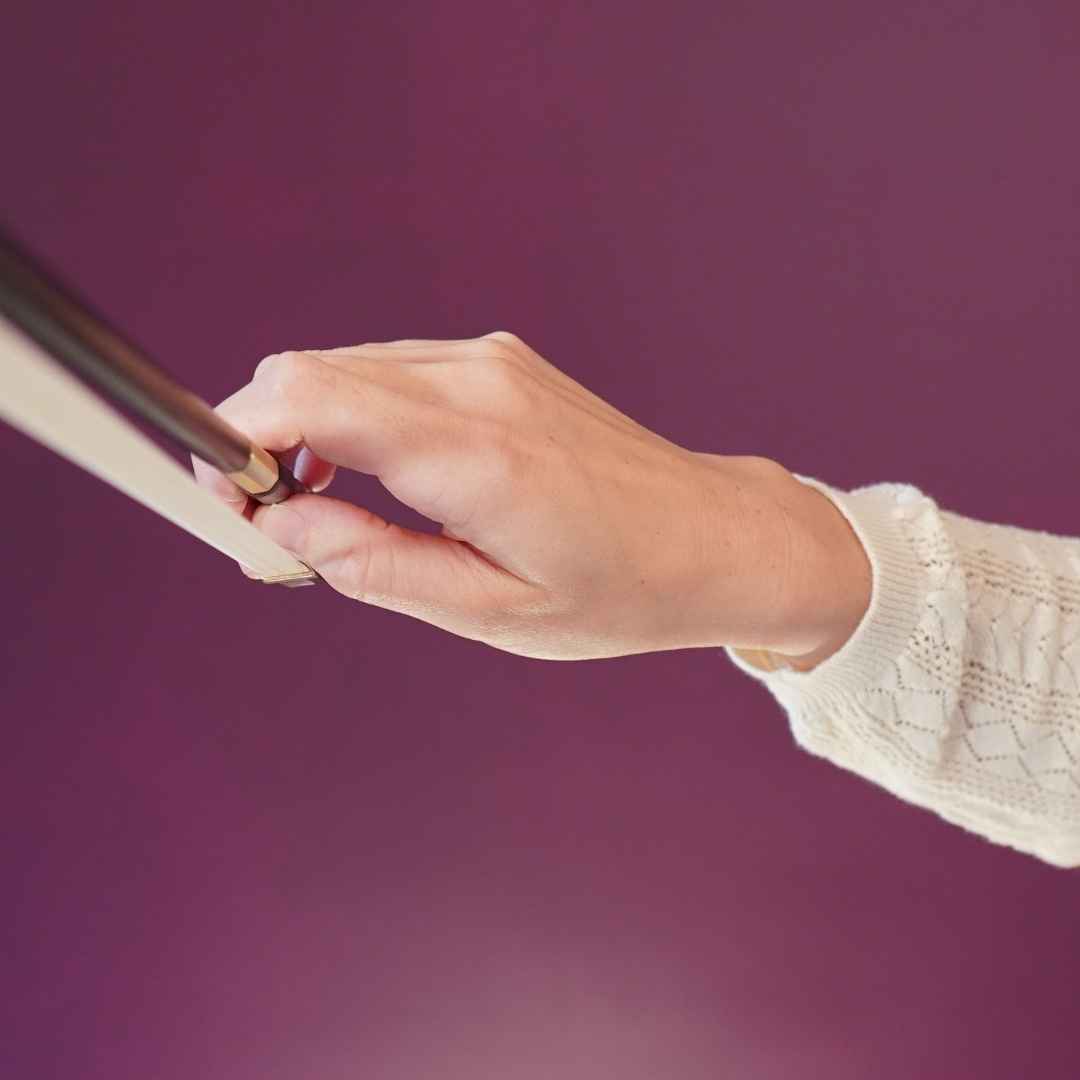
Violin bow hold from below
The thumb is slightly curved and not locked. It can move along smoothly with the bow strokes.
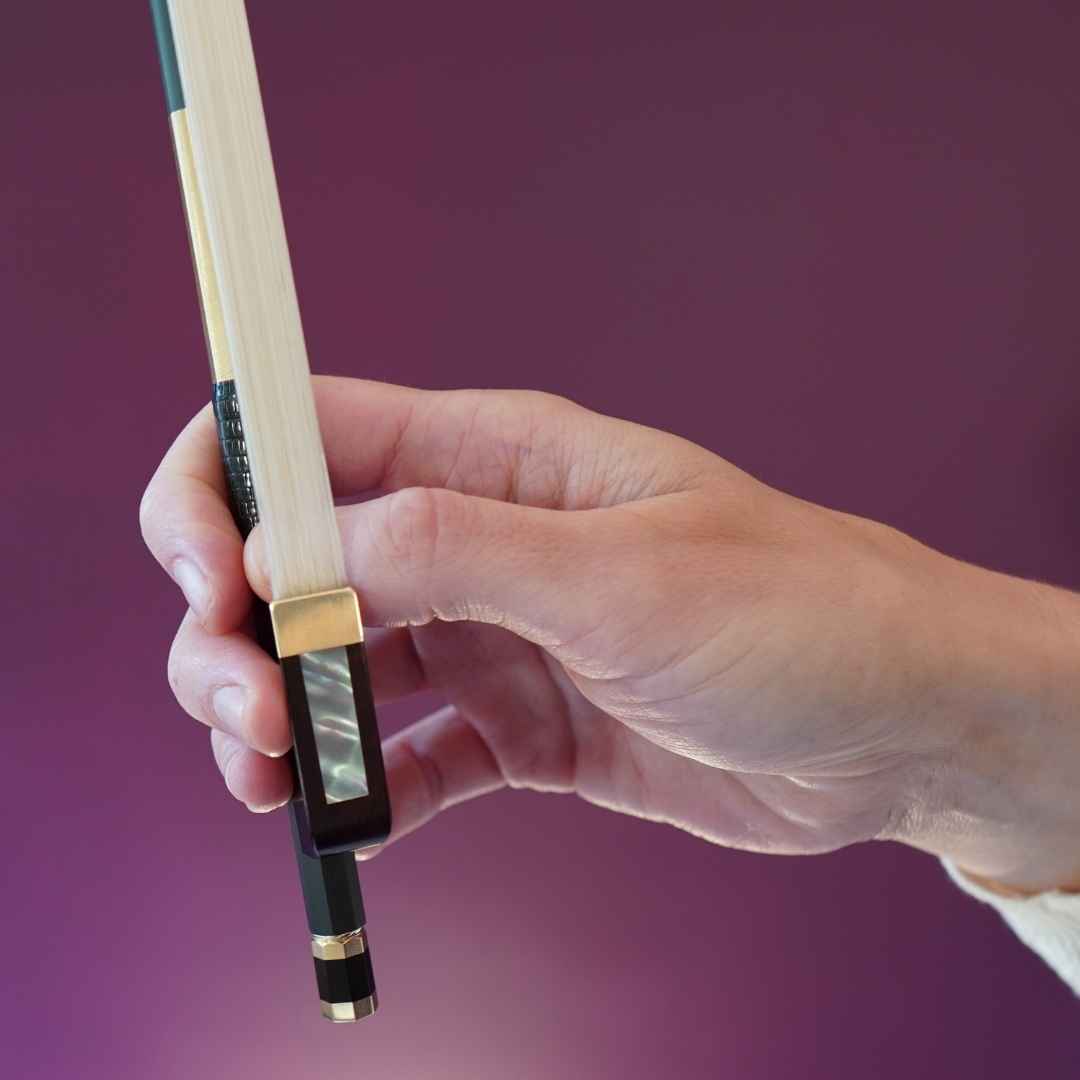
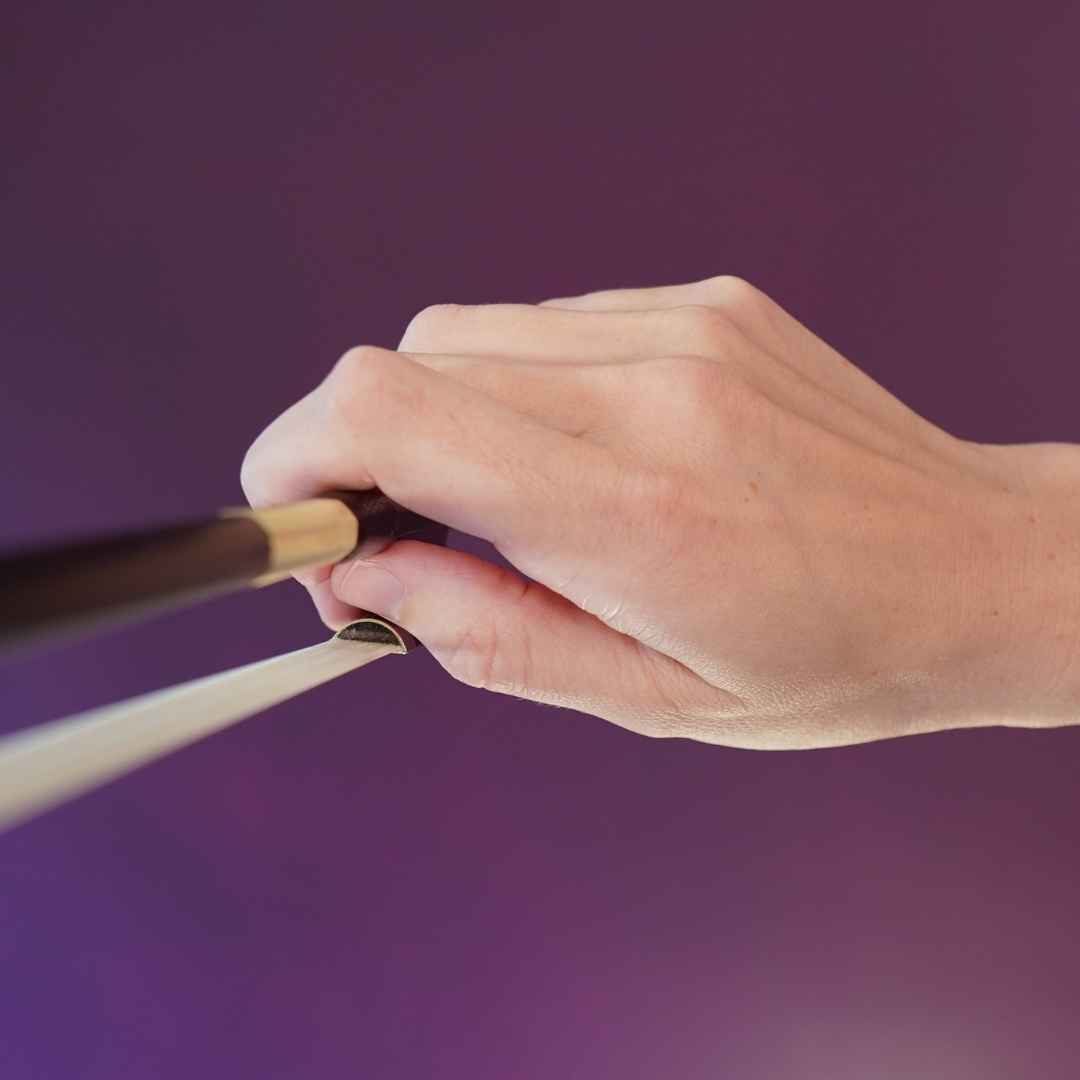
Violin bow hold thumb
In this violin bow hold from the side you see the placement of the thumb. You don’t push your thumb into the whole of the frog. Instead you let the bow rest on the edge of your thumb nail. The thumb touches the bow just between the thumb leather and the frog.
3 EASY Steps to a Perfect Violin Bow Hold
With this step by step guide you’ll find a violin bow hold that works for YOU and your hand, so you can play the violin comfortably and beautifully.
Make sure to hold your violin bow with your left hand while you build up the bow hold with the right hand. In that way you can build up a relaxed violin bow hold without worrying that you drop the bow.
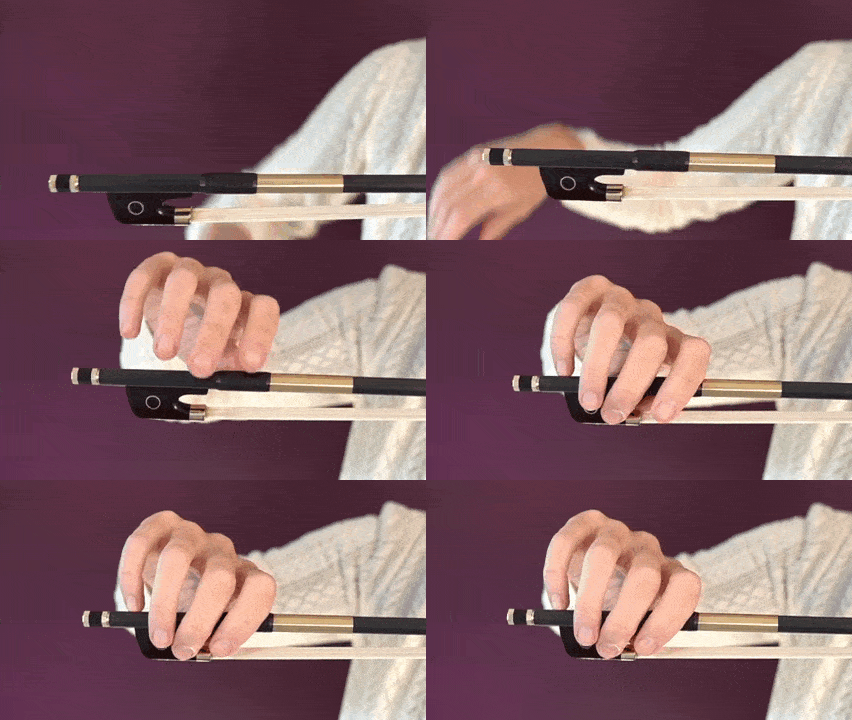
Step 1: Place your fingers relaxed and gently over the violin bow
This is not yet the correct position of your thumb and pinky, but the aim here is to build up a relaxed and proper violin bow hold step by step.
To prevent scratchy and squeaky sounds, it’s extremely important that you let your fingers rest on the violin bow.
The tip of your ring finger should be on the Paris eye.
Your knuckles should be in line with the stick of the violin bow. The fingers should be equally spaced apart and just a little bit.
Step 2: Place your thumb just between the thumb leather and the frog
The violin bow rests just on the edge of your thumb.
The edge of your thumb nail touches the violin bow stick just between the thumb leather and the frog.
You don’t need to push your thumb into the hole of the frog. That would make your bow hold very uncomfortable and tensed.
It’s personal how you place the thumb exactly, depending on the shape of your hand and your violin bow.
Make sure the ball of your thumb feels relaxed. Don’t curve the thumb too much. It should be in a slightly curved natural position.
Step 3: Place your pinky on top of the bow
Place your pinky just on the edge before the top edge of the bow. Every violin bow is octagonal at the frog.
If you place your pinky on the top edge, it will constantly slip off when playing. Very frustrating!
If you place your pinky just before, it has some stability and will stay in it’s place.
Franco Belgian vs Russian Bow Hold
The two most common violin bow holds are the Franco Belgian and the Russian bow hold. Historically this depended on where you were trained as a violinist. Nowadays we see great violinists use both bow holds not really depending on which country they are from.
Choosing between the two is a matter of trying out what first your hand best and with which bow hold you can bow the best. If you take private lessons, you can consider assuming the same violin bow hold as your teacher, because he/she can coach you better on this.
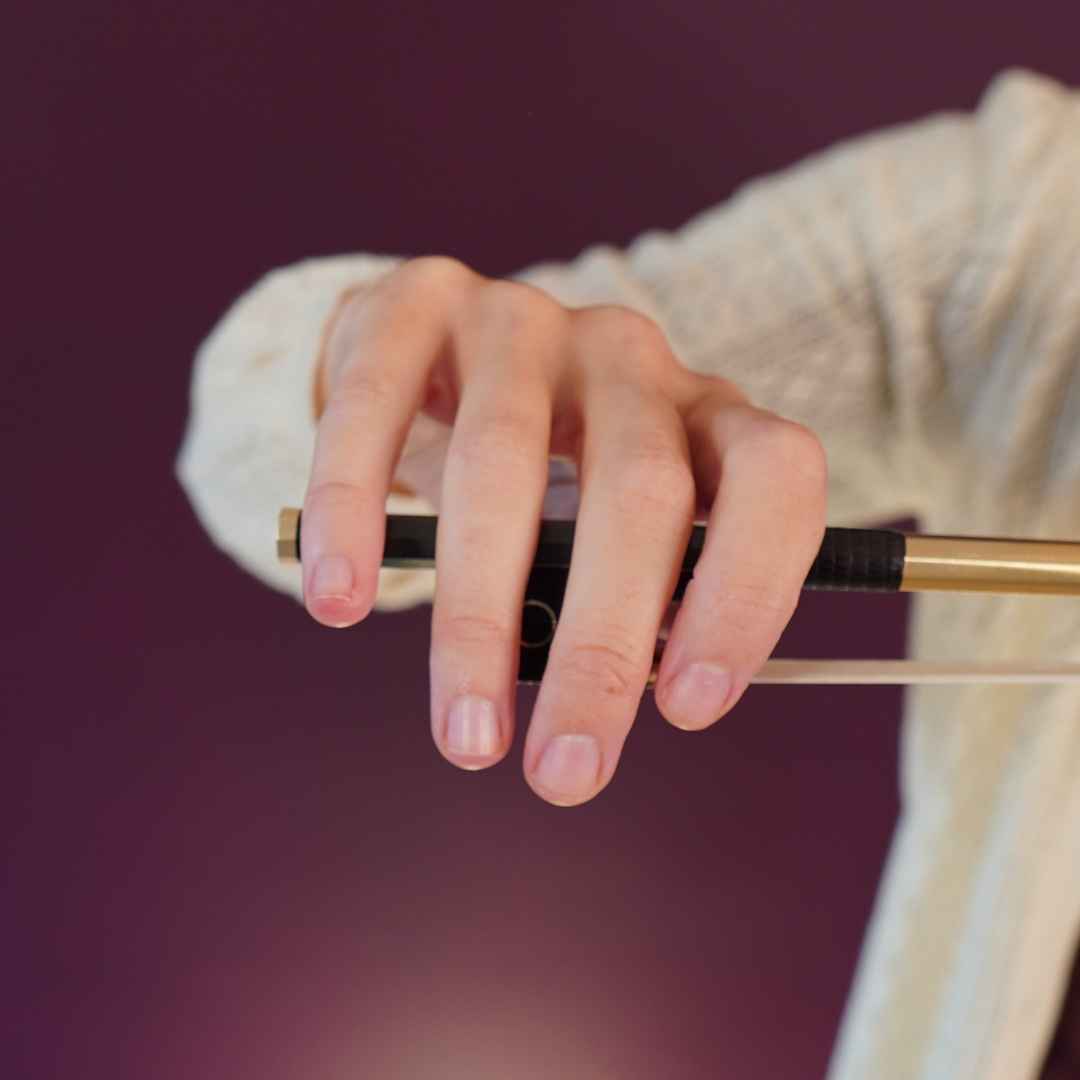
Franco Belgian violin bow hold
In the Franco Belgian bow hold the index finger rests on the bow between the second and third knuckle. Automatically the bow hold is not so much tilted towards the tip and the arm is relatively low.
In the Franco Belgian bow hold you see more finger action in the lower half of the bow as the pinky is more curved.


Hilary Hahn is a famous violinist who uses the Franco Belgian bow hold

Russian violin bow hold
In the Russian violin bow hold the index finger rests on the bow between the base knuckle and the second knuckle. The bow hold is tilted more towards the tip and the arm is automatically held higher.
The pinky is a bit straighter than in the Franco Belgian bow hold, but it’s not stiff or locked. It moves along with the bow strokes.
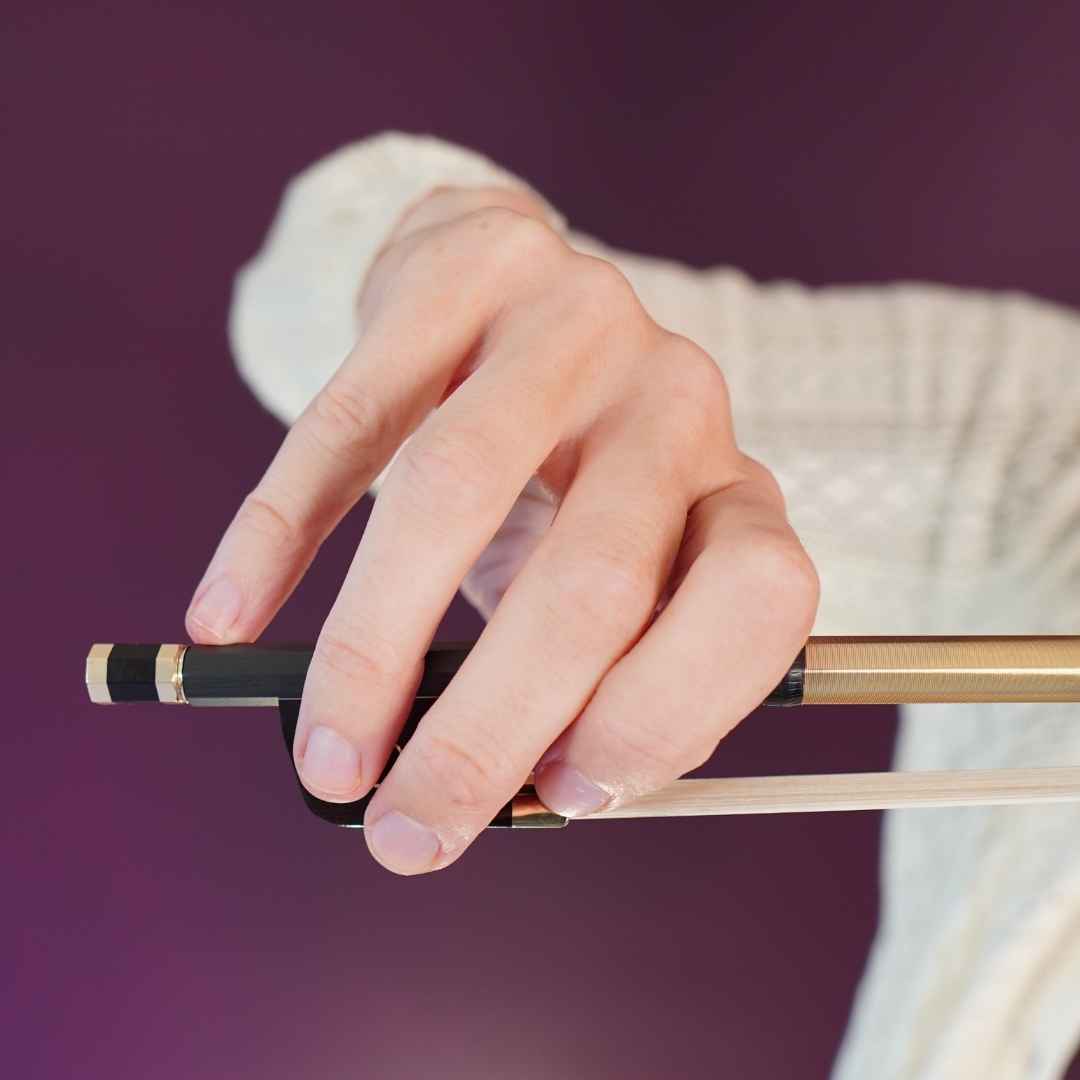
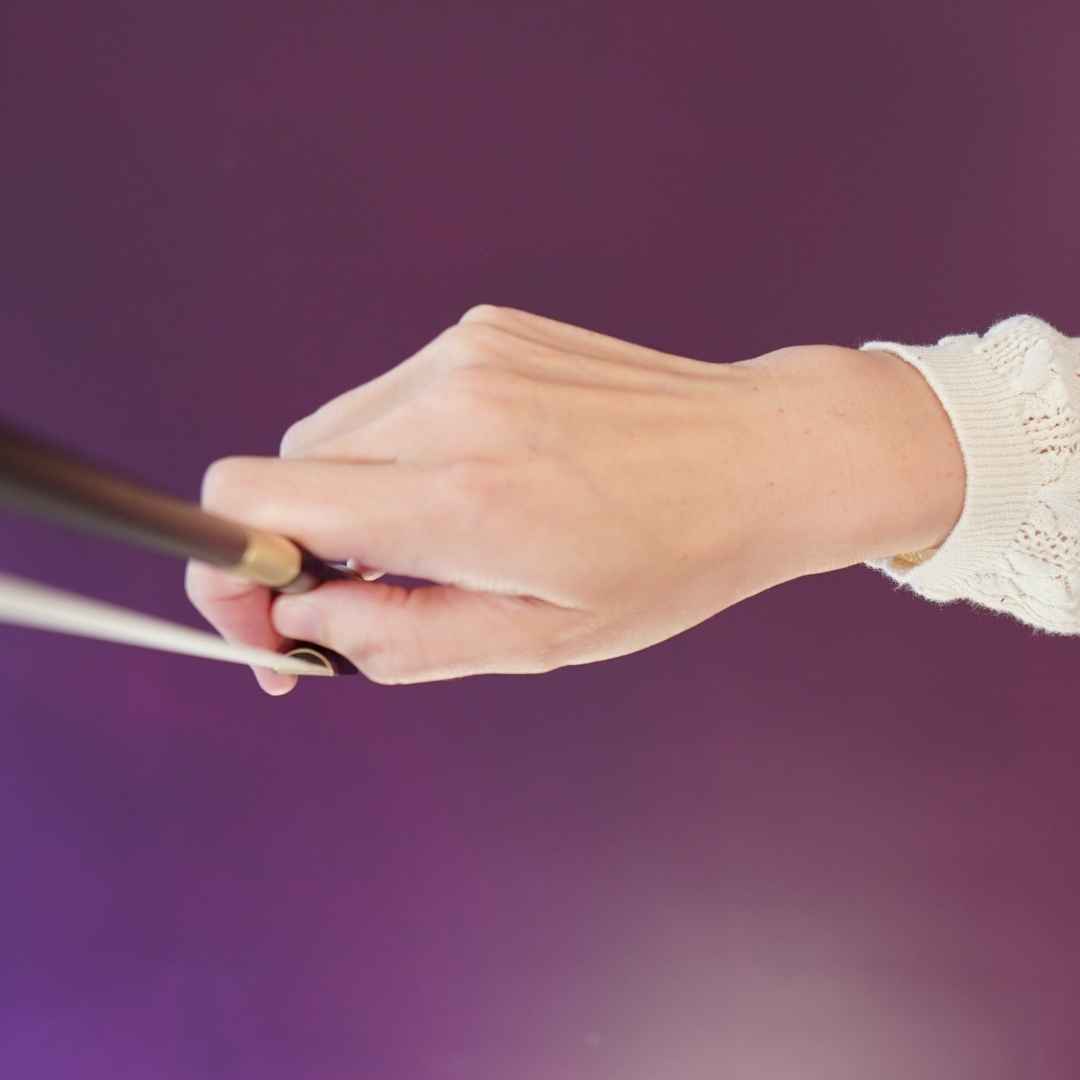
Ray Chen is a famous violinists who uses the Russian bow hold

Your violin bow hold moves while playing
Besides that a violin bow hold is highly personal and each violin player needs to find out what works best for the shape of your hand, the violin bow hold also moves along while playing.
To create a beautiful sound on the violin, one must bow smoothly and let the fingers of the bow hand move along with the bow strokes.
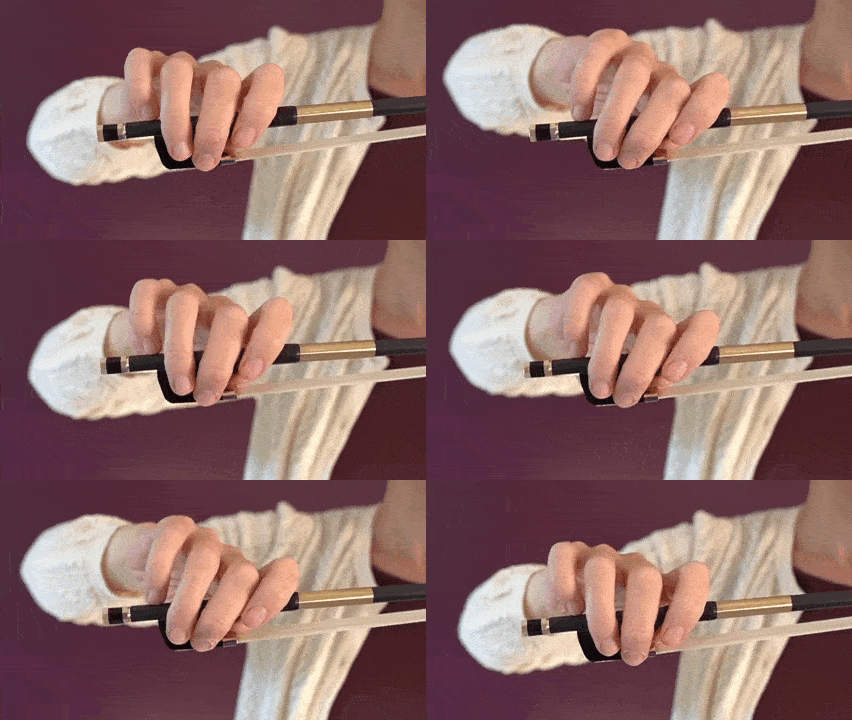
See the pictures below for the violin bow hold at the extreme frog and tip. Learn more about bowing smoothly in this video lesson.
Violin bow hold at the frog
At the frog you curve your fingers and bend your thumb. Your wrist goes up a bit. The balance of the bow hold is towards your pinky.
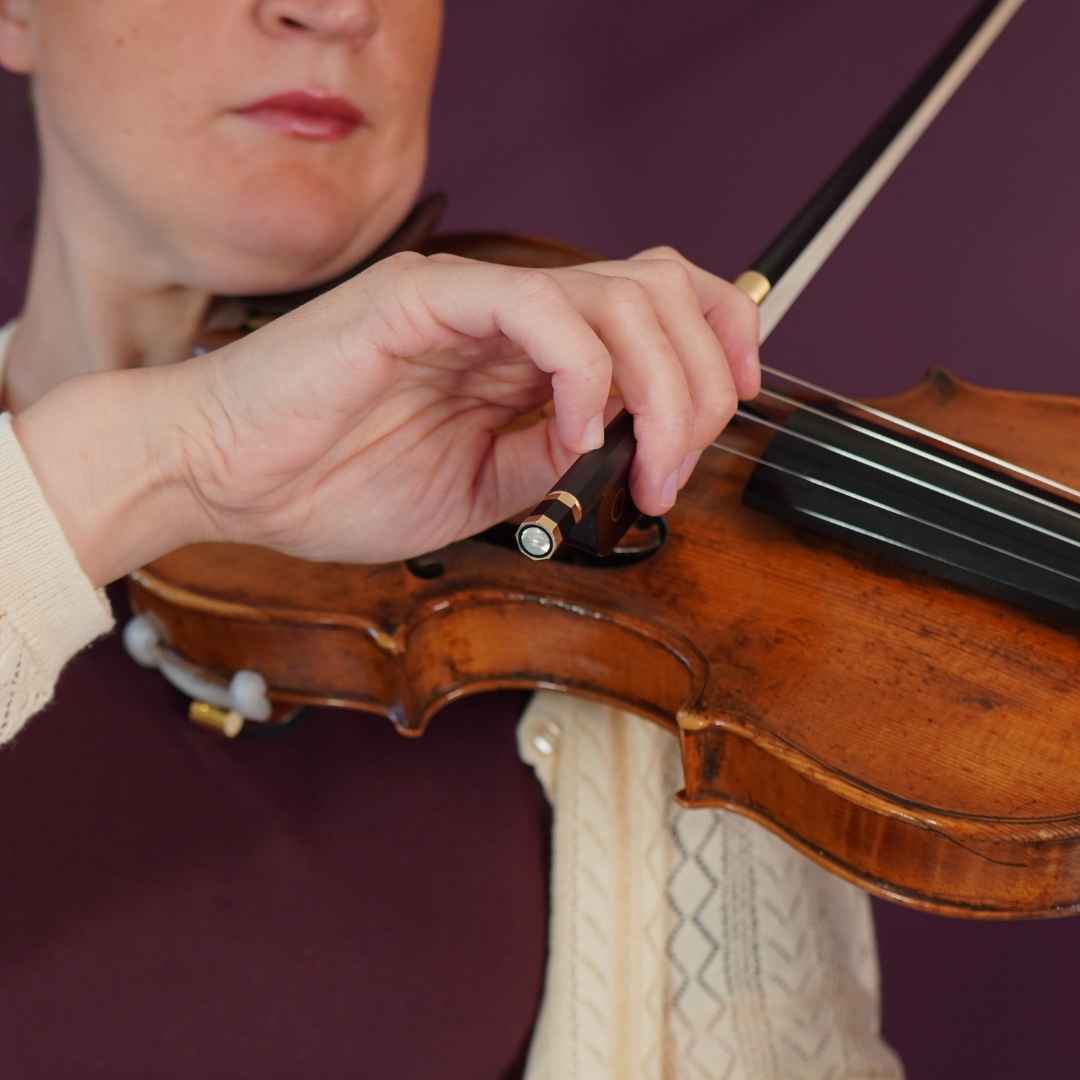
Violin bow hold at the tip
At the tip you stretch your fingers without overstretching them. Your wrist goes down a bit, but never collapses.
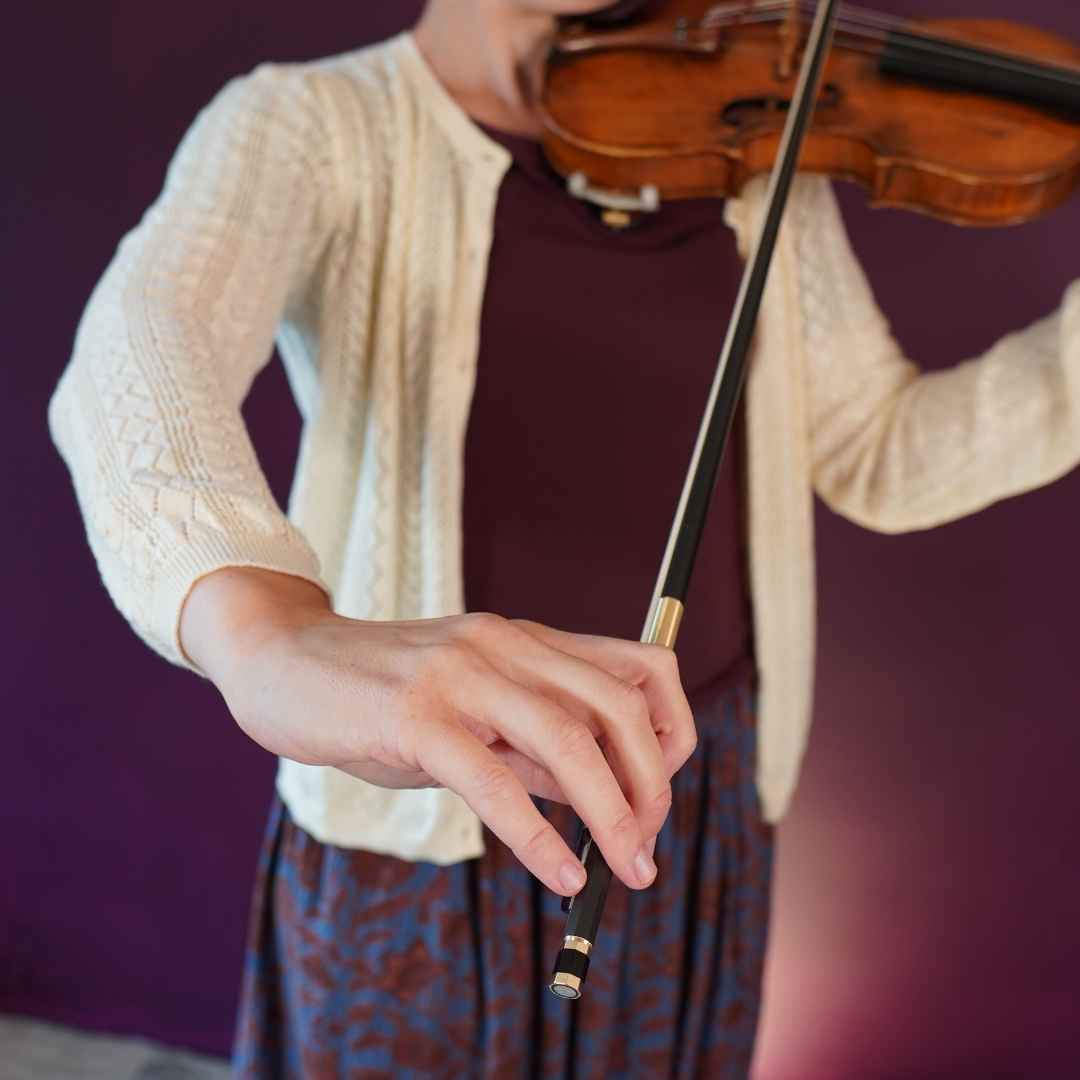
3 Violin Bow Hold Exercises for a Relaxed and Flexible Bow Hold
Now you’ve learned a good bow hold, we can do exercises to ensure that you make the right movements while bowing, so you can make a beautiful sound.
Your fresh violin bow hold might feel a bit weird and it might be hard to relax your hand and maintain a good bow hold while playing. That’s when violin bow hold exercises come in.
To bow smoothly on the violin, we should train the finger movements that you make while bowing separately.
How to practice your violin bow hold
First practice the coming exercises with a pencil, which is a lot less heavier than the violin bow. It’s important to perform the bowing exercises correctly and fluently, not to train immense strength. Training just for power, will give you a tensed bow hold.
When the exercises go well with the pencil, do them in the balance point of the bow (which is usually about 1/3 from the frog). Move bit by bit to the frog all while checking that you still do the movements relaxed and fluently. If you tense up, go back to the balance point or the pencil.
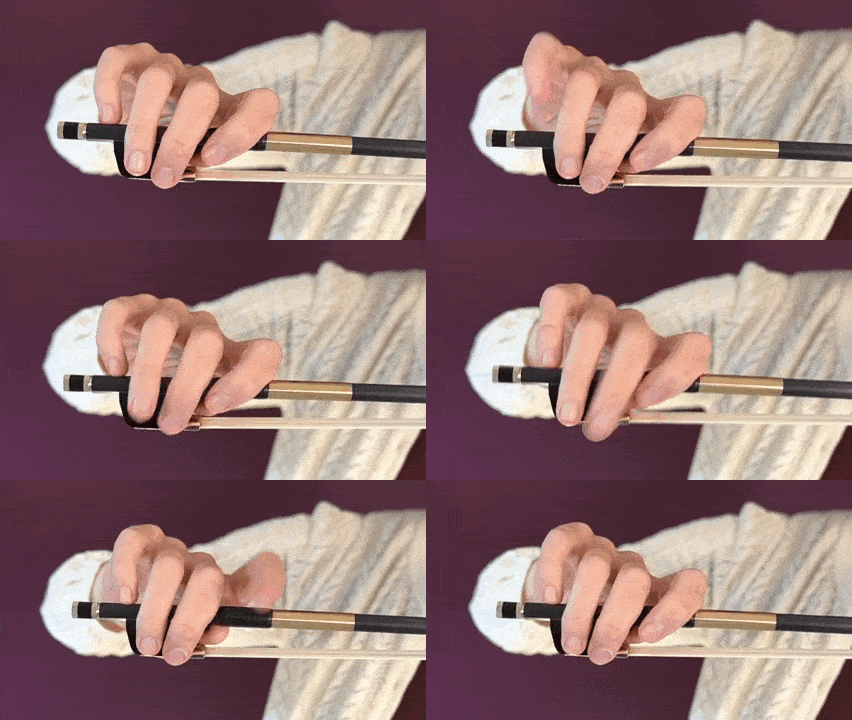
Tap the violin bow
Tap each finger a couple of times (pinky, middle fingers, index finger) while your hand is in the bow hold. This will relax your hand and train your fingers to move independently:
Bridge
There are two ways to do this famous exercise. For stability of the bow hold, do it with your lower arm and wrist. For pinky strength move just your pinky like this:

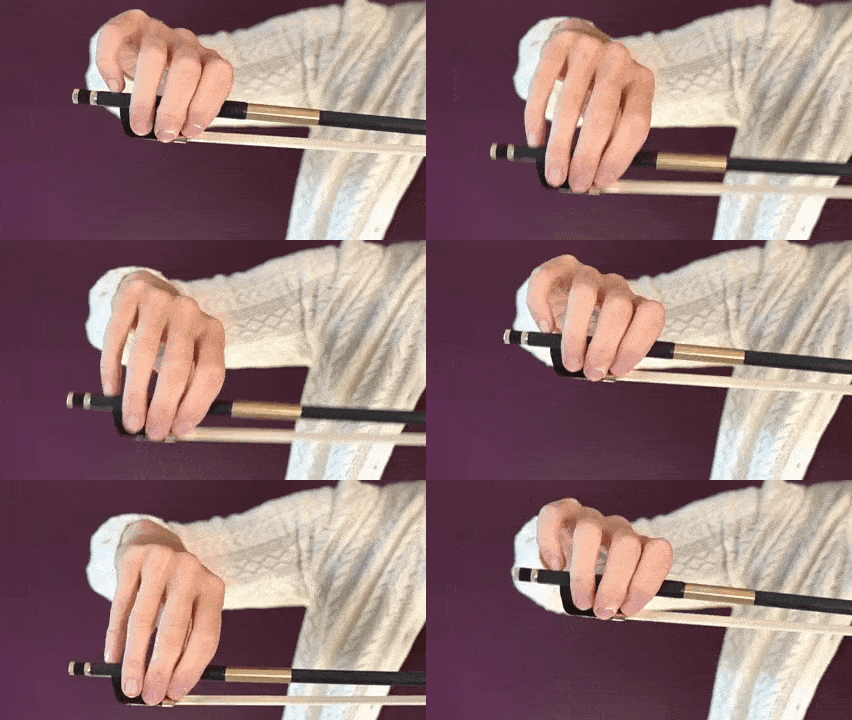
Vertical bowing movements
Practice the vertical finger action in your violin bow hold:
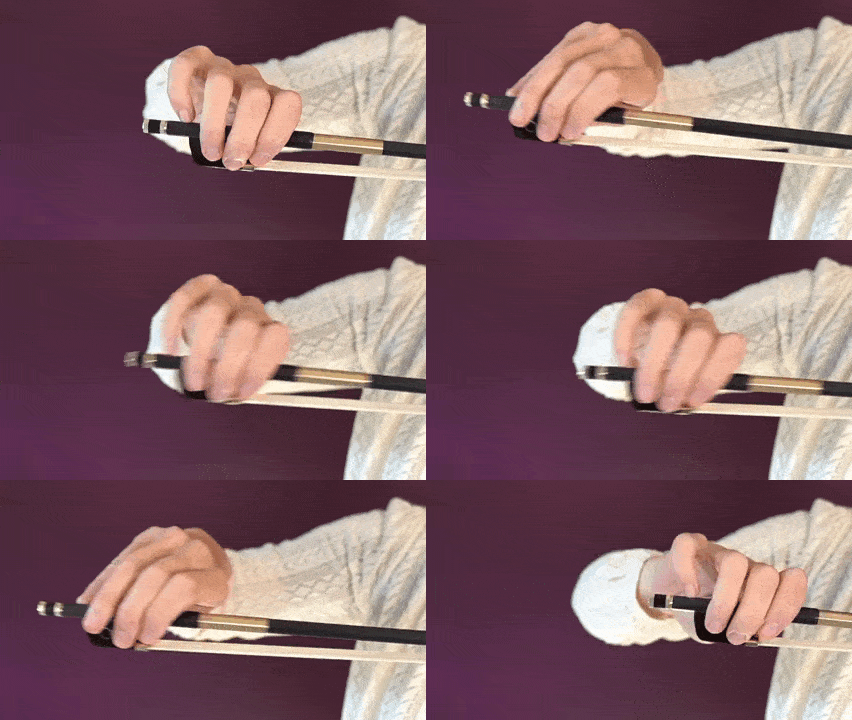
Horizontal bowing movements
Practice the horizontal finger action in your violin bow hold:
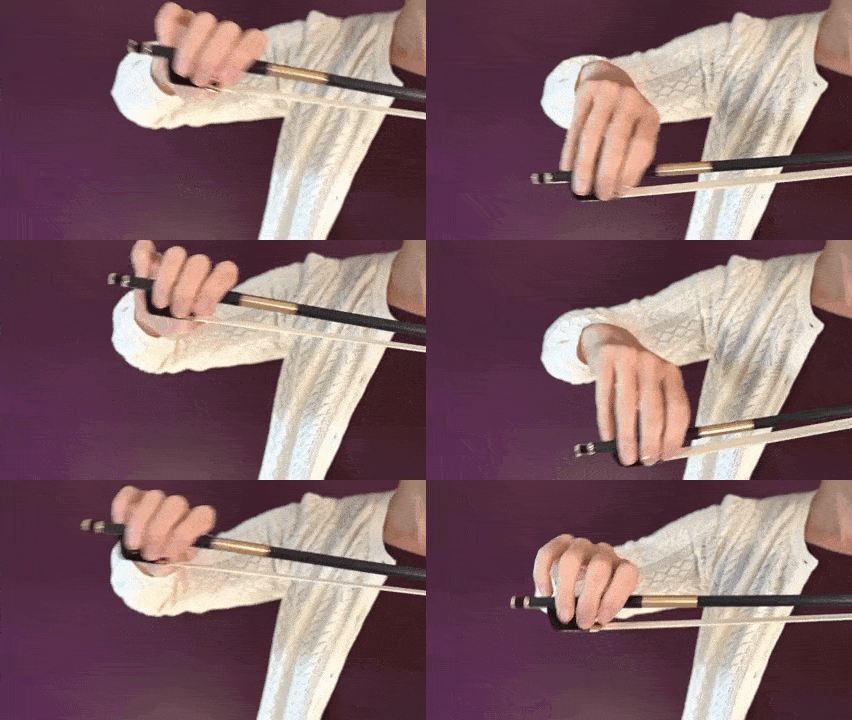
Circular movements
Combine the horizontal and vertical movements in a circular motion:
Pronation and Supination
You might have heard violinists say something like ‘put weight into the bow’ or ‘lift weight off the bow’.
In the standard violin bow hold the hand is tilted slightly towards your index finger. The index can be placed slightly further up the bow for more control.
Your index finger is very important while bowing. You transfer the weight from your arm through your index finger into the bow to create a full and deep sound on the violin. This feels like your arm is resting on your index finger without pushing.
Like you would turn a key to the left you can put more or less weight on the bow. By tilting the hand towards the pinky you lift weight off the violin.
It makes a lot of sense to practice this movement separately.

Hi! I'm Zlata
Classical violinist helping you overcome technical struggles and play with feeling by improving your bow technique.
Finding your Perfect Violin Bow Hold
As a beginner violinist the violin bow hold can seem simple, but it can be so hard to do yourself. Don’t worry if it takes you a long time. Building up good basics in violin playing is very rewarding over time.
All violinists need to find a violin bow hold that’s perfect for their hand. It’s highly personal. This article gives you the general principles and some great exercise to develop your natural bow hold.
Interested to learn more about violin bowing? You’ll LOVE this:
When you’re a bit used to your violin bow hold, you can focus on learning to bow smoothly and create a beautiful sound. This video is all about smooth bowing.
You might have heard of different violin bowing techniques like detaché, martelé, staccato and spiccato. What to learn first? This video teaches you all about the six basic bow strokes.

This was a really helpful article!
While doing the Franco-Belgian bow hold, is there any hard and fast rule about the middle or the index finger being opposite the thumb, or does that vary from player to player?
At varies per player, but generally the index finger is opposite the thumb.
Great info. Thanks. The details are so clear
Glad it’s helpful!
That’s incredible, really appreciate this lesson, recently I begin learning, but I have a lot of problems with my hand and the position, I will try with your exercises. Thanks so much.
Happy practicing!
Well put together with great info and presentation! Thanks very helpful! Do you have similar info on other postural musts. I constantly feel I am fighting a sore neck. I have tried a few shoulder rests and changed out my chin rest, with some success, but still just don’t feel comfortable (mostly feel like I am squeezing to hard with a cocked neck and chin pressure) and the biggest result of practice is a sore neck and back, LoL.
Certainly! Just use the search function on the top right of my website.