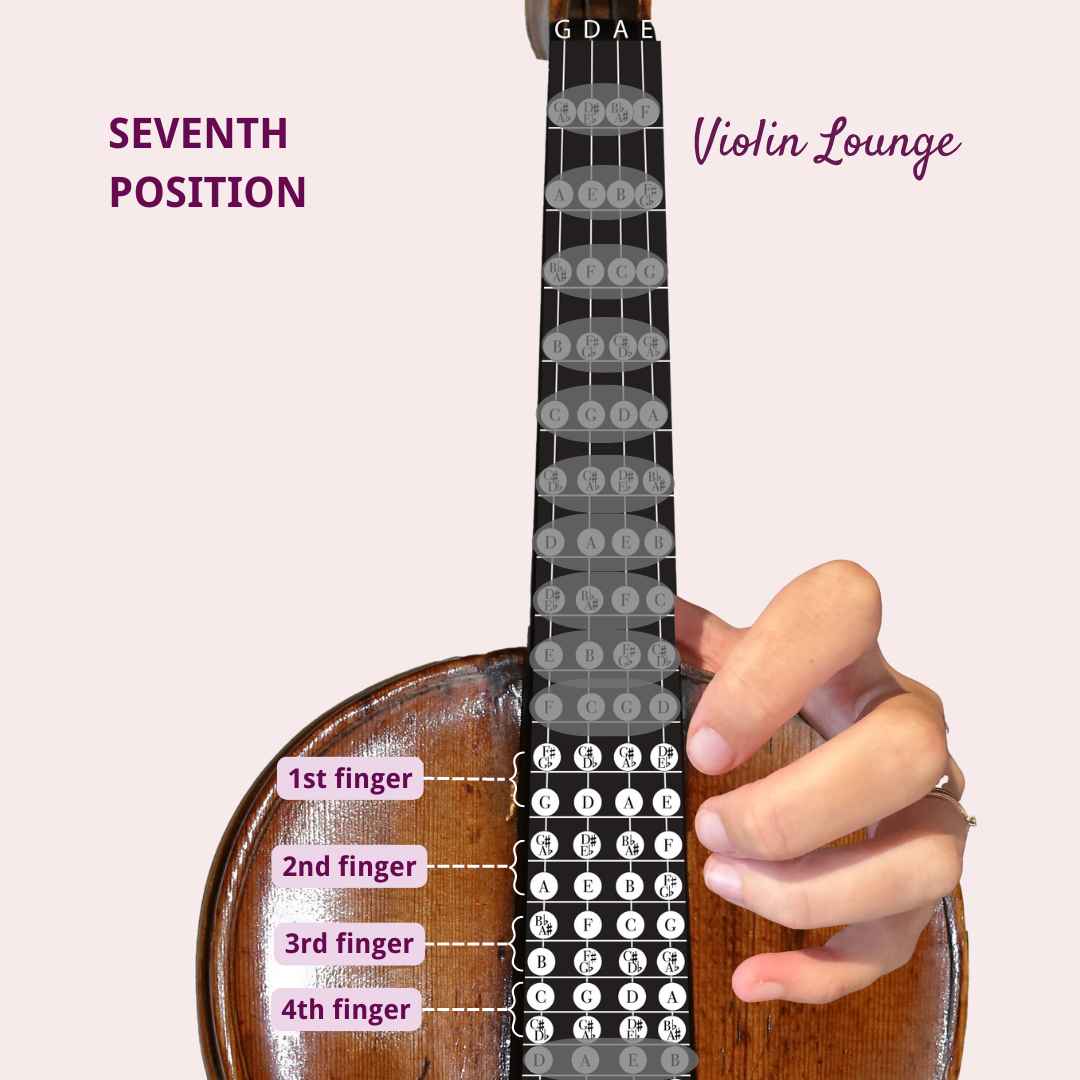
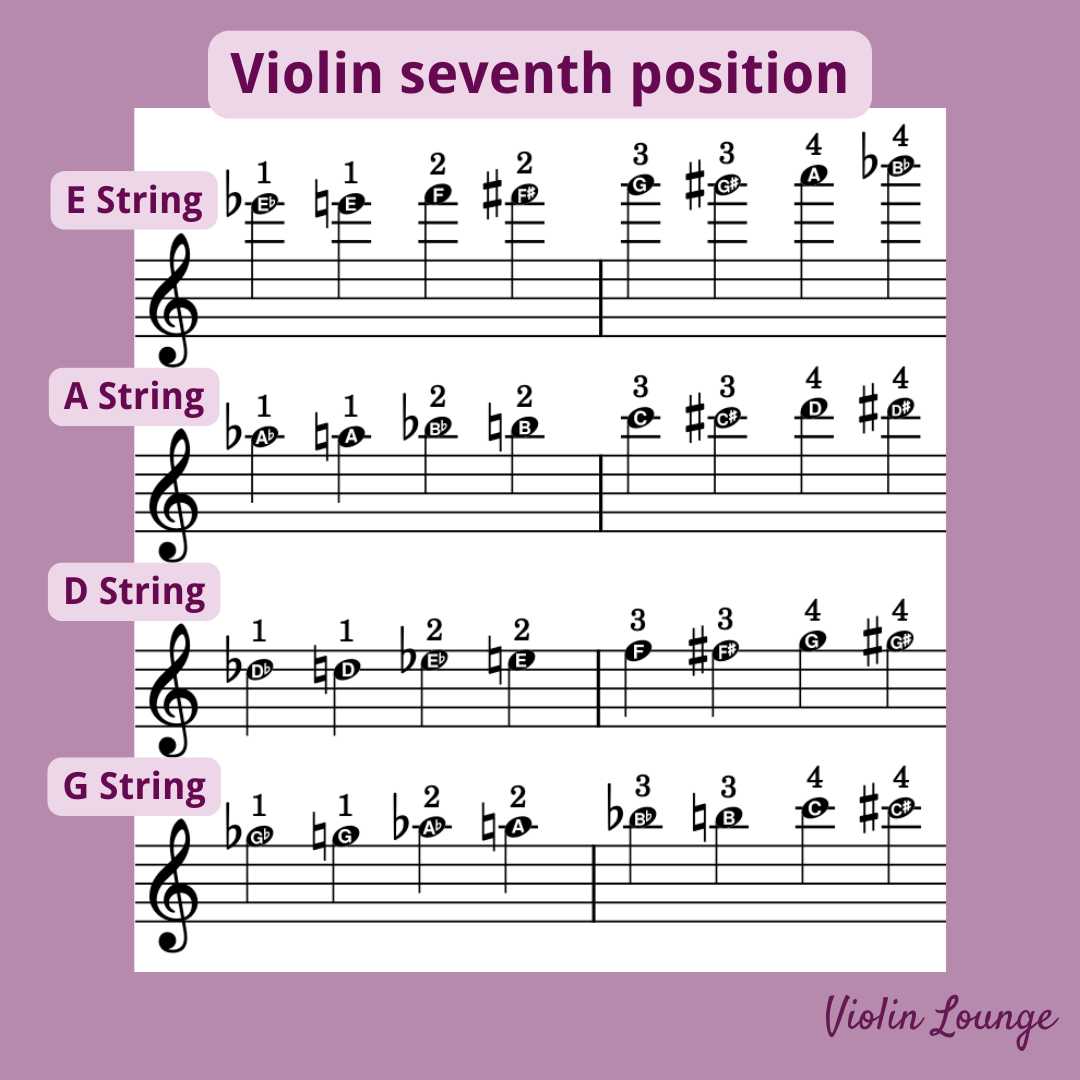
Violin Fifth Position – all notes, finger chart and exercises

Finding Fifth Position

Tricks to find the fifth position on the violin

Fifth position is one of the easier ones to find, despite being so high. Here’s one trick you can use: in fifth position your wrist will be up against the edge of your violin. In all the lower positions, first finger and your left thumb can be across from each other. Starting from fifth position, however, the thumb stays touching the heel of the violin while first finger moves forward to bring the hand up around the instrument.

Here’s another trick if you’re playing “regular” fifth position (E on G string, B on D string, F# on A string, or C# on E string): first finger will be directly over the “purfling”, or decorative black edge, of your violin.

If you have already learned third position, it is easy to fifth from there: just shift first finger to where your third finger is in third position.

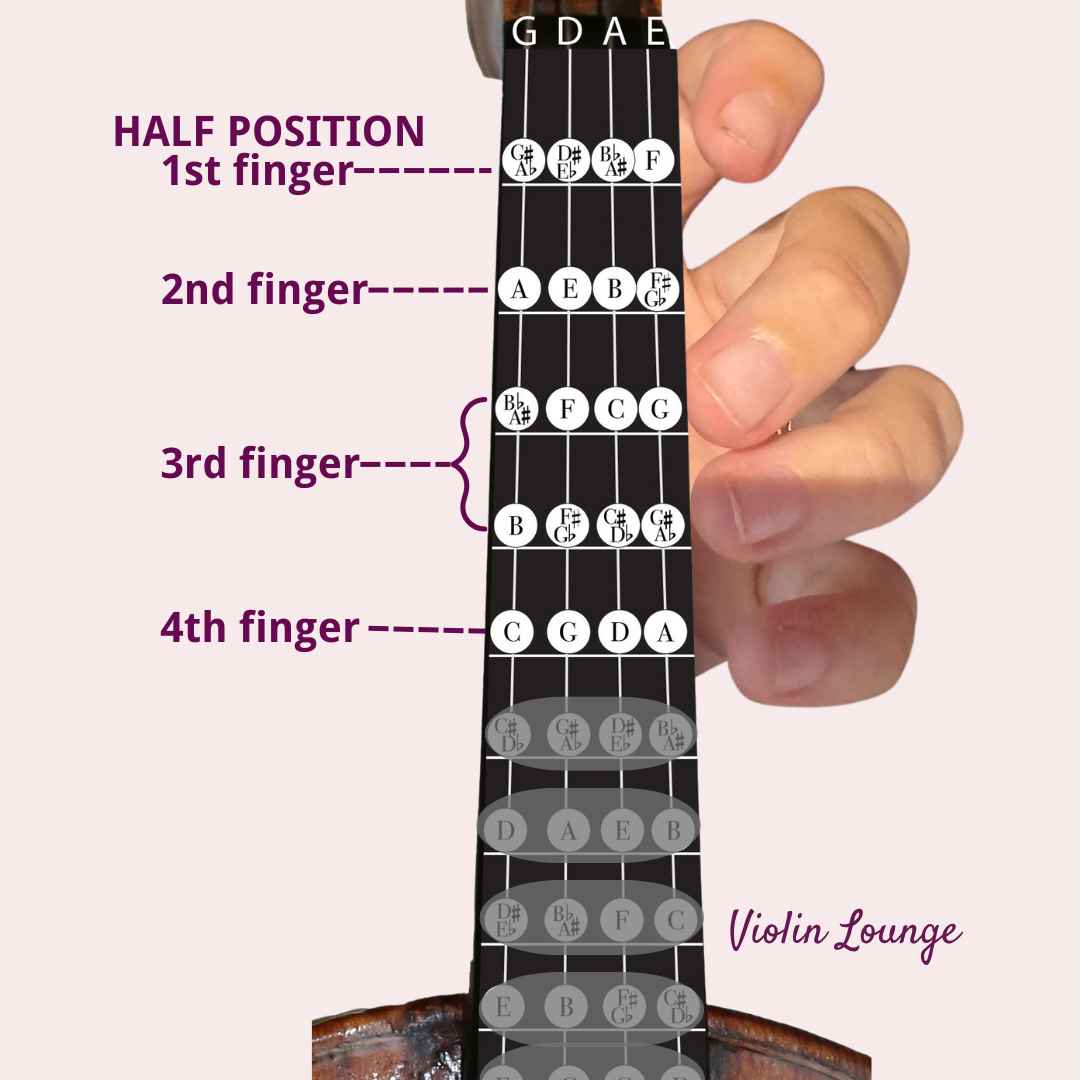
Finger Chart of Fifth Position

As we alluded to above, fifth position can start in slightly different places depending what key you are in. Here we show the full possibilities:

Notes in Fifth Position

The full chromatic range of notes you can play in fifth position is as follows, starting from “low” fifth position:
G string: D#/E♭, E, F, F#/G♭, G, G#/A♭, A
D string: A#/B♭, B, C, C#/D♭, D, D#/E♭, E
A string: F, F#/G♭, G, G#/A♭, A, A#/B♭, B
E string: C, C#/D♭, D, D#/E♭, E, F, F#/G♭

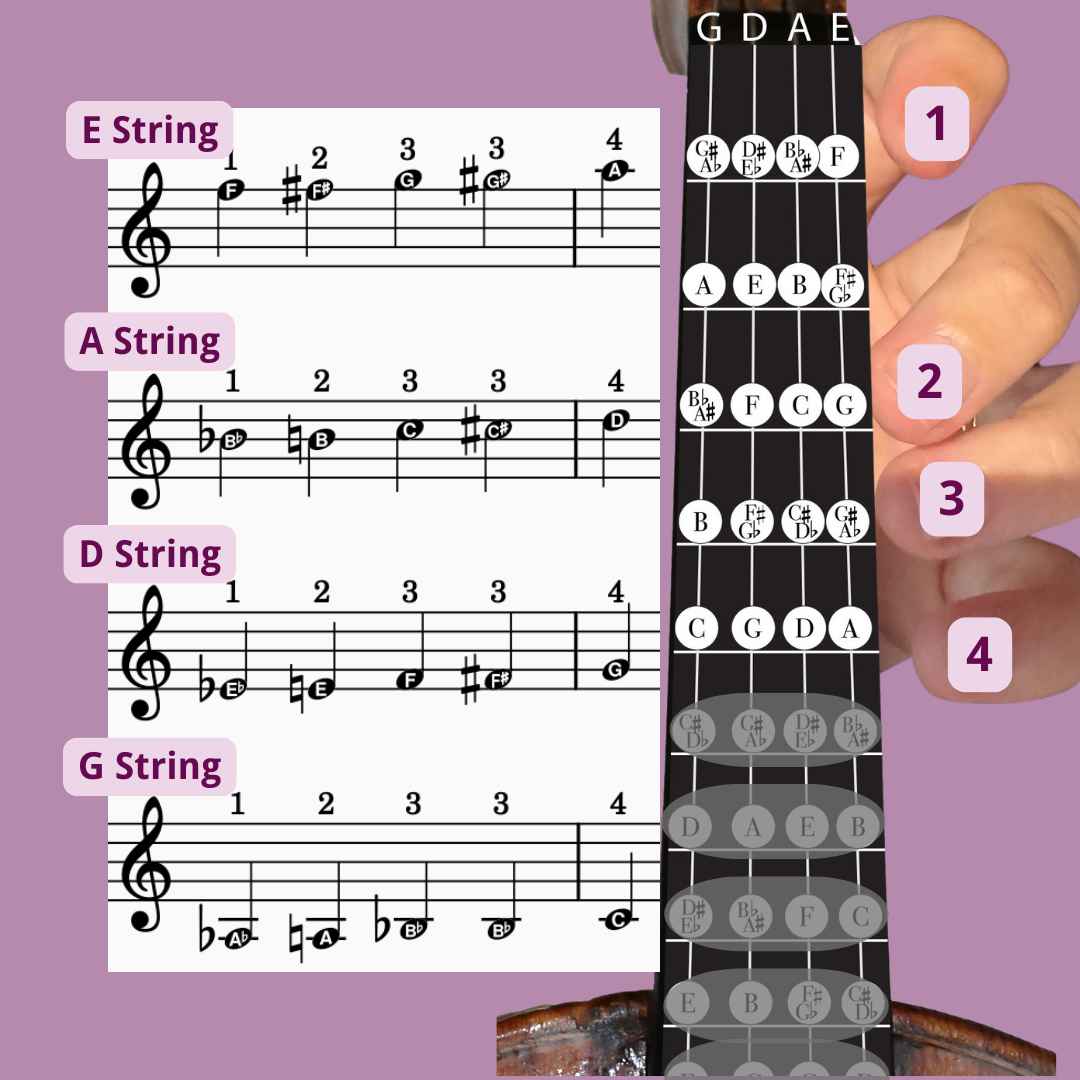
Sheet music of the fifth position

This is what the fifth position notes look like in violin sheet music. I’ve chosen between notes that are enharmonically the same. Of course if a F# is possible, a Gb is possible too (also see the finger chart above).

Example of Fifth Position

Meditation de Thais by Jules Massenet is a wonderful violin solo for exploring fifth position. It’s short, beautiful, and just challenging enough for someone at this stage without being overwhelming. It will really help you learn the fifth position notes on each string. Watch this video of Augustin Hadelich playing it, and see if you can catch the fifth position passages. Then watch the score video to see where fifth position is marked.

Fifth Position in Sheet Music

Aside from third, fifth position is the most common higher position. Being able to play in third and fifth will greatly widen your horizons. Here’s some great examples of fifth position etudes to help you learn this skill:

How to Learn Fifth Position

To learn fifth position, remember the same tips we learned in the third position article. It is especially important to have a loose left thumb since your other fingers will have to move forward independently of the thumb. Also remember that finger spacing is slightly closer together the higher up the instrument you go.

Shifting straight from first to fifth position is a big jump. I recommend dividing the labor while learning where the position is for the sake of smoothness and stability. For example, you can practice playing a whole A Major scale on the A string just by shifting. As you go up the scale, shift to third position on the D and fifth position on the F#. You can do this to practice shifting on every string.

As you get more comfortable, do sliding shifts: starting with first finger in first position, gently slide up to fifth position, as you should always leave your gide finger on the string during a shift. Do it with the bow so you can hear the slide and know when you get to the top. Do it slowly at an even speed to learn the feel of shifting.

But how do you hide such a big slide later? The trick is to move the finger smoothly but quickly, barely touching the string, in between bow strokes or while moving the bow very slowly so no sound is heard. However, depending on the piece you may want a somewhat audible slide, which is often stylistic.

What are tips and experiences learning fifth position? Let me know in the comments!


Violin Fourth Position – all notes, finger chart and exercises

Fourth Position: the most neglected position on the violin

Most violinists study fourth position after learning first, third, fifth, and second. At this point you should be getting comfortable shifting around the instrument and reading notes with extra ledger lines! However, often fourth position is just skipped or only touched lightly. This results in avoiding the fourth position, while it can come in really handy when selecting fingering for your piece.

May the fourth be with you!

Let’s learn all about the fourth position and polish up this neglected position.

Where does fourth position start?

For many people, fourth position starts about where their wrist starts to touch the rib of the violin. If you practice this over and over, it can be a good shifting tool. However, for a more exact measurement, fourth position starts where regular fourth finger would be in first position. If you’ve already learned fifth, this is a half step lower. Sometimes you might also start from “low” fourth position on Db, Ab, Eb, or Bb. this is a whole step below fifth position. Use the reference point of the soundbox to get secure in the fourth position. Feel the difference between the hand posture of the third and fourth position.

Finger chart of fourth position

Similarly to second position, the hand frame of fourth changes a lot depending on the need. This chart helpfully shows which fingers should be used on each note:

Notes in Fourth Position

The full chromatic range of notes you can play in regular or low fourth position are as follows:
G string: D♭, D, D#/E♭, E, F, F#/G♭, G
D string: A♭, A, A#/B♭, B, C, C#/D♭, D
A string: E♭, E, F, F#/G♭, G, G#/A♭, A
E string: B♭, B, C, C#/D♭, D#/E♭, E

Sheet music of the fourth position

This is what the fourth position notes look like in violin sheet music. I’ve chosen between notes that are enharmonically the same. Of course if a F# is possible, a Gb is possible too (also see the finger chart above).

Example of Fourth Position

The Prelude from J.S. Bach’s famous Partita No. 3 opens in fourth position. In this video of Midori, you can clearly see how she plays the first six notes in fourth before shifting to open E.

Fourth Position in Sheet Music

Here are some etudes and pieces that can help you get comfortable with fourth position:

How to Learn Fourth Position

Although it may seem tricky at first, you will be surprised how useful fourth position is. Like second position, it fills in the passages that are awkward to play in third and fifth. For general shifting tips, check out my articles on third and fifth position. Here’s a few helpful things specific to fourth position:

Depending on the key, fourth position in particular changes a lot between “low” and “regular” fourth position. “Low” is helpful for keys like Bb or Eb Major, while “regular” is great for E Major. You will use fourth position A LOT for these keys.

Practice slide-shifting to fourth positon by playing a one octave scale on each string. For example, on a string play A, B, C#, D in first position, then shift to fourth on E. Your fourth finger will end on A.

Fourth finger in fourth position will land on a harmonic. A harmonic means that you don’t have to press the string down, just touching it gently creates a beautiful clear tone. Use harmonics in fourth position to check if you are in tune.


Hi! I'm Zlata

Classical violinist helping you overcome technical struggles and play with feeling by improving your bow technique.

Learn to play in tune in the fourth position

You might have stumbled upon this blog post, because you discovered that you neglexted the fourth position in your violin studies and want to improve it.

I personally have sort-of-ignored the fourth position and have avoided it for a long time. It took exercises in the style of Paganini to get it solid for me and now I’m happy that I have the fourth position in my tool box. It can come in so handy when choosing fingerings in your pieces.

Great exercises to get reliable intonation in the fourth position are left hand pizzicato exercises, double stop arpeggios, shifting exercises. stretches, glissando scales, artificial harmonics and velocity exercises.

In my online membership Paganini’s Secret, there’s a whole module all about the fourth position which will improve your playing guaranteed. Check it out and register right here.

What are your tips specifically for fourth position? What are the biggest challenges for you? Let me know in the comments!

Top 7 Musical instruments for infants and toddlers

Nurture your child’s musical talent by singing and playing with these musical instruments picked by a music teacher

Sing with your child

From birth to the age of seven children are most sensitive to music and musical activities pay off most in terms of cognitive development. This is why it’s so important to sing with your child and play with instruments.

The best is to sing simple songs and move on the beat by clapping or tapping or using a musical instrument.

As an early childhood music teacher I’ll list my favorite musical instruments for infants, toddlers and preschoolers

We’ll discuss:

  1. The voice
  2. Maracas
  3. Egg shakers
  4. Claves
  5. Guiro
  6. Tambourine
  7. Wrist bells

And as a bonus I will mention scarves and play silk.

#1 The voice

Yes, the human voice, preferably the one they’ve heard when still in the womb (that’s yours, mom!), is the best musical instrument for babies and toddlers. No matter how you judge your singing or musical abilities, you are the greatest rockstar to your child.

Singing and seeing how your child starts to respond and sing along is the best way to stimulate imitation and musical development. Besides that it’s a great way to bond and regulate emotions.

If you want to learn more, read this book ‘the Lullaby Effect: the science of singing to your child’ by Anita Collins.

#2 Maracas

Have one hand hold the maraca and the other hand face palm up. With a fluent large movement, tap the maraca on the palm of the other hand. When you sing with your child, tap the beat.

Don’t hold the arm of your child and force the movement on the beat. Rather tap their knee when they’re on your lap and encourage them to play the maraca themselves. In that way they learn to keep a steady beat from the inside out and really feel that beat.

#3 Egg shaker

Egg shakers are easy to hold for infants and toddlers. You can use just one hand and shake the egg in the air. You can also, just as described with the maracas, have one hand palm up and then tap the shaker with the other hand.

An alternative is to use two egg shakers, one in each hand and move the hands simultaneously up and down or one up and the other down interchangably.

Remember to use the egg shaker always in combination with singing and tapping the beat to what you’re singing together.

#4 Claves

Claves require slightly more coordination, so it might take your toddler some time to be able to do this in the beat while singing.

Hold one stick with one hand and with the other hand, just like the maracas, make a large fluent movement and tap the other stick.

Quality claves give a beautiful sound. 

#5 Guiro (frog)

These cute wooden frogs immediately spark curiosity. As a violin teacher this might just be my favorite musical instruments for infants and toddlers as the movement practices the coordination skills for bowing technique on the violin.

The movement is a bit more complex than of the musical instruments above, so don’t be surprised that it could take a three year old some practice. Be sure to hold the guiro still in one hand and make large fluent round movements with the other hand holding the stick. The stick should land on the guiro, glide over it’s back and then continue in it’s circular movement.

#6 Tambourine

I love the combination of a hand drum and tambourine as it makes two different sounds simultaneously: the bells and the drum itself. It can be played with a drum stick or with the hand.

Holding the tambourine in it’s place and drumming with the other hand takes some coordination. Toddlers can definitely learn to do this while singing. Infants might have the tambourine on their lap and then drum with one or both hands.

#7 Wrist bells

This musical instrument is even suitable for babies who can’t even sit. Wrap them around the wrist or the ankles and amaze your little one. For babies you could perhaps start with soft rattle socks as they’re better fitting and less heavy.

Toddlers can dance and walk around with the bells around their wrists and/or ankles making this instrument very suitable for circle games. On the beat you can walk in a circle and walk in and out.

Bonus: scarves or play silks

Technically it’s not a musical instrument as it doesn’t make sound, but it’s great to use when singing: scarves or play silks. While Instagram moms are discovering play silks as the latest open ended toy trend, we music teacher know of the magic of scarves for much longer.

What I like about scarves is that they flow and they give a totally different sensation and movement than the other musical instruments for infants mentioned above. You can use them in so many ways: wave them from side to side on the beat, throw them in the air and let them land on a resting tone, dance with them, move them along musical phrases etc. 

Hi! I'm Zlata

Classical violinist helping you overcome technical struggles and play with feeling by improving your bow technique.

To teach a child an instrument without first giving him preparatory training and without developing singing, reading and dictating to the highest level along with the playing is to build upon sand.– Zoltan Kodály

Singing with your child is so important for musical development, bonding and the development of language, motor skills, social skills and much more. These beautiful music instruments can enhance this experience and teach your child to keep a steady beat and coordinate movements to music and singing.

As a violinist and a mother it’s my greatest joy to share my love of music with my children.

What’s your favorite musical instrument for infants and toddlers?

Violin Third Position – all notes, finger chart and exercises

Learning the third position on the violin really opens some possibilities

If you’ve just recently started doing position work and shifting, you’re most likely working on third position. It is absolutely one of the most commonly used violin positions. The finger spacing is comfortable, and the basic third position hand frame uses the same scales as first position. Many teachers also consider it the best way to initially learn vibrato, which we will touch on later.

Finding third position

Third position starts about half way between the fingerboard nut and the edge of the violin (also called the “purfling”). Your palm, wrist, and arm are able to hang down freely, elbow pointing at the ground. To find it, slide your first finger on A string from B up to D. This is the start of third position, where third finger would normally be.

Finger chart of third position

This chart will help you visualize and understand the third position and it’s left hand posture:

Notes in Third Position

The full chromatic range of notes you can play in third position are as follows:
G string: C, C#/D♭, D, D#/E♭, E, F, F#/G♭
D string: G, G#/A♭, A, A#/B♭, B, C, C#/D♭
A string: D, D#/E♭, E, F, F#/G♭, G, G#/A♭
E string: A, A#/B♭, B, C, C#/D♭, D, D#/E♭

Sheet music of the third position

This is what the third position notes look like in violin sheet music. I’ve chosen between notes that are enharmonically the same. Of course if a F# is possible, a Gb is possible too (also see the finger chart above).

Example of Third Position

Once you get past beginning stages, third position is INCREDIBLY common in all levels of violin repertoire. It is crucial to understand sheet music markings to know when third position is required or encouraged. It is often used for more lyrical passages, to avoid awkward string crossings, or to create a different color. In some cases, playing third position is often a performer’s personal choice.

As an example, if you see a 1 written where you would put third finger in first position, shift to third. If you use the finger chart above to learn the notes in third position, you will be able to tell when to shift and what finger goes with each note.

Here is a clip from the famous piece Czardas by Vittorio Monti. Most of this piece’s fast section is in third position. Notice how this makes string crossing easier and allows for higher notes. Make sure to start the video at 2:40.

Exercises and pieces in the third position

As noted above, third position is everywhere! It is so easy to find long examples of it in many pieces. Here are some great exercise books and pieces that will help you strengthen this skill:

There are many intermediate student concertinos you can play when you get proficient in first and third position. Here’s a list of 34 student concertinos in first and third position plus free sheet music.

How to Learn Third Position

It is so important to nail the first to third position shift. If you have not shifted before, here’s a few tips to keep in mind:

  1. Allow your left thumb to be loose and flexible. Gripping the neck prevents shifting and causes injury.
  2. When you shift, don’t just slide the finger. Allow your entire lower arm, wrist, and hand to move as one.
  3. Keep the finger you are shifting just slightly (but not tightly) touching the string for a smooth motion.
  4. When practicing slow shifts, do not overshoot the shift. It’s okay to slide up slowly at first, but overshooting will teach you to play out of tune.
  5. Keep your other fingers close to the fingerboard for speed and to maintain hand frame.

A great way to start learning the notes of third position is to play one-octave scales. The basic scales of third position (C major, G major, and D major) match the ones you learned early in first position. They will sound familiar and have easy fingering patterns. To play the D Major scale in third position, start with first finger on A string and go all the way up to fourth finger on E string. As you learn the notes, you will start to notice some pretty cool relationships between first and third positions. What are some things you notice already?

Note on Harmonics

Third position is also when you begin using natural harmonics. The harmonic series is a musical and physical phenomenon. We won’t go into the science here, but basically, if you rest your finger on the surface of the string at its exact midpoint, it produces a pure, ringing tone. You do not even have to push your finger down! This happens because of the equivalent vibrations in the two sides of the string. There are several different sets of natural harmonics on violins, but dividing the string in half is the main one. The note produced is one octave higher than its corresponding open string. (G for G string, D for D string, etc.) Technically, the harmonics are in fourth position, but there are many intermediate pieces in third position that will stretch up for a harmonic, so they are usually taught simultaneously. Read my easy guide to violin harmonics here.

Note on Vibrato

Many more advanced violinists actually find playing third position even more enjoyable than first. Since it is further from the scroll, it is easier to have a loose, relaxed hand. For this reason, some pedagogues teach vibrato through third position. If you started learning vibrato exclusively in first position but have been struggling, try doing your exercises in third position instead! For more help with this, watch my video on learning vibrato on the violin.


Free third position violin course

I’d love to help you further to really learn the third postion and play some beautiful music. Join my FREE third position challenge and we’ll cover:

  • learning to play in tune in the third position
  • shifting back and forth between first and third position
  • scales in the third position
  • play Meditation from Thaïs by Massenet (an easy arrangement I made)

It includes video lessons and sheet music. Click here to join and I hope to see you there.

Violin Second Position – all notes, finger chart and exercises

Second Position: no man’s land on the violin

The second position can feel like no man’s land on the violin. In the first position you have the reference point of the nut and the peg pox. In the third position and higher you have the reference points of the soundbox. While the highest positions are known to be most difficult, it’s actually the second position that a lot of players struggle with to play in tune.

Don’t worry! In this article I will show you exactly where to find the notes in the second position on the violin, the sheet music and how to practice them.

Especially in an orchestra the second position is very useful to decide on handy fingerings. It really pays off to learn. As a student said: upon having an aha moment when discovering the conveniences of second position proficiency, “Wow, it gives me all the shortcuts, like right click on the mouse.”

Finding the second position on the violin

Second position starts where second finger would be in first position. For example, on the A string, second finger goes on C in first position. In second position, you will start on C (or C#, both count.)

Finger chart of second position

This chart will help you visualize and understand the second position and it’s left hand posture:

Notes in Second Position

The full chromatic range of notes you can play in second position are as follows:
G string: A#/B♭, B, C, C#/D♭, D, D#/E♭, E
D string: F, F#/G♭, G, G#/A♭, A, A#/B♭, B
A string: C, C#/D♭, D, D#/E♭, E, F, F#/G♭
E string: G, G#/A♭, A, A#/B♭, B, C, C#/D♭

Sheet music of the second position

This is what the second position notes look like in violin sheet music. I’ve chosen between notes that are enharmonically the same. Of course if a F# is possible, a Gb is possible too (also see the finger chart above).

How will you know when to play in second position?

There will usually be a fingering marked in the music at least for where the shift to second position occurs. Beginning pieces may have the second position fingerings marked for the entire passage. For example, if you see an A in the middle of the staff but there is a three written over it, that means it is in second position. Violin fingerings will always try to minimize shifting, so stay in second position for as long as you can if it helps avoid string crossings or awkward trills.

Exercises and pieces in second position

Second position is less common than first, third, or fifth. It’s used for short passages that would be too uncomfortable or clumsy in first or third positions. Thus there are not many pieces that have extended second position passages, but there are plenty of etudes and scale exercises that focus on strengthening second position. Here are a few good places to start:

Examples of Second Position

Here is an example of what second position looks like while playing. In this under tempo version of the Kabalevsky, you can clearly see her shift to first finger, second position on the A string after the first few measures. Notice how she stays in second position for as long as she can afterwards:

How to Learn Second Position

Second position intimidates many people, but it is not difficult to learn. Many teachers prefer that students learn third position first and then go back to second position. This is a good idea, but if you want or need to play second position, don’t worry whether you have learned third or not. Just make sure you are solid in first position as your basis before adding others.

I suggest learning the finger placement in second position before you practice shifting to it. Since it is a little higher up the fingerboard, the finger spacing will be a bit more narrow. Practice finding both low second position and high second position. In low second position, the first finger should be on B♭, F, C, or G (based on what string you are on). In high second, first finger is on B, F#, C#, or G#.

Initially, it might be a little tricky to understand the hand frames for second position. “Should I use low second position or high second position?” “Does third finger touch second finger or is there a space?” “What do I do for sharps and flats?” don’t panic! Just remember that for a half step, two fingers will always touch and for a whole step, there will always be a space.

Here are a few practice exercises to try:

  • Start on first finger, second position on the A string (a C natural). Put second finger a half step up, touching, on C#. Alternate between the two notes to get used to the spacing. Then move second finger over to D and alternate. Keeping second finger down on D, put third finger on E♭. Alternate two and three. Move third up to E natural and alternate. Continue doing this pattern and try the other strings also until you are comfortable with all the half steps in second position.
  • Here is a shifting exercise. Put first finger, first position on the A string (B natural). With you finger and hand gently leading, slowly slide your arm forward to second position, then back down. Continue the “siren”, keeping the finger in the string the whole time so you can clearly hear the shift. Later, you can lift the finger pressure slightly off the string (but still touching it) to make the shift silent. Tyr this shifting from every finger to its corresponding note in second position.

Note: For shifting, remember to let your left thumb be loose, and let your palm hand down towards the ground rather than gripping the fingerboard. Also be sure to shift your whole arm and hand, instead of just reaching one finger up. This creates tension and won’t help you create a good second position hand frame. Once you have routinely practiced second position, you will be amazed how useful and flexible it is!

Hi! I'm Zlata

Classical violinist helping you overcome technical struggles and play with feeling by improving your bow technique.

Learn to play in tune in the second position

The second position is a weak spot for many violin players, all while it can come in so handy when you’re proficient in it. For me it felt like no man’s land for many years and I always felt insecure and tried to avoid it.

It took exercises in the style of Paganini to get it solid for me and now I’m happy that I have the second position in my tool box.

Great exercises to get reliable intonation in the second position are left hand pizzicato exercises, drone scales, double stop arpeggios, shifting exercises. glissando scales, artificial harmonics and velocity exercises.

In my online membership Paganini’s Secret, there’s a whole module all about the second position which will improve your playing guaranteed. Check it out and register right here.