Violin Second Position – all notes, finger chart and exercises

Second Position: no man’s land on the violin

The second position can feel like no man’s land on the violin. In the first position you have the reference point of the nut and the peg pox. In the third position and higher you have the reference points of the soundbox. While the highest positions are known to be most difficult, it’s actually the second position that a lot of players struggle with to play in tune.

Don’t worry! In this article I will show you exactly where to find the notes in the second position on the violin, the sheet music and how to practice them.

Especially in an orchestra the second position is very useful to decide on handy fingerings. It really pays off to learn. As a student said: upon having an aha moment when discovering the conveniences of second position proficiency, “Wow, it gives me all the shortcuts, like right click on the mouse.”

Finding the second position on the violin

Second position starts where second finger would be in first position. For example, on the A string, second finger goes on C in first position. In second position, you will start on C (or C#, both count.)

Finger chart of second position

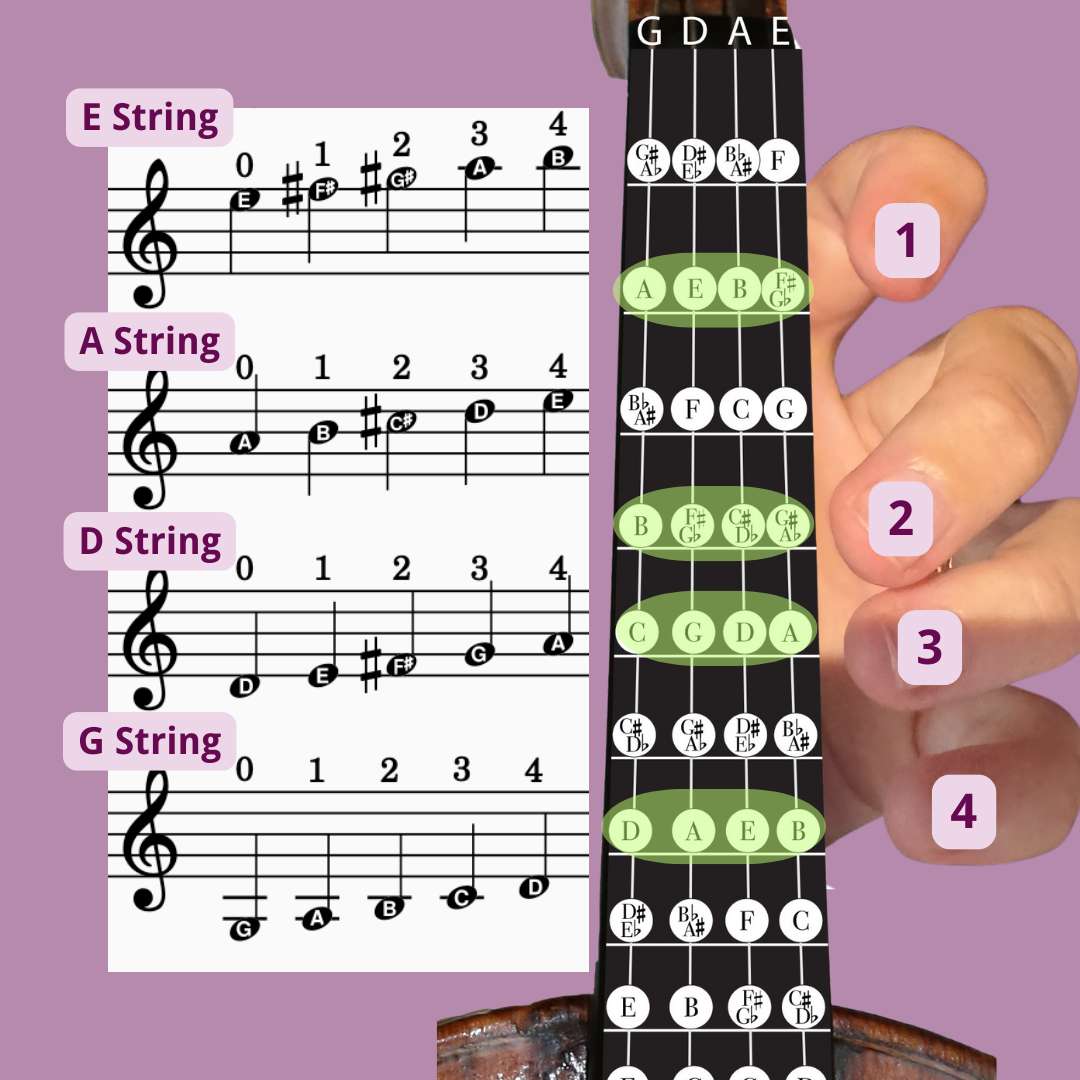
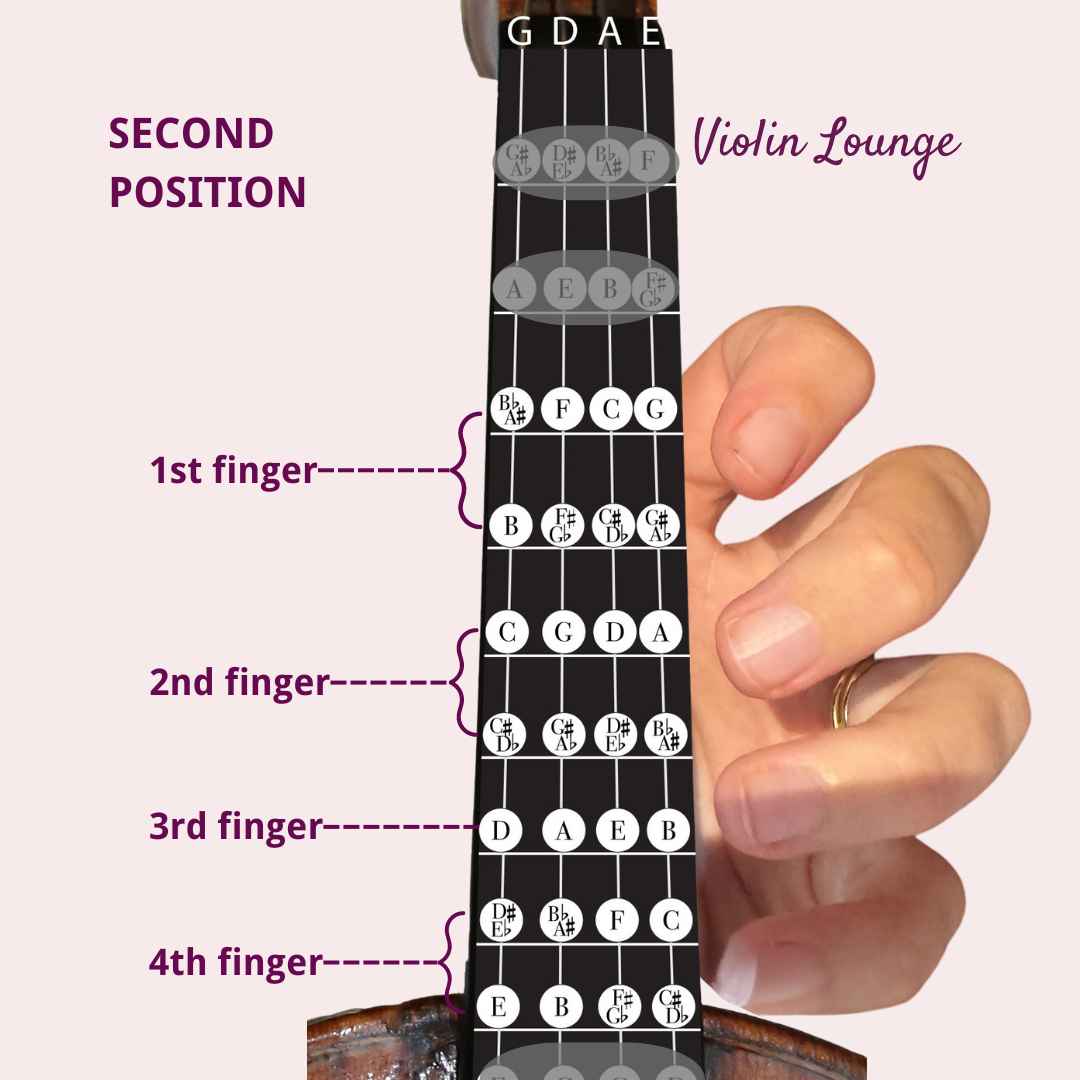
This chart will help you visualize and understand the second position and it’s left hand posture:
Notes in Second Position

The full chromatic range of notes you can play in second position are as follows:
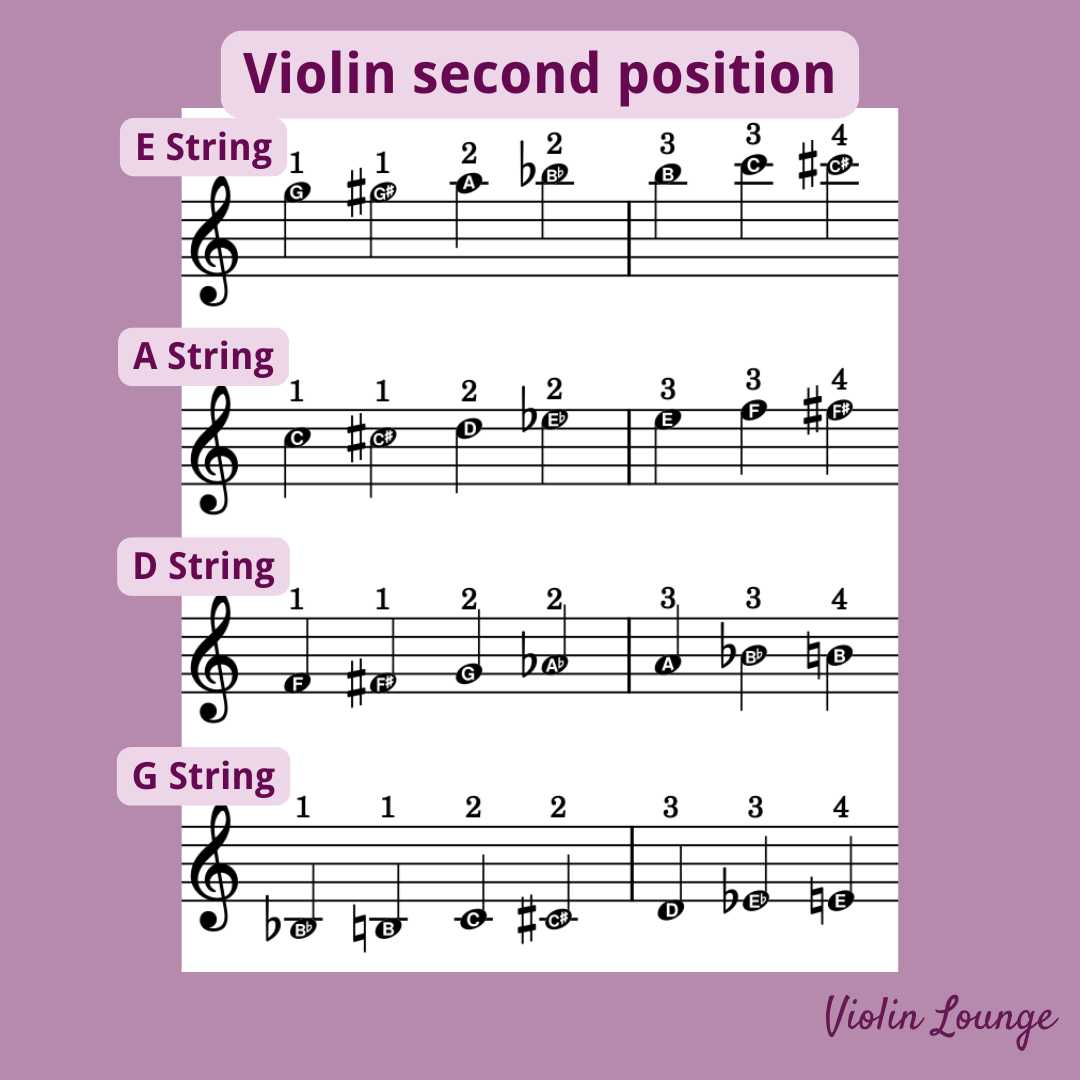
G string: A#/B♭, B, C, C#/D♭, D, D#/E♭, E
D string: F, F#/G♭, G, G#/A♭, A, A#/B♭, B
A string: C, C#/D♭, D, D#/E♭, E, F, F#/G♭
E string: G, G#/A♭, A, A#/B♭, B, C, C#/D♭

Sheet music of the second position

This is what the second position notes look like in violin sheet music. I’ve chosen between notes that are enharmonically the same. Of course if a F# is possible, a Gb is possible too (also see the finger chart above).
How will you know when to play in second position?

There will usually be a fingering marked in the music at least for where the shift to second position occurs. Beginning pieces may have the second position fingerings marked for the entire passage. For example, if you see an A in the middle of the staff but there is a three written over it, that means it is in second position. Violin fingerings will always try to minimize shifting, so stay in second position for as long as you can if it helps avoid string crossings or awkward trills.

Exercises and pieces in second position

Second position is less common than first, third, or fifth. It’s used for short passages that would be too uncomfortable or clumsy in first or third positions. Thus there are not many pieces that have extended second position passages, but there are plenty of etudes and scale exercises that focus on strengthening second position. Here are a few good places to start:

Examples of Second Position

Here is an example of what second position looks like while playing. In this under tempo version of the Kabalevsky, you can clearly see her shift to first finger, second position on the A string after the first few measures. Notice how she stays in second position for as long as she can afterwards:

How to Learn Second Position

Second position intimidates many people, but it is not difficult to learn. Many teachers prefer that students learn third position first and then go back to second position. This is a good idea, but if you want or need to play second position, don’t worry whether you have learned third or not. Just make sure you are solid in first position as your basis before adding others.

I suggest learning the finger placement in second position before you practice shifting to it. Since it is a little higher up the fingerboard, the finger spacing will be a bit more narrow. Practice finding both low second position and high second position. In low second position, the first finger should be on B♭, F, C, or G (based on what string you are on). In high second, first finger is on B, F#, C#, or G#.

Initially, it might be a little tricky to understand the hand frames for second position. “Should I use low second position or high second position?” “Does third finger touch second finger or is there a space?” “What do I do for sharps and flats?” don’t panic! Just remember that for a half step, two fingers will always touch and for a whole step, there will always be a space.

Here are a few practice exercises to try:

  • Start on first finger, second position on the A string (a C natural). Put second finger a half step up, touching, on C#. Alternate between the two notes to get used to the spacing. Then move second finger over to D and alternate. Keeping second finger down on D, put third finger on E♭. Alternate two and three. Move third up to E natural and alternate. Continue doing this pattern and try the other strings also until you are comfortable with all the half steps in second position.
  • Here is a shifting exercise. Put first finger, first position on the A string (B natural). With you finger and hand gently leading, slowly slide your arm forward to second position, then back down. Continue the “siren”, keeping the finger in the string the whole time so you can clearly hear the shift. Later, you can lift the finger pressure slightly off the string (but still touching it) to make the shift silent. Tyr this shifting from every finger to its corresponding note in second position.

Note: For shifting, remember to let your left thumb be loose, and let your palm hand down towards the ground rather than gripping the fingerboard. Also be sure to shift your whole arm and hand, instead of just reaching one finger up. This creates tension and won’t help you create a good second position hand frame. Once you have routinely practiced second position, you will be amazed how useful and flexible it is!
Hi! I'm Zlata

Classical violinist helping you overcome technical struggles and play with feeling by improving your bow technique.

Learn to play in tune in the second position

The second position is a weak spot for many violin players, all while it can come in so handy when you’re proficient in it. For me it felt like no man’s land for many years and I always felt insecure and tried to avoid it.

It took exercises in the style of Paganini to get it solid for me and now I’m happy that I have the second position in my tool box.

Great exercises to get reliable intonation in the second position are left hand pizzicato exercises, drone scales, double stop arpeggios, shifting exercises. glissando scales, artificial harmonics and velocity exercises.

In my online membership Paganini’s Secret, there’s a whole module all about the second position which will improve your playing guaranteed. Check it out and register right here.

Read all my violin position blog posts:

Violin First Position – explained with finger charts, notes and videos

What is the first position on the violin?

First position is the easiest position to find on the violin and the first you learn. The notes of the first position start one note above the open string. For example the first finger (index finger) on the A string is placed on the note B. The further fingers are placed one note higher for each finger. In the first position your hand is located at start of the fingerboard near the peg box.

In this blog you’ll listen and see all the notes in the first position and learn how to find them on the fingerboard.

Within the first position you can move your finger half tones, which means there are different finger frames in the first position.

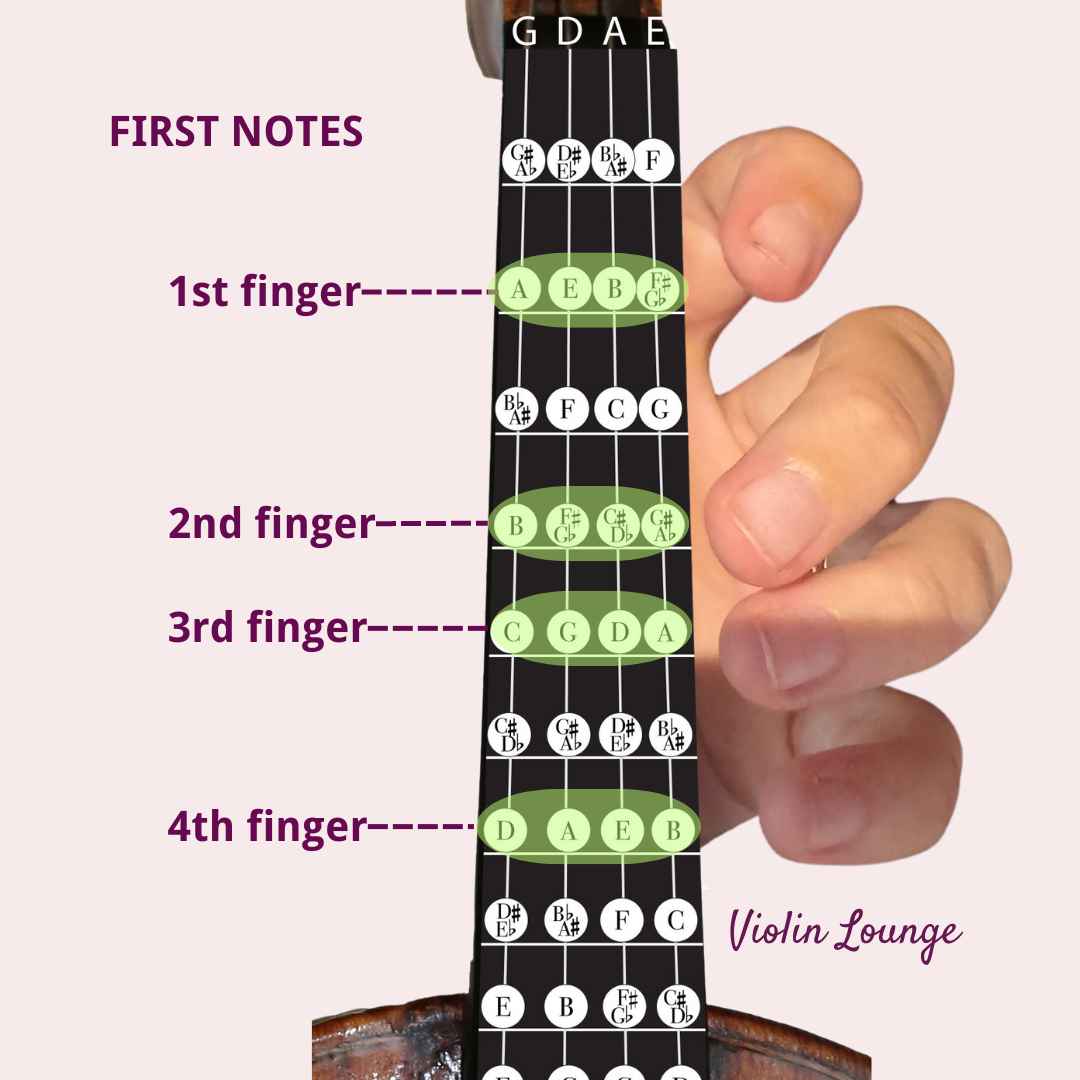
I’ll start explaining the first notes (first frame) you learn on the violin. See the finger chart below. After that we’ll discover more notes in the first position.

First notes you learn on the violin

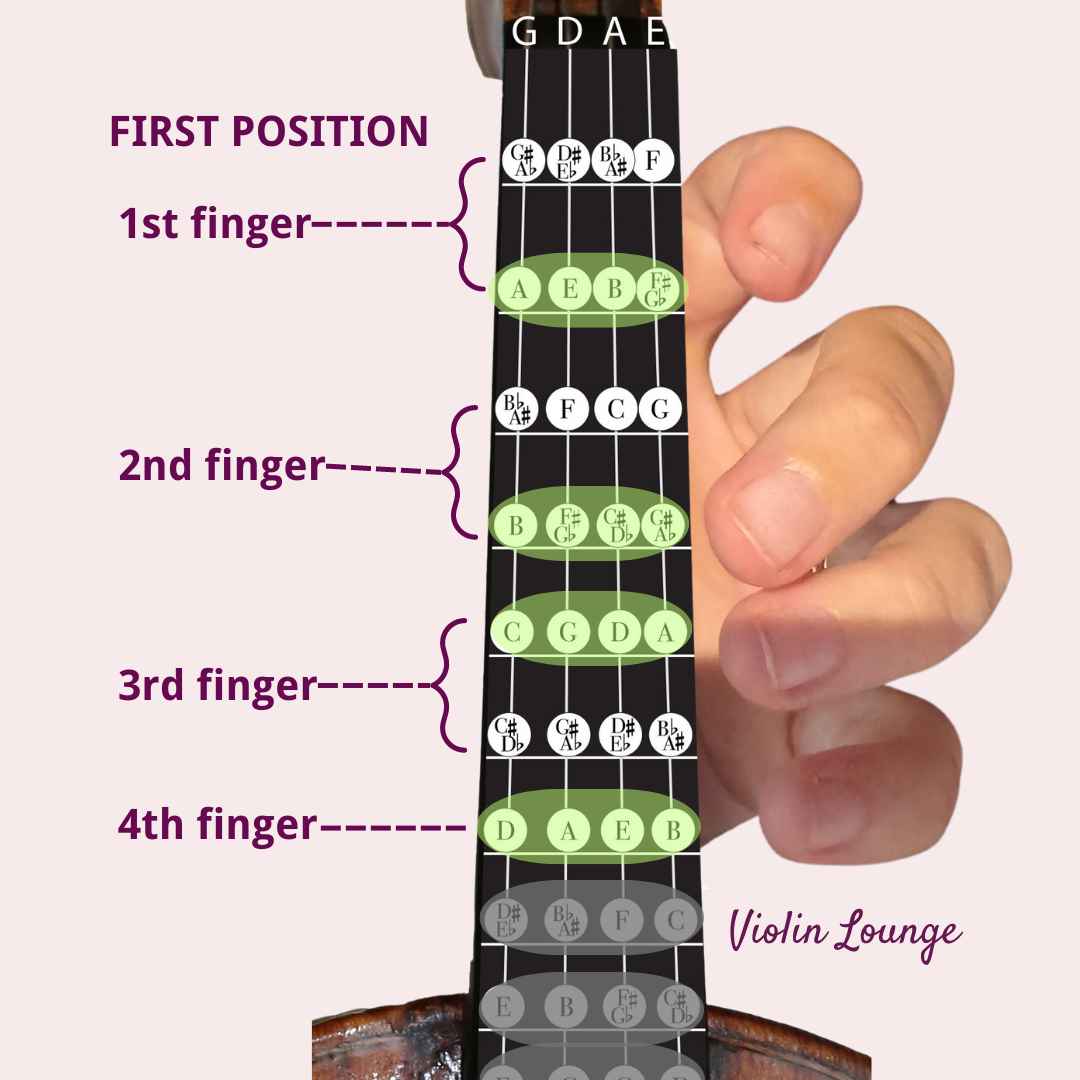
To learn to play in tune on the violin, it’s important that you first get proficient in the first finger frame in the first position. Above you see the notes of that first frame highlighted in green.

Finger placement of the first notes on the violin

The placement of the first finger notes is about one inch from the nut of the fingerboard. There is a whole step (tone) between the first and second finger, a half step (semitone) between the second and third finger and a whole step (tone between the third and the fourth finger. For most people that means that there’s space between the first and second finger, the second and third are close together and there’s space between the third and fourth finger.

Note names of the first notes

The notes you play with the first finger frame in the first position on the violin are (first to fourth finger): on the G string, A, B, C, D; the D string E, F#, G, and A; the A string B, C#, D, and E, and the E string F#, G#, A and B.

First notes in sheet music

In the below chart I’m linking the fingering to the note names and the notes in the sheet music. If you’re new to reading sheet music, here’s a beginner guide to reading notes.

Finger tapes on the violin

Many beginner violinists will have colored tapes on the fingerboard showing where the first position is located. If you do not use tapes, you will need to place your fingers very carefully and check that you are in tune.

Personally I’m not a big fan of finger tapes on the violin as it’s so important with this instrument to train your ear and to adjust your fingers accordingly. Finger tapes can make you dependent and ‘lazy’ when it comes to listening. If you use them, don’t use them too long otherwise it might get in the way of your progress in the long run.

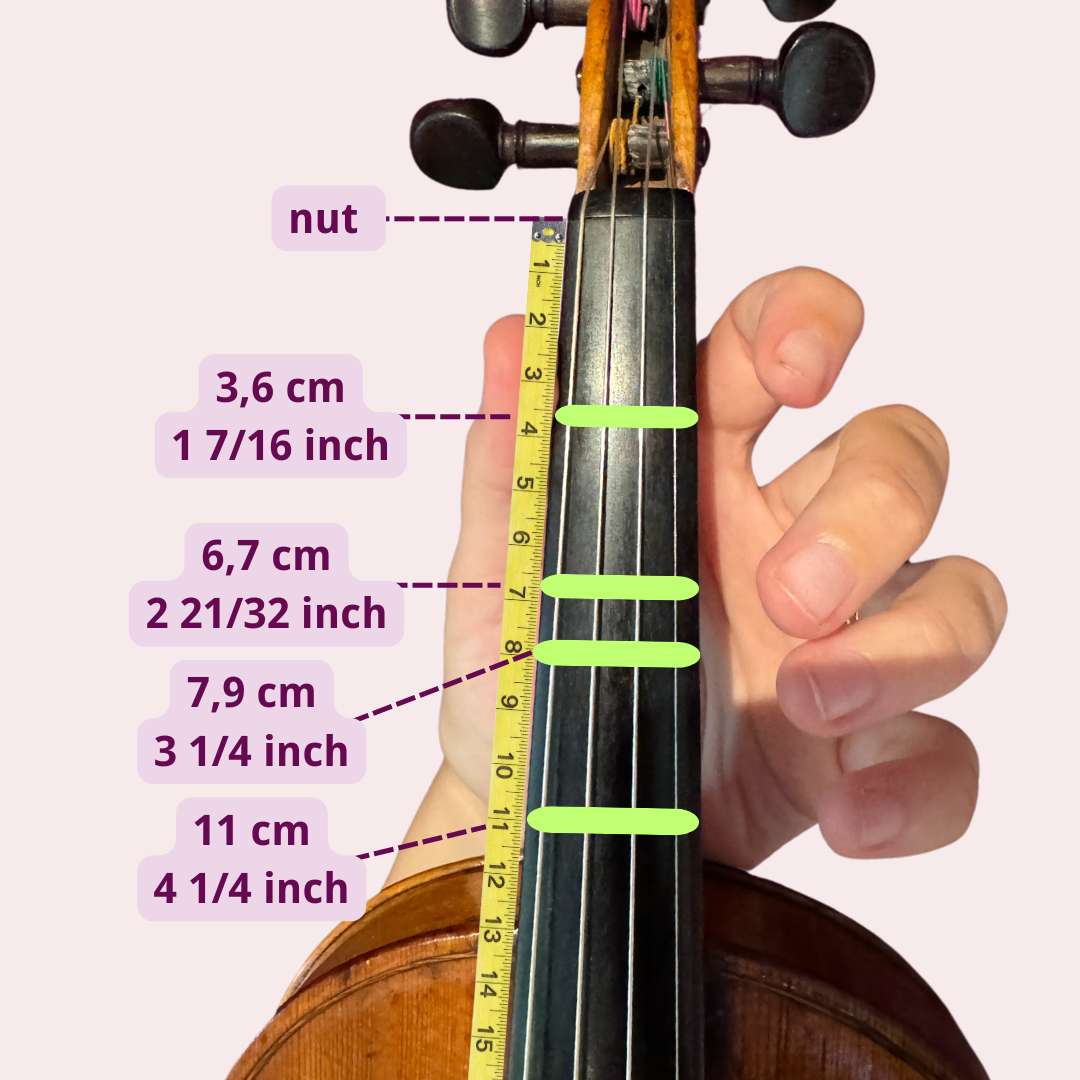
Where to place the tapes on your violin?

As the measurements of each violin are different (even slightly within one size), it’s best to look up the notes with a tuner and then place the tapes accordingly. You can also use this violin finger tape placement calculator, which gives you the measurements based on the vibrating string length (nut to bridge) of your violin. Below is an indication of where to place the finger tapes on the violin:

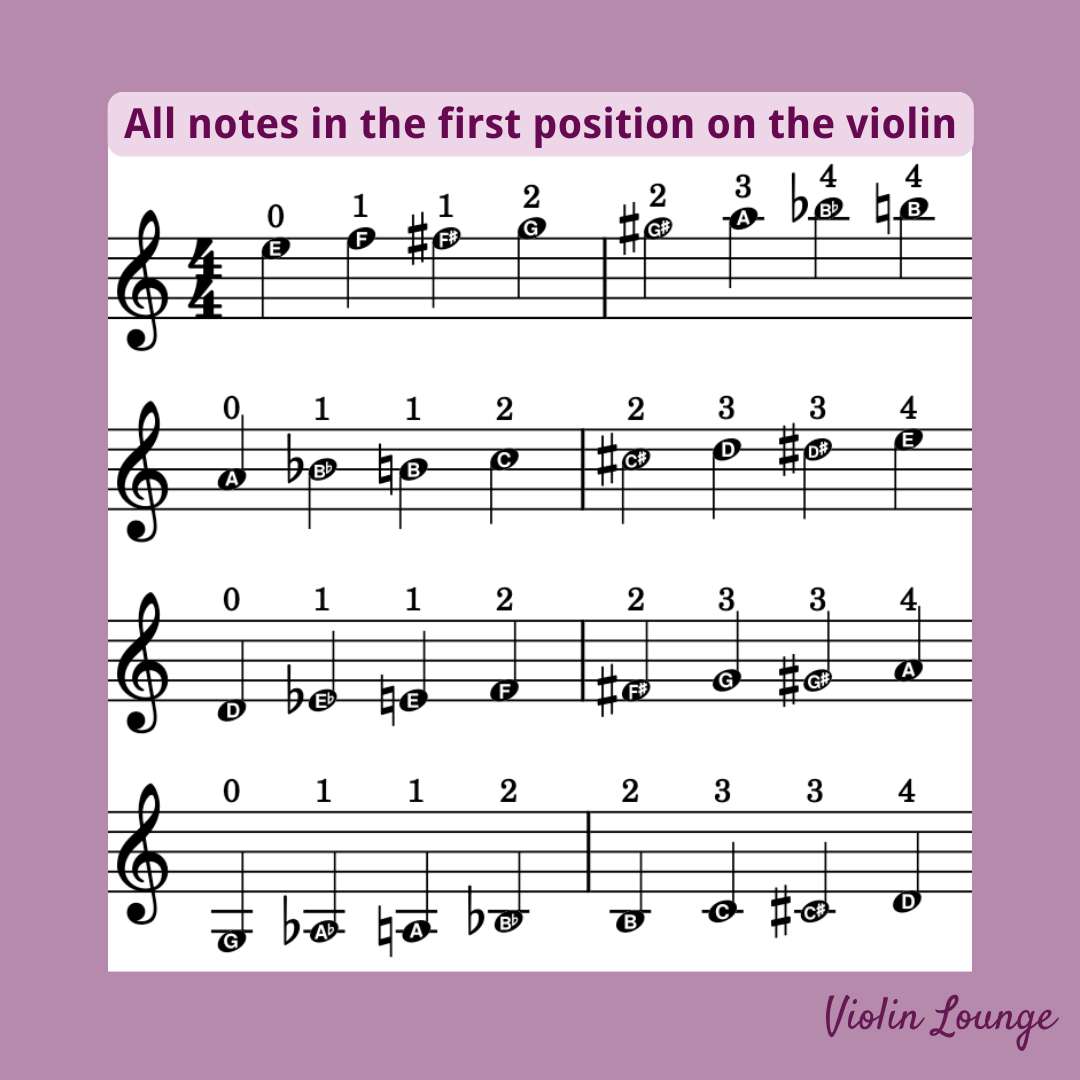
All notes in the first position

Now you have some clarity on how to find the first notes you learn, you can expand to all notes in the first postion. 

All of these notes can be reached by adjusting one of your fingers a half step up or down. For example, to play a C natural on the A string instead of C#, move your second finger down a half step so it touches your first finger. For more details on using different finger combinations in first position, check out the article on half position.

In the video on the right (or below on mobile), you can listen to all violin notes in the first position.

Finger chart of first position and sheet music

Below you’ll find the finger chart and sheet music of all violin notes in the first position.

Violin music in the first position

You may be wondering, how much violin music can I actually play if I only know first position? Tons! There are so many beautiful simple pieces in first position, as well as arrangements of complex pieces. For example, the first three books of the Suzuki method can be played entirely in first position. The genres of hymn songs, fiddle tunes, and baroque music all have many selections in first position only.  Here are just a few examples of books and etudes you can use to practice first position:

  1. Suzuki Vol. 1-3
  2. Graded Course of Violin-Playing, Vol. 1-4
  3. Scales in First Position for Violin by Harvey S. Whistler
  4. Sixty Studies, Op. 45 by Franz Wohlfahrt
  5. Fiddle Tunes for the Violinist by Betty Barlow

Actually all beginner methods start in first position.

It’s even possible to play easy violin concertos all in the first position. You can find a list of them with free sheet music right here.

Examples of first position

Here are a few examples of what your hand position will look like while playing in first position. Notice that the hand does not move up, but the fingers do individually move up and down a little to get different half steps. The first example is from Rieding’s Violin Concerto in B Minor.

The second example is Seitz’s Concerto No. 5 in D Major:

Join my FREE beginner violin course

I take you from scratch step by step to your first violin concerto including 40 videos, sheet music and violin tabs.

Hi! I'm Zlata

Classical violinist helping you overcome technical struggles and play with feeling by improving your bow technique.

How to Learn First Position on the Violin

Learning first position is one of the initial steps to learning violin. If you already know the basics of what notes are on each string, this will be very easy. The fingering charts and scale books shown above will help you learn how to place your fingers accurately and practice intonation. In the beginning, using tapes to remember notes helps, but it is even more helpful to practice setting each note with a tuner or drone to get your intonation as clean as possible.

If this is your first foray into learning violin notes, don’t worry! There are only a handful of first position notes to remember, and once you learn them you can play countless songs. Take it slow; trying learning one string or one scale at a time. If you have questions or other advice from your own experience learning first position, leave them in the comments!

If you’d like to learn the violin from scratch as an adult beginner, join my free complete beginner course right here.

Read all my violin position blog posts:

How to practice with a metronome (+ free online metronome)

Tips for effective practicing with a metronome, so you can get fast progress on the music you play

Learn about speed, subdivisions and difficult rhythms:

“Practice with a metronome!”

If you are a violinist at ANY stage of learning, I can almost guarantee this is something that you’ve heard many times before. Using a metronome is a great practice technique if used in the correct way. If used improperly, it’s just a frustrating clicky sound that will haunt your dreams. Kidding! Kind of.

In this article, I will explain how to best practice with a metronome to improve your rhythm skills and get fast progress on the piece you are practicing.

What is a metronome?

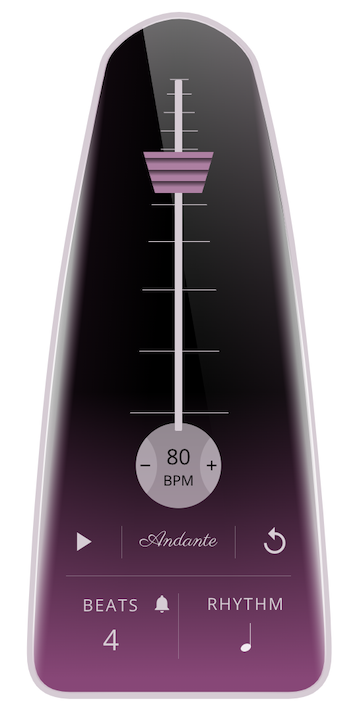
A metronome is a device (either mechanical, electronic, or online) that produces a steady pulse, using both aural and visual cues. The pulse is measured in BPM (Beats per Minute). For example, 60 BPM is essentially one beat per second, while 120 BPM is two beats per second.

I recommend using my free online metronome with subdivisions you can find right here.

When to practice with a metronome?

When practicing, it is important to use the right practice techniques for the problem you’re looking to solve. Practicing with a metronome is not going to help you with intonation, but it can help if you’re having the following issues:

  • Maintaining an even tempo throughout the piece.
  • Struggling with accurate rhythm.
  • Having issues getting the piece to “flow”.
  • Not able to play certain passages up to speed.
  • Wanting to generally increase the speed at which you can play.

How to practice with a metronome

How you use the metronome in practice will depend on your skill level

Beginning players need to first get comfortable playing simple rhythms with the metronome. If you’ve never used the metronome before (or are struggling to get started) here are some steps to follow.

  1. Place your metronome on at 60 BPM.
  2. Practice clapping with the metronome on various simple rhythms. Start with quarter notes (one clap per click), then half notes (one clap per two clicks), and then eighth notes (two claps per click).
  3. Practice playing these simple rhythms on open strings.
  4. Practice scales in these simple rhythms.

Playing with the metronome is going to take a lot of brainpower at first, and that’s okay!

I always recommend for beginners only focus on staying with the metronome when learning how to use it. If you’re trying to stay with the metronome, plus working on your intonation, trying to make sure your bow is straight, and trying to keep your fingers close to the string, there are way too many things to think about and something is bound to fall by the wayside! These things are obviously important but should be addressed away from the metronome.

If you’re faced with challenging rhythms that you can’t quite decipher, the best practice technique is going to be subdividing.

Subdividing is essentially dividing up each note into the smallest common denominator, thus making it easier to keep track of and count. Follow these steps to practice subdividing.

  1. Identify the smallest common denominator of the passage (ie the smallest note value).
  2. Change the setting on your metronome to correspond with that note value.
  3. Determine how many of each of those note values go into larger note values. For example, if you determine that your smallest common denominator is 16th notes, figure out how many 16th notes go into each of the larger note values (this also includes ties).
  4. Play the written rhythm while the metronome is clicking the subdivisions. It should be much easier to count.

If you’re looking to increase your general speed of a piece, here are the steps you need to follow to gradually work it up with the metronome.

  1. Pick a section of the piece (not the whole thing!)
  2. Identify a tempo where you can play it comfortably, no matter how slow. All notes, rhythms, and dynamics should be accurate.
  3. Play that section at least 3 times with the metronome with no mistakes.
  4. Move the metronome up slightly, by no more than 5 clicks, and repeat.
  5. Aim to increase the speed by 5-15 clicks per day.

But I just can’t play any faster! What do I do?

First, recognize that gradually increasing your speed takes time. Depending on the difficulty of the piece, give it at least a few months before declaring that you’ve reached a plateau.

If you really can’t go any faster, increase the speed by 10-20 BPM. I know it sounds crazy, but stay with me for a second. Play the section a few times at this new faster speed. It doesn’t have to be perfect but aim to get through it. Then increase the speed again and repeat the process. Now, go back to the original, desired speed. It should seem much slower and more manageable.

Rhythmical Variations

The best way to increase your speed in runs is to practice rhythmical variations. The aim of this practice technique is to practice just a few notes at a time, but at a very quick speed, which will increase the overall speed at which you’re able to play the run. Here are the steps to follow to practice in rhythmical variations:

  1. Play two notes as fast as possible. Take out all bowings and play each note separately.
  2. Stop for as long as necessary to mentally prepare for the next two notes.
  3. Repeat for the remaining length of the run.
  4. Now, practice in opposite pairs. To do this, start out with a single note, and then resume playing in pairs. You should be playing different pairs than before.
  5. Repeat the process with groups of three, four, six, and eight.

Using a metronome to practice violin vibrato

Did you know that you can use a metronome to practice vibrato!? Yes, it’s possible and extremely effective! Practicing vibrato with the metronome is a great way to practice the vibrato motion and make sure your vibrato is even. Follow these steps to practice vibrato with the metronome.

  1. Place your metronome on 60 BPM.
  2. Practice your vibrato in quarter notes (one movement per click. I also call this “pizza”).
  3. Practice your vibrato in eighth notes (two movements per click. I call this “pepperoni”).
  4. Practice your vibrato in sixteenth notes (four movements per click. I call this “I would like a slice of pizza.”
  5. Gradually increase the speed of the metronome as you feel comfortable.

Difficult rhythms to practice with a metronome

Dotted rhythms (dotted quarters, dotted eighths followed by sixteenths, etc)

These rhythms are challenging because you have to play off of the beat (meaning that you are not going to be playing right with the click of the metronome.) However, when practicing along with this online metronome, you can simply choose these rhythms in the bottom right-hand corner and play exactly with the beats.

Triplets (especially when in combinations of eighths and quarters)

The most common tendency when practicing triplets is to rush. I like to call triplets “the lazy rhythm” to help remind students to evenly spread the three notes out over the beat. When faced with triplets in combinations of eighths and quarters, I recommend subdividing the triplet in your head.

Syncopated rhythms

Syncopations are difficult because you have to play off of the beat of the metronome (similar to dotted rhythms). Along with subdividing and using the built-in syncopation rhythms in this online metronome, I recommend listening to the piece as much as possible to internalize the rhythm.

What are the benefits of practicing with a metronome?

There are several things that practicing with a metronome can help with. They include but are not limited to:

  • Keeping a steady pulse. When I first started to practice with a metronome, I swore to my teacher that it was the one changing speeds, not me! It’s only natural to speed up when things are easy and to slow down when things are hard. The metronome helps you identify this and work to correct it.
  • Understanding complex rhythms. Not all music is made up of quarters and half notes (if only it were that easy!). The best way for practicing and understanding complex rhythms is subdividing, which we will cover later in this article.
  • Improving difficult runs. There are some runs (which are simply a long string of fast notes) that just seem impossible! Practicing with a metronome will greatly improve your chances for success (covered more in detail below).
  • Getting a piece up to performance tempo. Say you can comfortably play a piece at 60 BPM, but it’s marked at 100 BPM. How are you going to make up that difference? Well, by using the metronome, of course!

Hi! I'm Zlata

Classical violinist helping you overcome technical struggles and play with feeling by improving your bow technique.

Why is practicing with a metronome so difficult?!

In short, it is one more thing to add to the long list of things to worry about during practice. A metronome shows no mercy, which can make it an incredibly difficult practice partner. Overall, the metronome is a practice tool that should enhance your practice, not leave you miserable. If you can get through the initial challenges of learning how to most effectively use it, then the metronome truly can become a great tool to add to your practice toolkit.

How do you practice with the metronome?

Share it in the comments below!

7 Classical music periods explained with examples

A Beginner’s Guide to the Seven Eras of Classical Music

Become classical-music-smart by learning about all eras: medieval, renaissance, baroque, classical, romantic, modern and contemporary

What is classical music?

Classical music, often referred to as Western art music, encompasses a broad tradition that spans over a millennium: from the Medievals all the way to 21st century. This term is sometimes confused with the Classical era (usually written with a capital C), a specific period within this tradition from about 1750 to 1820 including composers like Mozart, Haydn and Beethoven. In this guide, we’ll journey through the seven distinct eras of classical music, detailing their developments, characteristics, and key composers. We’ll also explore how musical instruments, concert settings, and sheet music evolved over time.

Of course outside ‘Western’ (usually referring to Europe and the United States) art music, there are many rich music traditions over the whole world with their own history, harmonies and instruments. Please note that those are very interesting to explore, but not the focus of this blog post.

Whether you’re new to classical music or you want to discover new composers to listen to, it’s important to know the classical music periods and their characteristics. Knowing how classical music developed through the eras will guide you in finding new music to love, listen and play.

What are the classical music periods?

Although music evolves in organically and differs per country and composer, in music history we distinguish seven classical music periods:

  1. Medieval Period (c. 500–1400)
  2. Renaissance Period (c. 1400–1600)
  3. Baroque Period (c. 1600–1750)
  4. Classical Period (c. 1750–1820)
  5. Romantic Period (c. 1820–1900)
  6. 20th Century and Modern (1900–2000)
  7. Contemporary (2000–Present)

In this blog post I will explain how classical music developed through the centuries, what instruments are used, the most important composers and of course lots of listening tips.

#1 Medieval Period (c. 500–1400)

The Medieval period marks the beginning of Western classical music history. Following the fall of the Roman Empire, music in this era was primarily religious, as the Church dominated cultural and intellectual life. Gregorian chant, named after Pope Gregory I, was the most prevalent form of music. These chants were monophonic, consisting of a single melodic line without harmonic accompaniment, creating a meditative and spiritual atmosphere in vast, echoing cathedrals.

Medieval polyphony

Polyphony began to emerge in the later Medieval period, introducing multiple independent melody lines sung simultaneously. This development added complexity and richness to the music.

Medieval musical instruments

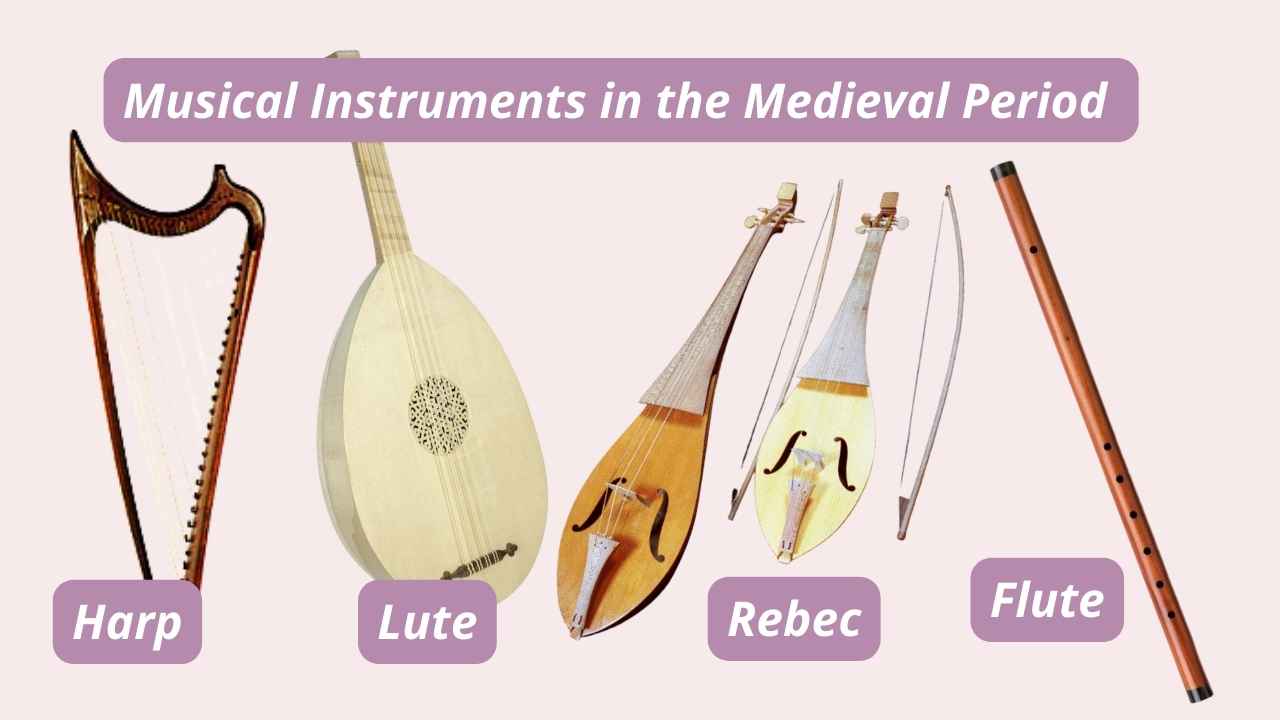
Instruments were used sparingly, but the ones that did appear included early versions of the lute, harp, and hurdy-gurdy. The violin’s ancestors, such as the fiddle and rebec, began to take shape, laying the groundwork for future string instruments.

Sheet music during this period was rudimentary. Notation systems, like neumes, were used to indicate pitch but not precise rhythm. This limited notation was sufficient for the monophonic chants of the time but would evolve significantly in later periods.

Key Composers and Listening Tips in the Medieval Period:

  1. Hildegard von Bingen: A visionary abbess and composer, Hildegard’s music is ethereal and deeply spiritual. Listening tips: “O vis aeternitatis,” “Ave generosa,” “Ordo Virtutum”
  2. Guillaume de Machaut: A poet and composer, Machaut’s work includes both secular and sacred music. Listening tips: “Messe de Nostre Dame,” “Douce dame jolie,” “Le Remède de Fortune”
  3. Perotin: Known for his elaborate polyphonic compositions, Perotin’s music often features intricate melodic interplay. Listening tips: “Viderunt omnes,” “Sederunt principes,” “Beata viscera”
  4. Leonin: One of the earliest known composers of polyphony, Leonin’s works are foundational to the development of Western music. Listening tips: “Magnus liber organi,” “Alleluia, Pascha nostrum”
  5. Francesco Landini: A blind Italian composer known for his beautiful melodies. Listening tips: “Ecco la primavera,” “Non avrà ma’ pietà,” “Ballata: Questa fanciulla”

#2 Renaissance Period (c. 1400–1600)

The Renaissance era, meaning “rebirth,” was a time of great cultural revival and exploration in Europe. Music flourished as composers sought to express the beauty of the human spirit. This period saw the rise of polyphonic music, where multiple independent melody lines were woven together, creating intricate and harmonious textures.

Music during the Renaissance became more expressive and harmonically complex. The advent of imitative counterpoint, where musical themes are echoed between different voice parts, became a hallmark of the era.

Instruments such as the lute, viol, recorder, and harpsichord gained prominence. The violin began to evolve from earlier string instruments, developing a more refined shape and sound, which would soon lead to its central role in both ensemble and solo performances.

Concert settings during this time included both sacred spaces, like churches, and the courts of nobility, where secular music thrived. The role of the violin began to grow as it became a favored instrument for dance music and courtly entertainment.

Sheet music notation improved significantly during the Renaissance. The development of mensural notation allowed for the precise indication of rhythm, making the performance of complex polyphonic works possible. This period also saw the invention of music printing, which facilitated the wider dissemination of musical works.

Key Composers and Listening Tips in the Renaissance Period:

  1. Josquin des Prez: A master of Renaissance polyphony, Josquin’s music is known for its expressive depth. Listening tips: “Ave Maria,” “Missa Pange lingua,” “El Grillo”
  2. Giovanni Pierluigi da Palestrina: His smooth polyphonic style became a model for church music. Listening tips: “Missa Papae Marcelli,” “Sicut cervus,” “Stabat Mater”
  3. Thomas Tallis: An English composer whose work spans the transition from Catholic to Anglican music. Listening tips: “Spem in alium,” “If Ye Love Me,” “Lamentations of Jeremiah”
  4. William Byrd: Known for both his sacred and secular works, Byrd’s music is rich and complex. Listening tips: “Ave verum corpus,” “Mass for Four Voices,” “Pavana Lachrymae”
  5. Orlando di Lasso: A prolific composer whose works include madrigals, masses, and motets. Listening tips: “Matona mia cara,” “Tristis est anima mea,” “Missa pro defunctis”

Were there orchestras in the renaissance period?

During the Renaissance period, the concept of an orchestra as we know it today did not exist. Instead, music was often performed by smaller ensembles known as consorts, which consisted of instruments from the same family, such as viols, recorders, or lutes. These consorts were highly valued for their homogeneous sound and were used extensively in both secular and sacred music settings. The Renaissance also saw mixed ensembles, where instruments of different families played together, but these were more ad hoc and lacked the formal structure of a later orchestra. While large-scale ensembles did perform during grand occasions and court ceremonies, they were not standardized like the Baroque orchestras that followed. The development of instrumental music during the Renaissance, including the growing popularity of polyphony and the advancement of instrument design, set the stage for the formation of orchestras in the subsequent Baroque period.

#3 Baroque Period (c. 1600–1750)

The Baroque period introduced a dramatic and expressive style of music. This era emphasized contrast, elaborate ornamentation, and emotional depth. Composers like Johann Sebastian Bach and Antonio Vivaldi were pioneers in creating new musical forms such as the concerto, sonata, and opera.

Basso continuo

Baroque music is known for its use of basso continuo—a continuous bass line played by keyboard and bass instruments—which provided a harmonic foundation. Composers also explored the use of contrast in dynamics (loud and soft) and textures (solo versus ensemble), creating vibrant and dynamic pieces. A very well known example is the Canon in D by Pachelbel.

Baroque musical instruments

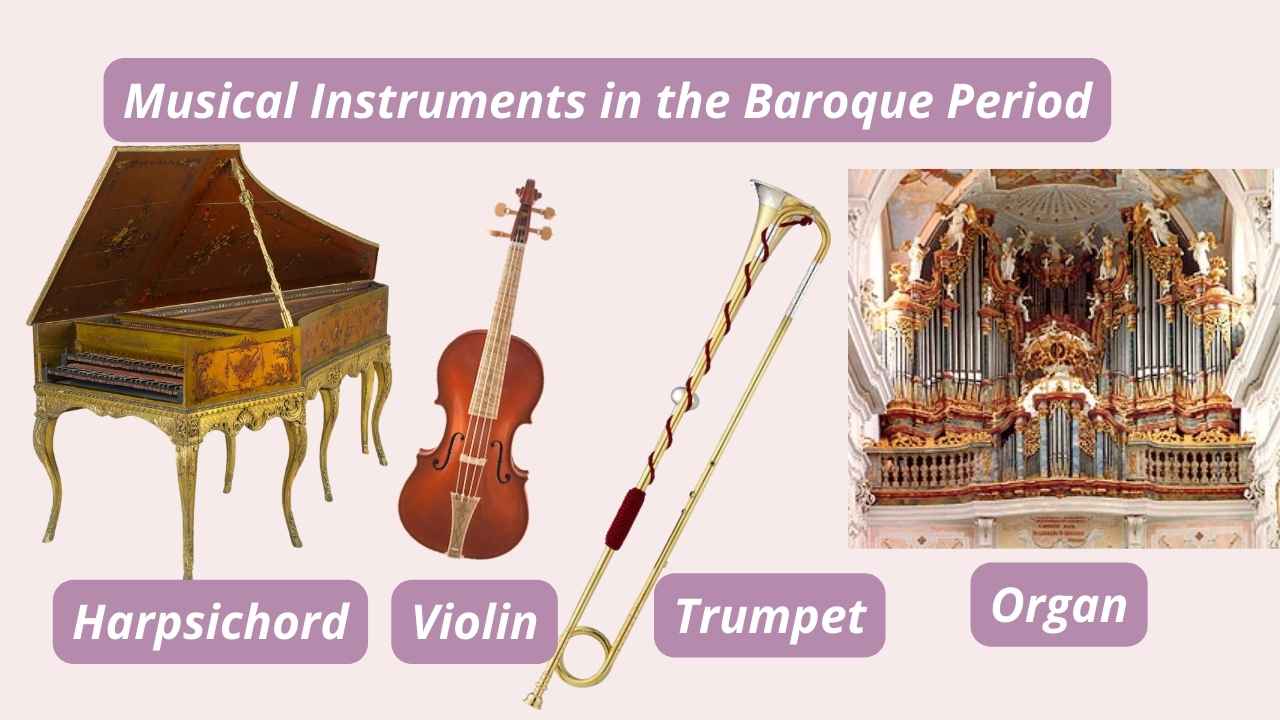
Instruments developed significantly during the Baroque period. The violin, in particular, saw remarkable advancements. Luthiers like Stradivari perfected the design, producing violins with a powerful, rich sound that became central to both solo and ensemble performances.

Concert halls and opera houses began to emerge, providing dedicated spaces for musical performance and allowing for greater public access to music.

Sheet music also evolved, with the use of figured bass and precise notation for ornamentation and dynamics, enabling musicians to perform with greater expressiveness and technical precision.

Key Composers and Listening Tips in the Baroque Period:

  1. Johann Sebastian Bach: A German composer whose intricate counterpoint and harmonic mastery define the Baroque style. Listening tips: “Brandenburg Concertos,” “Mass in B minor,” “Toccata and Fugue in D minor”
  2. George Frideric Handel: Known for his operas, oratorios, and instrumental works, Handel’s music is dramatic and accessible. Listening tips: “Messiah,” “Water Music,” “Music for the Royal Fireworks”
  3. Antonio Vivaldi: An Italian composer famous for his virtuosic violin concertos. Listening tips: “The Four Seasons,” “Gloria,” “Concerto for Strings in G major”
  4. Claudio Monteverdi: His work bridges the Renaissance and Baroque periods, especially in opera. Listening tips: “L’Orfeo,” “Vespro della Beata Vergine,” “L’incoronazione di Poppea”
  5. Henry Purcell: An English composer whose work includes operas, sacred music, and chamber music. Listening tips: “Dido and Aeneas,” “Music for the Funeral of Queen Mary,” “Abdelazer Suite”

Terrace dynamics

The Baroque era introduced the concept of terrace dynamics, a distinctive feature where music shifts abruptly between loud and soft volumes without gradual crescendos or decrescendos. This technique creates a dramatic contrast that heightens the emotional impact of the music. Terrace dynamics were particularly effective in Baroque compositions, where the alternation between different levels of sound intensity added to the expressive quality and grandeur of the pieces. This approach can be heard prominently in the works of composers like Johann Sebastian Bach and George Frideric Handel, who utilized these sudden dynamic shifts to enhance the overall structure and emotional depth of their music.

Baroque orchestra

The Baroque orchestra was a diverse and flexible ensemble that laid the foundation for modern orchestral practices. It typically featured a core of string instruments, such as violins, violas, cellos, and double basses, often supported by a continuo group consisting of harpsichord and lute. Wind instruments, including oboes, recorders, and bassoons, were frequently added to enrich the texture, along with occasional brass instruments like trumpets and horns.

Baroque consorts

Consorts were smaller, more specialized groups of instruments from the same family, such as a consort of viols or a consort of flutes. These ensembles played an essential role in Baroque chamber music, providing a homogenous sound ideal for intricate polyphonic compositions. The use of consorts allowed composers to explore a wide range of tonal colors and textures, enhancing the expressive capabilities of their music.

#4 Classical Period (c. 1750–1820)

The Classical period shifted away from the ornate complexity of the Baroque towards clarity, balance, and formality. This era emphasized structured forms such as the symphony, sonata, and string quartet, aiming to create music that was universally appealing. Composers like Wolfgang Amadeus Mozart and Franz Joseph Haydn perfected these forms, creating works that were elegant and symmetrical.

Classical music is characterized by its homophonic texture, where a clear melody is supported by chordal accompaniment. The fortepiano replaced the harpsichord as the dominant keyboard instrument, offering greater dynamic range and expressiveness. The string quartet (two violins, viola, cello) became a standard ensemble, showcasing the violin’s versatility in both solo and ensemble contexts. Read more about string quartets in this beginner’s guide.

Dynamics

The Classical era brought significant changes in musical dynamics compared to the Baroque period. While Baroque music often utilized terrace dynamics—sudden shifts between loud and soft volumes—the Classical era introduced gradual dynamic changes, such as crescendos and decrescendos. Composers like Mozart and Haydn employed these techniques to create smoother, more expressive transitions within their music. The ability to shape dynamics more fluidly was also facilitated by the development of the fortepiano, which replaced the harpsichord and allowed for more precise control over volume and articulation. This evolution in dynamic expression marked a significant shift towards the emotive and expressive capabilities that defined Classical music.

Classical orchestra

The Classical era saw significant evolution in the structure and composition of the orchestra compared to the Baroque period. The Classical orchestra became more standardized and expanded in size. The string section remained central, but the woodwind section grew to include pairs of flutes, oboes, clarinets, and bassoons. The brass section was also more consistently integrated, typically featuring horns and trumpets, along with the inclusion of timpani for added rhythmic and dynamic contrast. This expansion allowed composers like Haydn, Mozart, and Beethoven to explore richer textures, more complex harmonies, and a wider range of dynamics, resulting in a more balanced and powerful orchestral sound. The conductor’s role also became more prominent, guiding these larger ensembles to achieve greater precision and cohesion in performance.

Concert halls became more common, providing acoustically designed spaces that enhanced the listening experience. These venues allowed composers to write music that could be appreciated by larger audiences, fostering a public culture of concert-going.

Sheet music saw further refinement, with the development of standard notation for dynamics, phrasing, and articulation. This enabled more precise and expressive performances, as composers could convey their intentions more clearly to performers.

Key Composers and Listening Tips in the Classical Period:

  1. Wolfgang Amadeus Mozart: An Austrian composer whose music is known for its beautiful melodies and formal perfection. Listening tips: “Symphony No. 40,” “Eine kleine Nachtmusik,” “Requiem”
  2. Ludwig van Beethoven: A German composer who bridged the Classical and Romantic eras with his innovative and emotional works. Listening tips: “Symphony No. 9,” “Moonlight Sonata,” “Fidelio”
  3. Franz Joseph Haydn: Known as the “Father of the Symphony,” Haydn’s music is witty and inventive. Listening tips: “The Creation,” “Symphony No. 94 (Surprise),” “String Quartets, Op. 76”
  4. Christoph Willibald Gluck: A reformer of opera, Gluck sought to make the music serve the drama. Listening tips: “Orfeo ed Euridice,” “Alceste,” “Iphigénie en Tauride”
  5. Carl Philipp Emanuel Bach: Known for his expressive and often dramatic keyboard music. Listening tips: “Hamburg Symphonies,” “Keyboard Sonatas,” “Magnificat”

#5 Romantic Period (c. 1820–1900)

The Romantic period was characterized by its emphasis on emotion, individualism, and nationalistic themes. Composers sought to express deep personal feelings and used music to tell stories. This era saw the expansion of the orchestra and the development of programmatic music—music that tells a story or paints a picture.

Romantic music is known for its expressive melodies, rich harmonies, and expansive forms. Composers often pushed the boundaries of tonality, using chromaticism and complex harmonies to convey emotion. The violin became a central instrument in the Romantic orchestra, capable of great expressiveness and virtuosity, as seen in the works of composers like Paganini and Tchaikovsky. More on the rise of the virtuosos below.

Concert settings expanded further, with grand concert halls and opera houses providing venues for large-scale orchestral works and operas. Solo instruments needed to have more volume and a sound that was able to fill the bigger concert halls and play above the bigger orchestras. The piano also continued to develop, with improvements in its construction allowing for greater dynamic range and tonal color.

Sheet music publication flourished during the Romantic era, with advances in printing technology making music more accessible to the public. This democratization of music allowed a wider audience to engage with and perform classical music.

Key Composers and Listening Tips in the Romantic Period:

  1. Frédéric Chopin: A Polish composer known for his poetic piano works. Listening tips: “Nocturnes,” “Piano Concerto No. 1,” “Ballade No. 1”
  2. Richard Wagner: A German composer who revolutionized opera with his concept of Gesamtkunstwerk (total artwork). Listening tips: “The Ring Cycle,” “Tristan und Isolde,” “Lohengrin”
  3. Johannes Brahms: A German composer known for his symphonies, concertos, and chamber works. Listening tips: “Symphony No. 1,” “Hungarian Dances,” “A German Requiem”
  4. Franz Schubert: An Austrian composer famous for his lieder and symphonies. Listening tips: “Unfinished Symphony,” “Ave Maria,” “Die schöne Müllerin”
  5. Pyotr Ilyich Tchaikovsky: A Russian composer known for his ballets and symphonies. Listening tips: “Swan Lake,” “Nutcracker Suite,” “1812 Overture”

Rise of the virtuosos

The Romantic period celebrated the rise of the virtuoso, musicians whose extraordinary technical skills and expressive capabilities pushed the boundaries of their instruments.

Niccolò Paganini, a legendary violinist, composed caprices and concertos that demanded unprecedented agility, speed, and precision, inspiring awe and influencing countless musicians. His compositions include difficult double stops, harmonics, tenths, left hand pizzicato, up-bow staccato and ricochet. Women fainted at his concerts and it was thought he had a pact with the devil to be able to play so well. Learn more about Paganini’s playing technique in this video.

Franz Liszt, a piano virtuoso, transformed piano performance with his dazzling technique, incorporating rapid octaves, complex arpeggios, and dramatic dynamic contrasts in works like his “Transcendental Études.”

The technical demands of these virtuosos spurred the development of their instruments. Violins were crafted with greater precision, more strength, more volume and more refined bows. Piano construction advanced to include stronger frames and extended ranges to support more powerful and dynamic playing.

Beyond pianists and violinists, the era saw other instrumental virtuosos who similarly stretched the technical limits of their instruments.

Adolphe Sax, the inventor of the saxophone, was a virtuoso performer who demonstrated the versatility and expressive range of his new instrument. The saxophone’s unique timbre and agility quickly made it a staple in both classical and popular music.

Giovanni Bottesini, a double bass virtuoso, expanded the technical and expressive range of the instrument with his compositions and performances. His works often included advanced bowing techniques and rapid passages that challenged traditional notions of what the double bass could achieve.

Valentin Alkan, a French virtuoso, was celebrated for his performances on the pedal piano, an instrument equipped with pedals like an organ. Alkan’s compositions, such as his “Symphony for Solo Piano,” pushed the boundaries of what was considered possible on a keyboard instrument.

#6 20th Century and Modern (1900–2000)

The 20th century was a time of great experimentation and diversity in music. Composers broke away from traditional tonality and explored new forms and structures, leading to a wide array of styles and movements, from Impressionism to Serialism, and Minimalism to Electronic music.

One of the most significant developments was the rise of atonality and the twelve-tone technique, pioneered by Arnold Schönberg. Schönberg, along with his students Alban Berg and Anton Webern, formed what is known as the Second Viennese School. This group sought to break free from the constraints of traditional tonality, creating music that was based on a series of twelve tones arranged in a specific order. 

In contrast to the abstract approaches of the Second Viennese School, other composers sought inspiration from folk music. Béla Bartók and Zoltán Kodály, both from Hungary, were prominent figures in this movement. They traveled extensively to collect and study the folk music of Eastern Europe, which they then incorporated into their compositions. This fusion of folk elements with classical forms resulted in a vibrant, distinctive sound.

Bartók’s work is known for its rhythmic complexity and incorporation of folk scales and modes. Kodály, besides being a composer, made significant contributions to music education. He developed the Kodály Method, an influential approach to music teaching that emphasizes the importance of learning through singing and the use of folk songs.

Concert halls and recording technology advanced significantly, allowing music to reach a global audience. The development of radio, vinyl records, and later, digital recordings, transformed how people experienced music.

Key Composers and Listening Tips in the Modern Period:

  1. Igor Stravinsky: A Russian composer known for his rhythmic innovation and bold orchestration. Listening tips: “The Rite of Spring,” “Petrushka,” “Firebird Suite”
  2. Dmitri Shostakovich: A Soviet composer whose works reflect the tumultuous politics of his time. Listening tips: “Symphony No. 5,” “String Quartet No. 8,” “Piano Concerto No. 2”
  3. Arnold Schönberg: An Austrian composer who developed the twelve-tone technique. Listening tips: “Pierrot Lunaire,” “Verklärte Nacht,” “A Survivor from Warsaw”
  4. John Cage: An American composer known for his experimental and avant-garde works. Listening tips: “4’33”,” “Sonatas and Interludes,” “Music of Changes”
  5. Philip Glass: An American composer and prominent figure in minimalism. Listening tips: “Einstein on the Beach,” “Glassworks,” “Koyaanisqatsi”

#7 Contemporary (2000–Present)

Contemporary classical music continues to evolve, embracing a wide range of styles and influences. Composers are exploring new technologies, global influences, and interdisciplinary collaborations, resulting in a rich and diverse musical landscape.

Contemporary music often blends classical traditions with modern genres, incorporating elements from jazz, rock, and electronic music. The violin remains a vital instrument, both in traditional forms and in innovative new contexts, often amplified or electronically modified.

Concert settings have expanded beyond traditional halls to include multimedia performances and interactive installations. Advances in technology allow for sophisticated sound production and recording, bringing new dimensions to musical expression.

Sheet music in the contemporary era is highly varied, reflecting the eclectic styles of modern composers. Digital notation software has made it easier to create and share music, fostering collaboration and innovation. Some composers left traditional notation for graphic notation.

Key Composers and Listening Tips in the Contemporary Period:

  1. Arvo Pärt: An Estonian composer known for his minimalist and spiritual works. Listening tips: “Spiegel im Spiegel,” “Fratres,” “Tabula Rasa”
  2. John Adams: An American composer whose works blend classical and contemporary elements. Listening tips: “Short Ride in a Fast Machine,” “Nixon in China,” “Harmonielehre”
  3. Kaija Saariaho: A Finnish composer known for her innovative use of electronics and rich textures. Listening tips: “L’Amour de Loin,” “Graal Théâtre,” “Orion”
  4. Steve Reich: An American composer and pioneer of minimalism. Listening tips: “Music for 18 Musicians,” “Different Trains,” “Electric Counterpoint”
  5. Jennifer Higdon: An American composer celebrated for her accessible and vibrant orchestral works. Listening tips: “Blue Cathedral,” “Violin Concerto,” “Percussion Concerto”

Hi! I'm Zlata

Classical violinist helping you overcome technical struggles and play with feeling by improving your bow technique.

Closing notes 🎵

I don’t want to be a snob, but I’m always a bit surprised when people say ‘I also like classical music, it’s so relaxing’. Well, of course it’s always great if people appreciate classical music, but knowing a bit of music history will definitely enrich your experience. Popular culture easily talks about the decades of pop music, while often classical music is put on one pile of ‘classical’ without recognizing the vastly different music that is made through a time period of over a millennium.

Classical music’s journey from the Medieval period to the present day showcases an incredible evolution of styles, forms, and expressions. Each era brought its own innovations and masterpieces, enriching the tapestry of classical music. Now you know more about this, you will enrich your listening experience and find new classical music to explore.

Enjoy listening!

Playing in a String Quartet: Tips for Finding Members, Rehearsing, and Performing

Where to start when you want to play string quartets?

Playing in a string quartet is an enriching experience that combines the joy of music with the camaraderie of like-minded individuals. Whether you’re a beginner(ish), an intermediate or a seasoned orchestra player, you can learn and enjoy so much in a string quartet. However, where do you start?

The Joy of Playing in a String Quartet

To me playing chamber music is all the good stuff from playing solo and playing in an orchestra combined. Sure you have your solos, but a quartet also requires collaboration, listening and blending with your string quartet partners. You have your own part, but you’re still a team. Of course this is not to say that a soloist is also a team with the orchestra, but you get the difference. 

Besides a wonderful playing together experience, the string quartet repertoire offers endless opportunities for exploration and expression in classical, romantic and contemporary works.

Get a feel of playing in a string quartet

When you’ve never played in a string quartet, it might seem intimidating to search for fellow musicians and start one. A safe way to get the feel of playing in a string quartet from home, is to get the Tomplay sheet music app. You can play sheet music along with the recording of the other parts. You can mute the part you want to play and play along in whatever tempo you feel comfortable. Click here to try it for free and if you decide to continue, use the code VIOLINLOUNGE30 for 30% off your subscription.

Finding Fellow Musicians for your String Quartet

Finding musicians at your playing level is crucial for a cohesive quartet and an enjoyable experience for everyone in it. Here are some tips to connect with potential quartet members:

  • Your teacher: If you’re currently taking lessons, certainly if you’re taking them at a music school, likely your teacher has contact with other string teachers and can match you with some of their students. Also check the bulletin board. There might be others looking for a string quartet.
  • Your orchestra: Often string quartets are formed from people playing together in an orchestra, on amateur as well as professional level. If you’re not in an orchestra, you could ask around in local orchestras.
  • Social media: I’ve found several play together partners in local Facebook groups for musicians. 
  • Classified Ads: Websites like Craigslist or local community boards often have sections for musicians seeking ensembles.

Easy String Quartet Music for Beginners

Starting with easier pieces allows you to focus on ensemble playing rather than technical challenges. Here are some beginner-friendly string quartet pieces:

  • “Eine Kleine Nachtmusik” by Mozart: This well-known piece is melodious and relatively straightforward.
  • “Canon in D” by Pachelbel: Its repetitive structure makes it easier to learn and perfect.
  • “Simple Symphony” by Benjamin Britten: This piece offers beautiful, accessible music that sounds more complex than it is.
  • “Divertimenti” by Haydn: Haydn’s quartets are both educational and enjoyable to play.
  • Check out the website ‘Free gig music’ for easy arrangements of well known melodies for string quartet.

Preparing for Rehearsals

Preparation is a gift to your fellow string quartet members. Rehearsals are not to figure out your own part. You need to figure out your part and how it fits in the whole beforehand. Here’s how to get ready:

Listen to recordings: Familiarize yourself with the piece by listening to professional recordings. Pay attention to the overall structure and how your part fits in. This is extra effective if you do so with the sheet music in front of you.

Practice your part: Ensure you are familiar with your part before the rehearsal. Practice slowly to understand the tricky passages. Also make sure you understand how to fit in with the other parts. If you’ve tackled most of the technical difficulties a great way to practice fitting it into the whole is to use the Tomplay app. You can play sheet music along with the recording of the other parts. You can mute the part you want to play and play along in whatever tempo you feel comfortable. Also it’s possible to loop tricky bits and make your own notes. Click here to try it for free and if you decide to continue, use the code VIOLINLOUNGE30 for 30% off your subscription.

Mark your music: Note any dynamics, bowings, or fingerings that will help during rehearsal. In this way your practice pays off when playing together. Highlight difficult sections to work on in preparation.

Effective Rehearsal Techniques

Rehearsals should be more than just playing through pieces. Here’s how to make the most of your rehearsal time:

  • Warm-Up Together: Start with scales or a simple piece to get in sync with each other.
  • Set Goals: Decide on specific sections to focus on and what you want to achieve in each rehearsal. Just playing through your repertoire time after time isn’t so effective. It’s great to have a performance as your goal. 
  • Play little bits: It’s tempting to get carried away by the music and play the entire piece. However, for a rehearsal it’s most effective to focus deliberately on certain sections or even a bar of a piece. You can also use the ‘whole part whole’ strategy: play the whole piece, identify the difficulties, practice those tricky parts and play the whole again to see how it fits in.
  • Use a Metronome: This helps with timing, especially in tricky sections. If you’re not together, the metronome is always objective and can help you get on the same page (literally, haha).
  • Discuss Dynamics and Interpretation: Talk about how you want the music to sound and agree on dynamics, phrasing, and tempo.
  • Record Your Rehearsal: Listening back can provide insights into areas that need improvement.
  • Take Breaks: Regular breaks help maintain focus and prevent fatigue.

Finding Performance Opportunities as a string quartet

For amateur string quartets quartets

For amateur quartets, performing in community settings can be both fulfilling and beneficial. Here are some ideas:

  • Nursing Homes and Assisted Living Facilities: These venues often welcome live music and provide an appreciative audience. I played a lot in nursing homes during my conservatory time and it was a very rewarding experience plus useful performance practice.
  • Daycare Centers and Schools: Performing for children can be a fun way to share your music. For lots of children it can be the first time they see a violin, viola or cello.
  • Local Community Events: Farmers markets, festivals, and community gatherings often seek local performers.
  • Libraries and Coffee Shops: These venues sometimes host live music events and can be a great place to start.
  • Churches and Places of Worship: Many have regular musical performances and welcome quartets.

For professional quartets

For professional string quartets there comes a time that you not only want to enjoy your quartet, but also want to monetize it.

  • Wedding fairs and planners: if you don’t mind playing the Canon in D and the latest Bridgerton hits, weddings can be a great source of gigs. Visiting or playing at wedding fairs and getting to know wedding planners can be a good source of income. In the same way, you can get to know people who organize private parties and corporate events.
  • Festivals like outdoor classical music festivals are a great opportunity to perform without having to organize something yourself. It’s always interesting to explore what’s already going on in your area and see if you can join.
  • Host your own concert (offline or online): it definitely requires a lot of work in terms of organization and promotion, but simply finding a venue and selling tickets is a way to monetize your quartet and get the word out. A concert via livestream is also an option. 
  • Make videos and publish them on YouTube: If your channel becomes a bit popular, you can earn ad revenue and it’s a great way for potential customers to find you and get to know your music.
  • Recording and selling: there are several ways to monetize a recording of your music: digital downloads on platforms like Bandcamp, iTunes, and Amazon and streaming services like Spotify, Apple Music, and YouTube, where you can earn royalties. However, it takes a LOT of download before this becomes interesting.
  • Teaching and coaching: you can coach other chamber music ensembles, teach individuals or do educational projects for example at schools.


Hi! I'm Zlata

Classical violinist helping you overcome technical struggles and play with feeling by improving your bow technique.

Closing notes 🎵

Starting and playing in a string quartet is a delightful and educational endeavor. By finding the right musicians, choosing suitable music, preparing diligently, rehearsing effectively, and seeking out performance opportunities, you’ll create memorable musical experiences. Enjoy the journey of making music together and the joy it brings to both you and your audience. Happy playing!