Complete Guide to Tune your Violin + FREE Online Tuner | Violin Lounge TV #547
Do you struggle to tune your violin?
Let me solve your problems and teach you all the ways to tune your violin easily and correctly
We’ll start with the easiest way for beginner violinist to tune their violin and continue with the ways professionals tune.
Learning to tune your violin properly is extremely important
If your violin is not in tune, how do you expect to be able to play in tune?!
There are many different methods of tuning (described in detail below) so read on to learn everything you need to know to be able to tune your violin confidently and accurately.
First we’ll go into the tuning mechanism of the violin itself, so you know how the make the strings sound higher or lower to reach the right pitch:
- fine tuners
- pegs
Once you’ve learned how to handle the mechanics, you’re going to learn different ways to tune:
- online tuner (easiest and fastest way for beginners!)
- digital chromatic tuner
- tuning notes
- tuning fork (the way professionals tune)
The mechanics of tuning your violin
On the instrument, we tune the violin with the fine tuners and/or the pegs. I will explain both methods. In general we use the fine tuners for small adjustments and the pegs for larger adjustments in pitch.
How to tune your violin with the fine tuners
The fine tuners are located on the tailpiece and they generally are a bit easier to handle than the pegs. You just turn them to the left or to the right. This is why I recommend beginners to have their violin equipped with four fine tuners, one for each strings, and mainly use those to tune their instruments whenever possible.
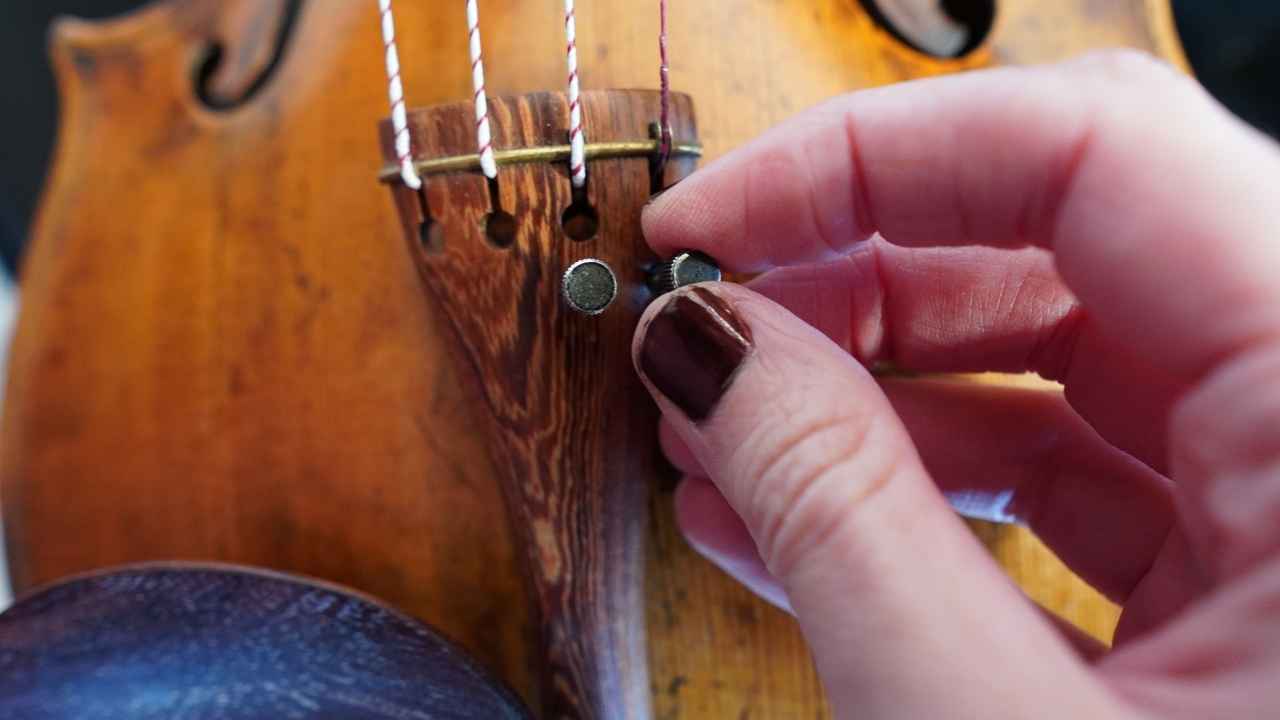
The fine tuners are just that- FINE tuners! Meaning that they can adjust the pitch of your string in very small increments, which makes violin tuning much easier. I recommend sticking mostly to the fine tuners if you are a beginner player.
Follow these steps to tune your violin with fine tuners
- Play your string and look at your tuner to assess if it is too high, too low, or just right.
- If the string is too high, turn the fine tuner counterclockwise (or to the left) to make the pitch lower.
- If the string is too low, turn the fine tuner clockwise (or to the right) to make the pitch higher.
How to hold your violin while tuning with fine tuners
Place your violin on your shoulder like you normally would when playing, and place your bow on the desired string. Move your left hand underneath your bow and adjust your fine tuners with your thumb and index fingers.

Why do most professional violinists only have one fine tuner?
When watching your favorite violinists play, you may have noticed that they only have one fine tuner on the E string. There are two main reasons for this. The first is that fine tuners can affect the sound of the instrument. While tailpieces with built-in fine tuners are becoming increasingly popular, using fine tuners with tailpieces without this capability shortens the length of the string between the bridge and the tailpiece (also called the “after-length” of the string), which affects the sound. Fine tuners have also been known to cause buzzing, Wolfe tones, and add extra weight to the instrument, no matter which type of tailpiece is used.
The second reason for having just one fine tuner is much more silly. It is used almost as a status symbol- implying that the violinist is so skilled at tuning that they don’t need to rely on the fine tuners. I, like the great majority of violinists in their early stages of learning, had all four fine tuners on my violin at first. I remember sometime in high school when my teacher told me she thought I was ready to take them off. I was so excited and felt as though I had truly “made it!” 😉
The E string is very tight and most prone to breaking while tuning with the peg, so that is why its fine tuner remains intact.
How to fix a fine tuner that’s stuck
If you can’t turn the fine tuner to the right anymore, you can reset it
Just like the pegs, the fine tuners can get stuck as well. This happens when the fine tuner is screwed all the way into the tailpiece so that it can no longer move the pitch higher, only lower. This isn’t a big deal but does need to be addressed so that you can continue to use the fine tuners to tune the violin.
If your fine tuner is stuck, follow these steps to fix it:
- Unscrew the fine tuner. The fine tuner shouldn’t be so loose that it is practically falling out but should have a significant amount of room beneath it so that you can use it to tune your violin more easily.
- Raise the pitch with the peg. When doing this, you’re not looking to get the string perfectly in tune, just relatively close to the correct pitch. See below on instructions how to use the pegs of your violin.
- Adjust with the fine tuner.
Now your fine tuner is unstuck! Congratulations!
How to tune your violin with the pegs
The pegs are the (usually) black things inside the peg box at the scroll side on the violin. The strings are wound around the pegs. By turning the pegs you can make the string sound higher (tighten the string) or lower (loosen the string).
If you don’t have fine tuners or just prefer to tune your instrument with the pegs, this is what you’ll need to do.
- Decide on a good position. If you’re just starting to learn how to tune with the pegs or just need to use them because your strings have slipped, I recommend sitting down and placing the violin in your lap with the strings facing towards you (see picture below). If you are a more advanced player or looking to tune your violin with the pegs more regularly, place your violin in playing position, and secure the thumb and index finger of your left hand to opposite sides of the peg (see the close up pictures below).
- Play your string and use the violin tuner to assess if it’s too high, too low, or just right.
- If the string is too high, turn the peg downwards (towards you) to make the pitch lower. If the string is too low, turn the peg upwards (away from you) to make the pitch higher.
- Turn the peg slowly and in small increments. You may need to slightly push the peg in towards the peg box while turning and then again after reaching your desired angle so that it stays in place.
How to turn the violin pegs while bowing
As you’re more used to tuning your violin and working with the pegs, you might want to be able to bow and turn the violin pegs at the same time. This requires a good position of the left hand, some patience and practice. In the beginning you’ll feel clumsy, but as you gain experience this will be as easy as brushing your teeth. Below is the left hand hold for each of the violin pegs. With this hold you can support the violin, turn the peg and push the peg in the direction of the peg box all at the same time.

Turning the pegs with the violin on your lap is an easy way to start.

When you’re a bit used to turning the pegs, you can do so while bowing.

Hand position to turn the G string peg

D string
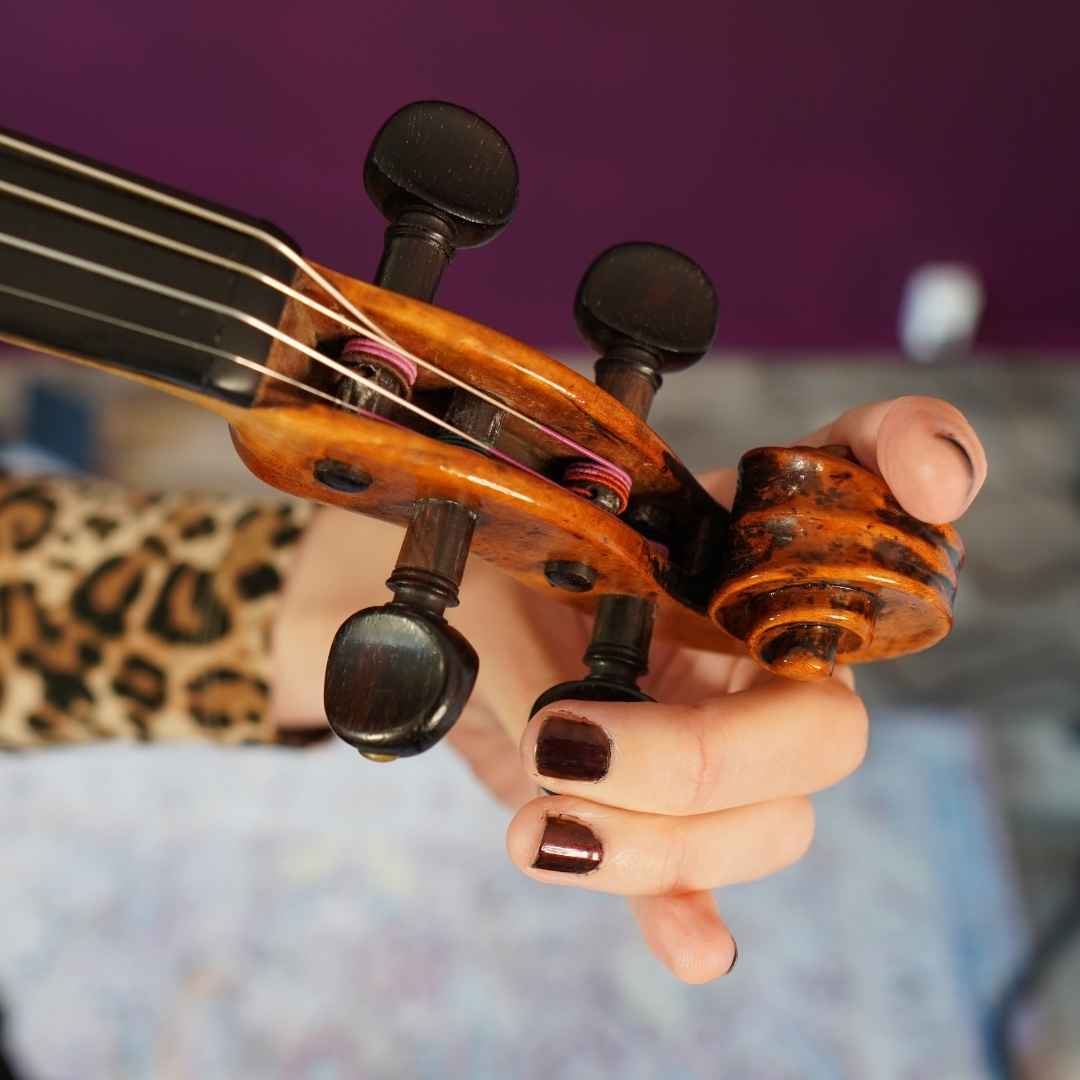
A string
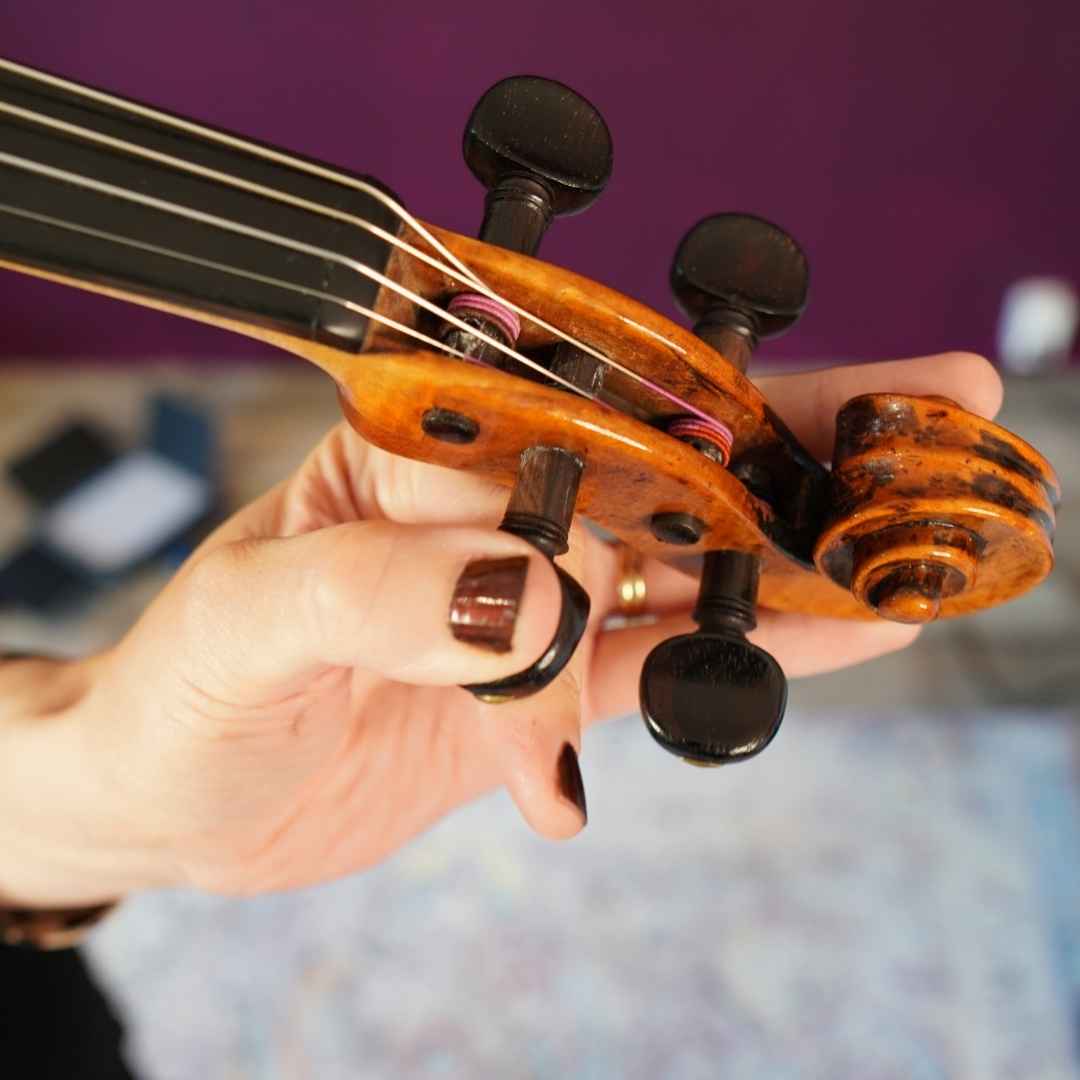
E string
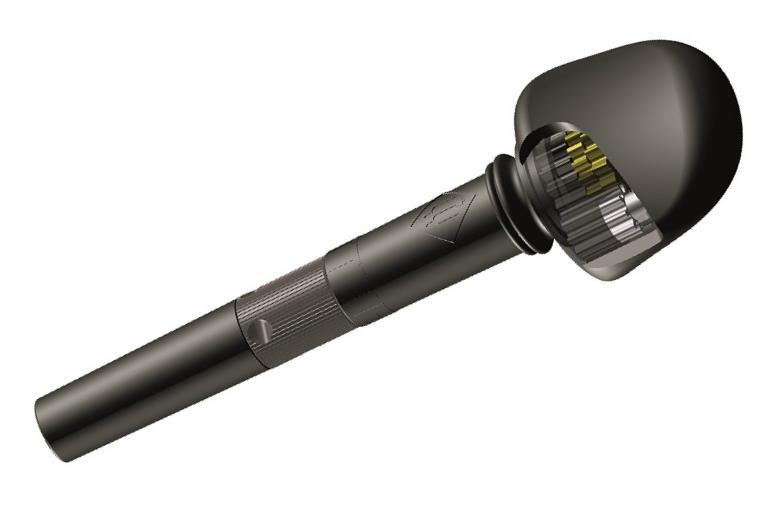
What are geared pegs?
Geared pegs are a newer innovation for tuning violins. They feature gears on the body of the peg that allow for much greater control than traditional pegs. Not only do geared pegs improve accuracy when tuning, but they also help players with limited strength and mobility tune more easily. You should consider geared pegs if you like the ease of tuning with the fine tuners, but do not like their effects on the sound.
Click here to buy geared violin pegs and never worry again about slipping or stuck pegs ever again!
How to fix a peg that’s slipping
If you turn your peg up, only to find that it falls right back down once you let it go, your peg is slipping. This is a very common issue and that is nothing to be alarmed by but is important to address it properly to ensure you’re not dealing with this every single time you tune your violin (which should be every time you practice!)
The short-term fix would be to push the peg into the violin as you are turning it and then to give it another push in when you’ve reached your desired angle. This does prevent the peg from slipping at that moment, but doesn’t do anything to prevent it from happening again (have you ever had your peg slip multiple times in a row? I have!). I don’t know about you, but I don’t want to be fixing a slipping peg every single time that I tune my violin. I’m getting frustrated just thinking about it!
Below is a step-by-step process that you can use to significantly decrease your peg’s likelihood of slipping while tuning. It may take a bit of practice, but once you get the hang of it, the whole thing should take no more than a few minutes.
- Place your finger underneath the string that’s slipping. Be sure to keep the tension of the string in place.
- Unwind the string so that it is wrapped around the peg just once or twice
- Push the string towards the peg and turn the peg upwards slowly.
This process forces the string to wind against the side of the scroll box, creating a wedge effect so that the peg can’t move out. The peg is essentially being squeezed by the string so that it is much less likely to slip.
How to fix a violin peg that’s stuck
A stuck peg is essentially the opposite of a slipping peg. In this case, no matter how hard you try, your peg just won’t move! The opposite problem, but equally as frustrating. When my peg is stuck, I call on my trusty peg soap. The official name is “peg compound” and you can buy it right here. Peg soap is a compound that helps lubricate your pegs so that they turn easier (and get unstuck!).
To use peg soap turn your violin peg downwards so that it begins to come out of the pegbox. Rub a thin layer of the peg soap around the part of the peg that is usually inside the pegbox. Only a thin layer is necessary; too much could actually cause your pegs to slip (and you just learned how to STOP that from happening!). Then, turn your peg back upwards and tune your violin. Your peg should turn much easier.
But what if I don’t have peg soap?! No problem. Do you have a pencil? If so, you can loosen your pegs. Simply repeat the process above, but instead of the peg soap, use pencil lead. It has the same effect. Chalk works great too!
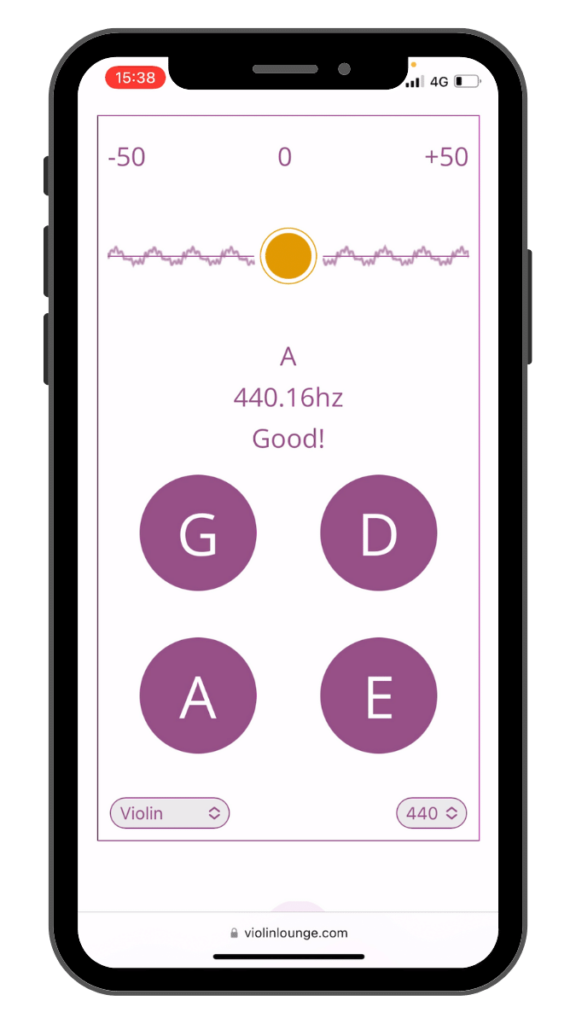
How to tune your violin with an online tuner tuner
The fastest and easiest way for a beginner to tune is with an online tuner
You can find my free online violin tuner right here.
Play the A string with the violin bow
I highly recommend playing the note over-plucking because when plucking, the pitch changes slightly, and therefore the tuner might not get an accurate read on the pitch (and your violin might not be tuned correctly!). Playing the note helps your tuner get a more accurate read on the pitch.
Watch the needle on the tuner
If the needle is right in the middle, congratulations, your string is perfectly in tune and you can move on to the next string. However, if the needle is pointing towards the left, the string is too low and needs to be raised, and if the needle is pointing to the right, then the string is too high and needs to be lowered. The tuner should also display the correct letter name of the string you’re tuning. If the letter name is incorrect, it’s highly likely that the violin is significantly out of tune and needs adjusting by the pegs.
For example, if you’re trying to tune your A string but you’re seeing a G (or F, or E…) then your string is much too low; and by contrast, if you’re trying to tune your A string but you’re seeing a B (or C or D…) then your string is much too high.
Adjust the fine tuners and/or pegs as described below.
Repeat on all strings.
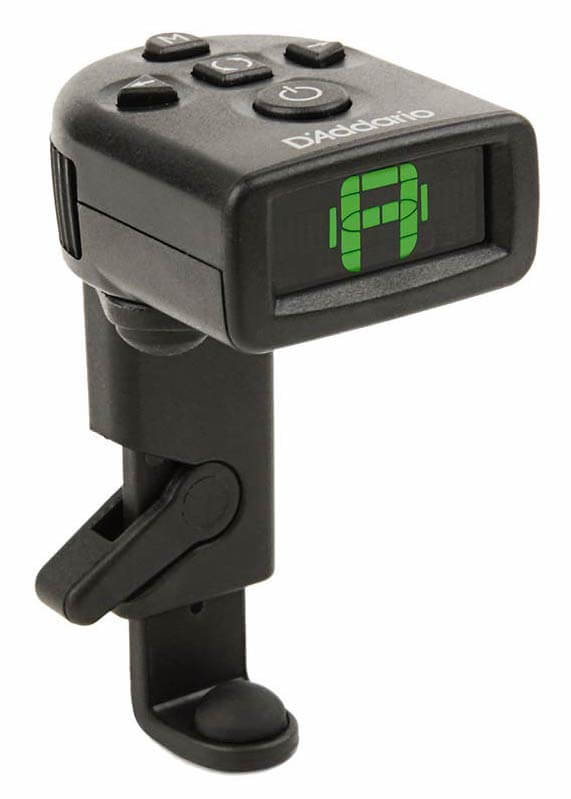
How to tune your violin with a chromatic digital tuner
An alternative for an online tuner is a digital chromatic tuner. This is not an app or a website, but a little physical device you keep in your violin case. The way the violin is tuned is very similar as the tuner will recognize the note and indicate if it’s too low or too high.
A big pro of of good digital tuners like the D’Addario micro tuner for violin is that you can place it on your instrument and also use it to check if you’re playing in tune while playing. However, keep in mind that this is based on whole tempered tuning.
A con of a digital chromatic tuner vs an online tuner is that it doesn’t point you in the direction of the string. It can recognize every random note. If your G is so low it’s near to a F, it can tell you the F note is too high while actually your G string is too low.
Another con of a digital tuner is that you need to have it with you, while you can reach my free online violin tuner from any phone, tablet or laptop you have at hand (and don’t we all have our phones with us at all time).
Violin Tuning Notes
Listen to these one minute tuning notes for each open violin string played by a violinist. Hearing an actual violin while you tune can make it easier to check if you did a good job tuning. Also this is good ear training opposed to the more passive tuning with a violin tuner.
How to tune your violin with tuning notes
Tuning your violin with tuning notes requires a bit more ear training, because you don’t have the tuner to tell you if the pitch is too high or too low and you must rely on your ear. However, it can be helpful to have a reference of what each string should sound like and compare yours to the tuning notes.
Follow these steps to tune your violin with tuning notes:
- Play the video above with the A string tuning note.
- Play your A string and notice how it compares to the tuning note.
- Identify if your string is too high (and needs to be tuned down) or too low (and needs to be tuned up).
- Tune your string accordingly with either the fine tuners or pegs.
- Repeat with the other strings.
But what if I don’t know if my string is too high or too low?!
That’s totally fine and normal at first! Take your best guess, and if you notice that while tuning that your string is getting farther away from the tuning note, go back the other way. Remember, when you’re lost, you can use the free online violin tuner on top of this page and it will use your microphone to tell you exactly in which direction you need to tune. This is easiest in the beginning. Tuning your violin with tuning notes takes some practice, so it’s all right to use my tuner as a back up
Tune your Violin like Professional Violinists do
Tuning the violin in fifths
Tune the A string first. After that bow on two strings at the same time to tune the other strings
Tuning in fifths is the most common way that professionals tune their instruments
This is arguably the most accurate method of violin tuning because the violin uses just intonation (as described below) but also does require a bit of practice (like anything else when it comes to learning violin!)
- Tune your A string. This could be with an electronic tuner (as described above) or a tuning fork (as described below).
- Once your A string is tuned, play your A and D string together as a double stop (the strings should sound simultaneously).
- Since violin strings are tuned in perfect fifths, the strings should sound almost as one note when played together.
- Identify if the D string is too high or too low and adjust accordingly. If you’re not sure, don’t worry! Take your best guess and start adjusting. If it sounds as if it’s getting worse rather than better, turn back the other way.
- Once the D string is in tune, play the D and G strings together, and adjust the G string as just described above.
- Go back and play the A and E strings together and adjust the E string as necessary.
- Check your strings with an electronic tuner to see how you did! (This is optional for more advanced players).
This method isn’t ideal for a beginner as it requires you to play on two strings at the same time, listen for the perfect fifths and tune your violin all at the same time.
How to tune with a tuning fork
Why would you tune with a tuning fork over an electronic tuner? It is great ear training!
Unlike electronic tuners, a tuning fork only plays an A, so your ear must be able to tune the rest of the strings to that A (as described above).
Here’s how to tune your violin with a tuning fork
- Hit the tuning fork on a stable surface and place it next to your ear. You should be able to hear an A.
- Play your A and see if it sounds the same as the tuning fork.
- If it does sound the same, your A string is in tune and you can continue to tune the rest of your strings. If it does not sound the same as the tuning fork, identify whether it is too high or too low and adjust accordingly with either the fine tuners or pegs.
- Once your A is in tune, tune the rest of the strings to it as described above.
Frequently asked questions about violin tuning
Do I have to start with A string when I tune my violin?
Starting with the A string is the most common practice when tuning. I recommend tuning the violin in this order: A, D, G, E. This comes from the tradition that the violin in an orchestra is tuned by the A of the oboe, but you could just as well start with the D string if you use an online tuner. I would recommend starting with the middle strings though. If your violin is very out of tune, then the bridge can become unstable or even collapse if you just tune the E string for example. More tips on not having the bridge collapse while tuning below.
What does ‘tuned in fifths’ mean?
The violin is tuned in fifths, meaning that each string is a perfect fifth away from the other. Starting on A, if you count up a fifth you get E (A B C D E), and if you count down a fifth you get D (A G F E D).
Fun Fact
Why do orchestras tune to the note A played by the oboe?
The use of tuning the A string first is because orchestras tune by the note A. If you’ve ever been to a concert, you’ll notice the orchestra tuning to the A of the oboe. Every stringed instrument has an A string. The oboe player makes sure he/she has tuned his/her instrument with an electronic tuner or tuning fork. The bright, rather penetrating, sound of the oboe is easy to hear by all orchestra members.
How often should I tune my violin?
Violins should be tuned each time you practice. Violins can be very fickle- even the slightest change in temperature or humidity (or even the wind blowing the wrong way) can make the violin go out of tune, at no fault to you.
Is a violin tuned differently than a fiddle?
Nope! They are tuned in the exact same way. This makes my online violin tuner on top of this page just as suitable for fiddle as for violin.
How to tune your violin with a piano?
When you’re playing together with a pianist, you should tune your violin to the piano. The method is the same as the tuning fork method described above. The only difference is that you play the A on the piano instead of that you hear it from the tuning fork.
How to ensure your strings don’t break while you tune your violin?
Breaking a string is one of the most common fears to overcome during violin tuning, especially if you’re new to tuning with the pegs.
First, if your string breaks while tuning, it’s really not a big deal. Think of it as a right of passage- it’s happened to all of us! (Yes, including me- I’ve actually had a string snap and hit me in the face while tuning). It’s always a good idea to keep an extra set of strings on hand just in case.
Here are some things you can do to prevent the string from snapping while tuning your violin:
Tune in very small increments. Even if your string is significantly out of tune, turning the peg in very small increments is going to help ensure that your string won’t break.
Check your tuning often. Each time you adjust the peg (or fine tuner), play the string to evaluate how far the pitch moved.
Don’t tune too high. Tuning too high places too much pressure on the string which makes it much more likely to break.
Tip: Make sure the bridge doesn’t collapse
There are two reasons the bridge may collapse when tuning: the strings are much too high (therefore putting too much pressure on the bridge) or the strings are much too low (thus not putting enough pressure on the bridge). Turning the pegs and/or fine tuners in small increments and checking the tuning often will strongly decrease the likelihood of this happening.
What is just intonation vs equal temperament?
There are two systems of tuning: just intonation and equal temperament. While this topic could be a whole different article altogether, I wanted to give a brief explanation because it is important to know this for violin tuning. Equal temperament means that every note is in the exact same ratio as one another. The advantage to this type of tuning is that the player can play in any key, but the disadvantage is that no interval sounds quite “perfect”. Pianos are tuned in equal temperament.
Under the system of just intonation, all musical intervals are tuned in whole-number ratios. The advantage to this system is that intervals sound perfectly in tune; the disadvantage is that the player can only play in a few keys. The violin uses just intonation. This is not to say that violinists can only play in a few keys, but instead that violinists must slightly adjust their pitch depending on what key they’re in and/or what notes are being played. When tuning violin strings to a piano (which uses equal temperament), the strings are not going to be exactly in tune with one another due to the nature of just intonation.
What does 440 Hertz mean?
“Hertz” is a unit of measurement, used to measure the number of vibrations per second; so A 440 means that the note is vibrating 440 times per second. A 440 was declared the standard tuning frequency by the International Organization for Standardization in the 1950s. It is still the most commonly used frequency today, although some orchestras do choose to tune at slight variations (either 441 or 442, both of which are slightly higher than 440).
In the period instrument movement, a consensus has arisen around a modern baroque pitch of 415 Hz (with 440 Hz corresponding to A♯), a ‘baroque’ pitch for some special church music (in particular, some German church music, e.g. the pre-Leipzig period cantatas of Bach) known as Chorton pitch at 466 Hz (with 440 Hz corresponding to A♭), and classical pitch at 428–430 Hz.
According to music theory, A=432 Hz is mathematically consistent with the universe. This is known as Verdi’s ‘A’ – named after Giuseppe Verdi, a famous Italian composer. Music tuned to 432 Hz is softer and brighter, and is said to provide greater clarity and is easier on the ears. Some people tie special meaning to 432 Hertz.
My free online violin tuner on top of this page is the only tuner in which you can set the Hertz to all mentioned numbers. Be a little careful when adjusting your modern violin to other tunings than 440-444 Hertz as your strings are made for that tension and might not do well with 432 or 466. Especially higher tension could cause your string to snap. Lower tension could make the string too loose to play on.

Hi! I'm Zlata
Classical violinist helping you overcome technical struggles and play with feeling by improving your bow technique.
Closing notes
Overall, tuning the violin is a skill within itself that must be practiced and will evolve over time. Remember to be kind to yourself (especially when something goes wrong!).
I hope this guide has given you a complete view on tuning your violin. You can now handle the mechanics and choose a handy way for you to tune your own instrument.
Keep in mind that it takes some time to learn to tune your instrument. In the beginning you might feel clumsy and it might feel scary to tune your instrument. Especially the E string might seem so tight that it might snap.
Just take your time to learn to tune, because you will benefit from it every day you practice. Be careful and tune bit by bit.
What’s your favorite way of tuning your violin? Leave a comment below!

0 Comments